6
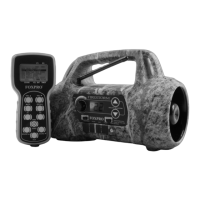
1. The TX9 remote features a keypad on the handle portion. The
first button from the top left is volume down.
2. The mute button is under the volume down button.
3. The sound down is under the mute button.
4. The P1 (Preset 1) is the last button on the lower left.
5. The auxiliary button is down and to the right of the P1 button.
6. The lanyard loop is on the bottom of the remote.
7. The P2 (Preset 2) is located across from the P1 button and is the
last button on the lower right.
8. The power/send button is located above the auxiliary button,
towards the middle.
9. The sound up button is located above the P2 button, directly
across from sound down.
10. The recall button is located above the sound up button, across
from the mute button.
11. The volume up button is the first button to the right, directly
across from volume down.
1-5 TX9 Remote: Requirements
The TX9 remote control operates on a single 9V battery. It is
recommended that you use high quality alkaline battery.
Installing the Battery in the TX9 Remote
1. Access the battery compartment by removing the door from the
back of the remote. The door slides down and off the remote.
2. Attach the 9V battery to the power wire in the back of the
remote.
3. Slide the battery compartment door back on the remote.