EasyManua.ls Logo

Freenove ESP32-S3 User Manual

Default Icon
142 pages
To Next Page IconTo Next Page
To Previous Page IconTo Previous Page
Page #89 background image
Any concerns? support@freenove.com
87
Chapter 6 TCP/IP
www.freenove.com
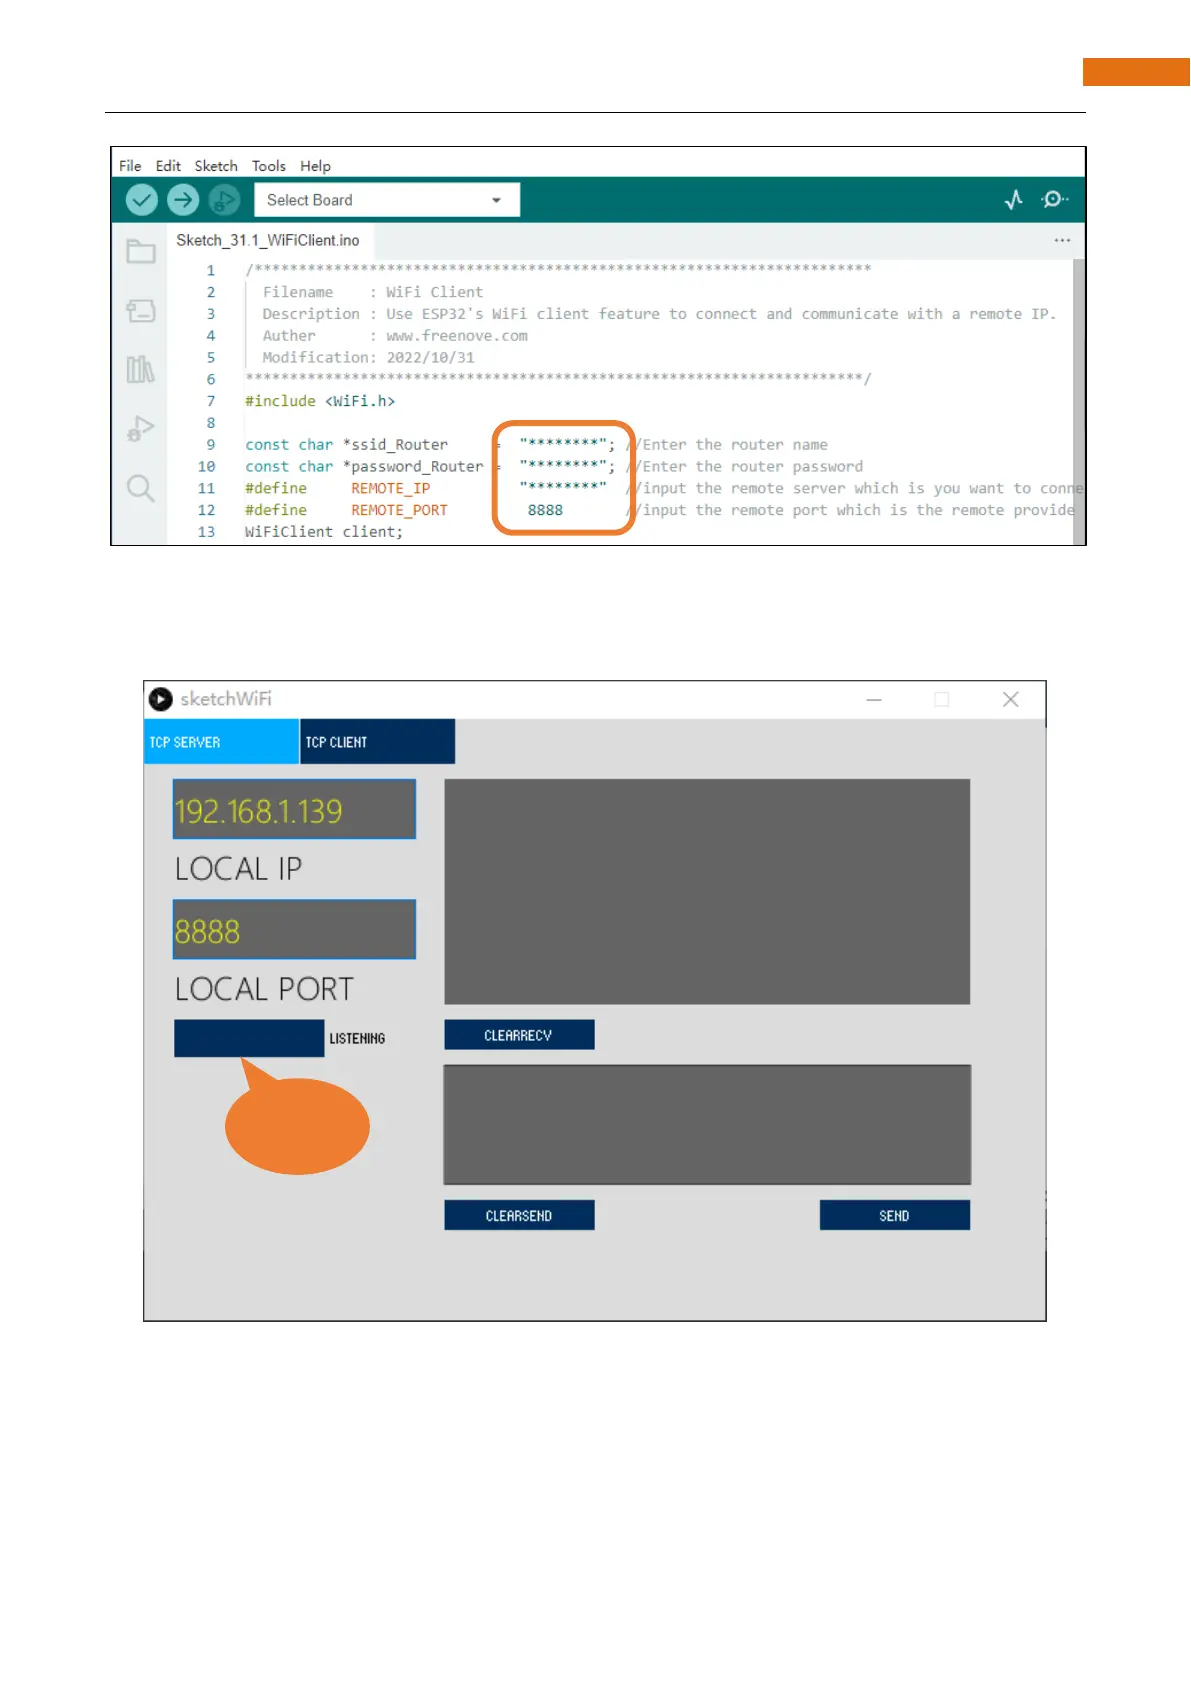
REMOTE_IP needs to be filled in according to the interface of sketchWiFi.pde. Taking this tutorial as an
example, its REMOTE_IP is 192.168.1.133. Generally, by default, the ports do not need to change its value.
Click LISTENING, turn on TCP SERVER's data listening function and wait for ESP32-S3 to connect.
Compile and upload code to ESP32-S3 WROOM, open the serial monitor and set the baud rate to 115200.
ESP32-S3 connects router, obtains IP address and sends access request to server IP address on the same LAN
till the connection is successful. When connect successfully, ESP32-S3 can send messages to server.
Click it
Question and Answer IconNeed help?

Do you have a question about the Freenove ESP32-S3 and is the answer not in the manual?

Freenove ESP32-S3 Specifications

General IconGeneral
BrandFreenove
ModelESP32-S3
CategoryControl Unit
LanguageEnglish

Summary

Important Information

Getting Started

Instructions for initial setup and reading the 'Start Here.pdf' document.

Get Support and Offer Input

Information on obtaining technical support and providing feedback to Freenove.

Safety and Precautions

Essential safety guidelines and warnings for using the product.

About Freenove

Copyright

Preface

ESP32-S3 WROOM Overview

Introduction to the ESP32-S3 microcontroller unit and its features.

CH343 Driver Installation

Guide to installing the CH343 driver for Windows and macOS.

Programming Software Setup

Instructions for installing and setting up the Arduino IDE for programming.

Environment Configuration

Steps to configure the Arduino IDE for ESP32-S3 board support.

Notes for GPIO

Details on strapping pins and their configurations for ESP32-S3.

Chapter 1 LED

Project 1.1 Blink

A project demonstrating how to control an LED to blink using ESP32-S3.

Chapter 2 Serial Communication

Project 2.1 Serial Print

Sending data from ESP32-S3 to a computer via serial communication.

Project 2.2 Serial Read and Write

Receiving data from a computer and sending it to ESP32-S3 via serial.

Chapter 3 Bluetooth

Project 3.1 BLE Data Passthrough

Demonstrates data transmission using Bluetooth Low Energy between ESP32-S3 and mobile phones.

Chapter 4 Read and Write the SDcard

Project 4.1 SDMMC Test

Using ESP32-S3 to read and write data to an SD card via SDMMC interface.

Format SD Card

Guide for formatting an SD card on Windows and macOS systems.

Chapter 5 WiFi Working Modes

Project 5.1 Station Mode

Configuring ESP32-S3 to connect to a WiFi router as a client.

Project 5.2 AP Mode

Setting up ESP32-S3 to act as a WiFi Access Point (hotspot).

Project 5.3 AP+Station Mode

Enabling ESP32-S3 to operate as both a WiFi client and Access Point simultaneously.

Chapter 6 TCP/IP

Project 6.1 As Client

Using ESP32-S3 as a TCP client to connect to a server on the same LAN.

Project 6.2 As Server

Using ESP32-S3 as a TCP server to accept client connections.

Chapter 7 Camera Web Server

Project 7.1 Camera Web Server

Accessing ESP32-S3 camera stream via a web browser.

Project 7.2 Video Web Server

Viewing real-time video data from ESP32-S3 camera via web pages.

Project 7.3 Camera and SDcard

Capturing photos with ESP32-S3 camera and saving them to an SD card.

Chapter 8 Camera Tcp Server

Project 8.1 Camera Tcp Server

Displaying ESP32-S3 camera video data on a mobile phone.

What's next?

End of the Tutorial

Concluding remarks and contact information for further assistance.