• 44 lbf·ft (60 N·m) for all ZF Meritor
FreedomLine automated transmissions.
• 35 to 50 lbf·ft (48 to 67 N·m) for all other
Meritor transmissions.
9. Operate the vehicle to check for correct opera-
tion.
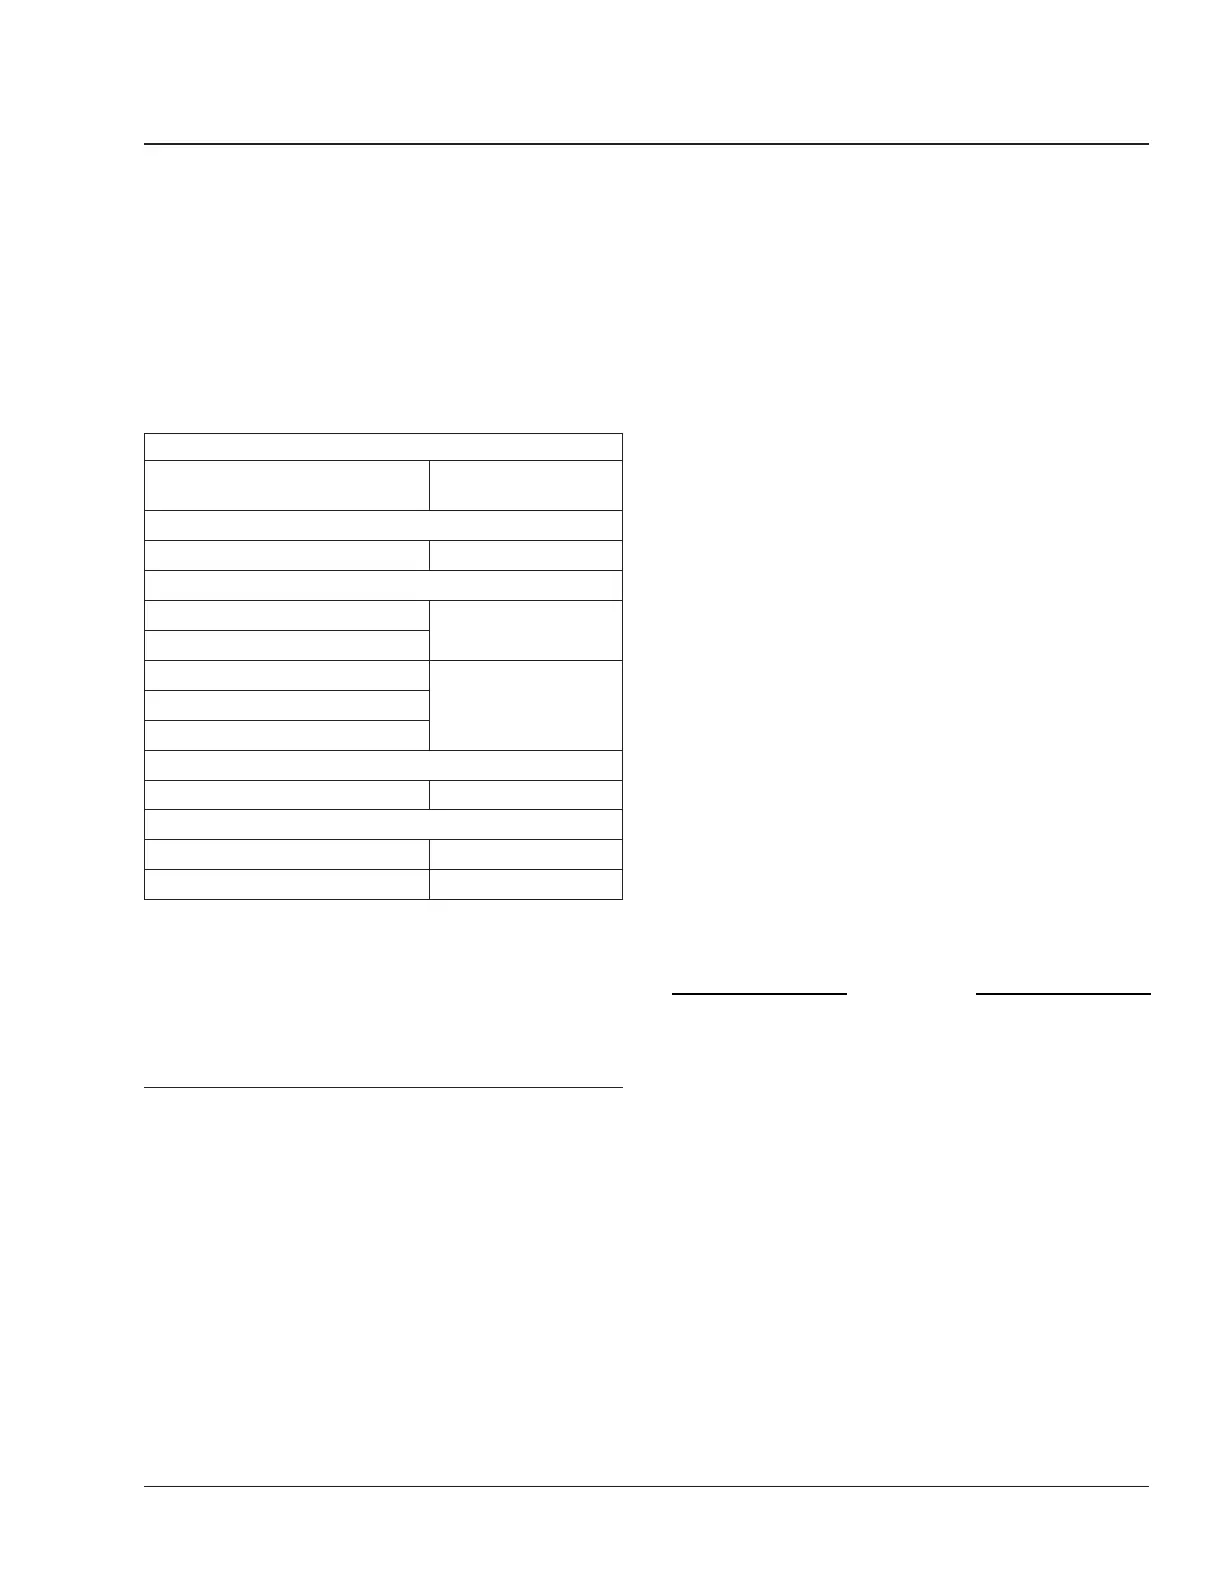
Meritor Transmission Lubricant Capacities
Transmission Model
Refill Capacity
*
:
qt (L)
Meritor M/MO Series
M/MO (all) 10.25 (9.7)
Meritor 9- and 10-Speed
–115A/B/C/R (all)
10.0 (9.5)
–125A/B/C/R (all)
–135A/B/C/R (all)
10.25 (9.7)–145A/B/C/R (all)
–155A/B/C/R (all)
Meritor 13-Speed
RM013–145A 11.0 (10.4)
ZF Meritor FreedomLine
All 12-Speed Models 11.6 (11.0)
All 16-Speed Models 12.5 (11.8)
*
Quantities listed are approximate. Fill the transmission until lubricant is
level with bottom of the fill hole, with the vehicle in normal operating posi-
tion.
Table 3, Meritor Transmission Lubricant Capacities
26–02 Allison Transmission
Fluid and Filter Change
When draining transmission fluid, check for evidence
of dirt or water contamination. A small amount of
condensation will appear in the fluid during operation.
Water contamination is normally characterized as a
milky discoloration of the transmission fluid. Obvious
contamination of the transmission fluid indicates a
leak between the water and fluid areas of the trans-
mission cooler. Inspect and pressure-test the cooler
to confirm the leak; replace leaking transmission
coolers.
1. Drain the transmission when the fluid is warm. If
not already warm, run the engine until the trans-
mission reaches normal operating temperature:
160 to 200°F (71 to 93°C).
2. Park the vehicle on a level surface. Apply the
parking brakes and chock the rear tires.
3. Clean the area around the drain plug and the
transmission fluid pan. Place a drain pan under
the transmission and remove the drain plug. Ex-
amine the fluid as it drains.
4. Remove the 12 mounting bolts (six each) from
the two filter covers.
NOTE: A lot of fluid will drain when the filter
covers are removed.
5. Remove the filter covers, O-rings, and two
square-cut seals from the transmission. See
Fig. 2.
6. Remove the filters from the bottom of the control
module.
7. Lubricate the new O-rings with transmission fluid,
and install them on the cover assemblies.
8. Install a new square-cut seal on each cover as-
sembly, and install the fluid filter elements on the
cover assemblies.
9. Install the filter and cover assemblies into the
filter compartment.
10. Align each cover assembly with the holes in the
channel plate sump, and push the cover assem-
blies in by hand to seat the seals.
NOTICE
Do not use the bolts to draw the filter covers to
the sump. This can damage the covers, seals, or
sump.
11. Install six bolts in each cover, and torque the
bolts 38 to 44 lbf·ft (51 to 61 N·m).
12. Replace the drain plug O-ring, and install the
drain plug. Tighten the drain plug 18 to 24 lbf·ft
(25 to 32 N·m).
13. Refill the transmission with fresh automatic trans-
mission fluid and check the fluid level. See
Table 4 for transmission lubricant capacities, and
Table 5 for approved transmission lubricants.
Transmission 26
Century Class Trucks Maintenance Manual, August 2017 26/3