QuickStart Reference Guide
3
4
2
␣5
6
␣7
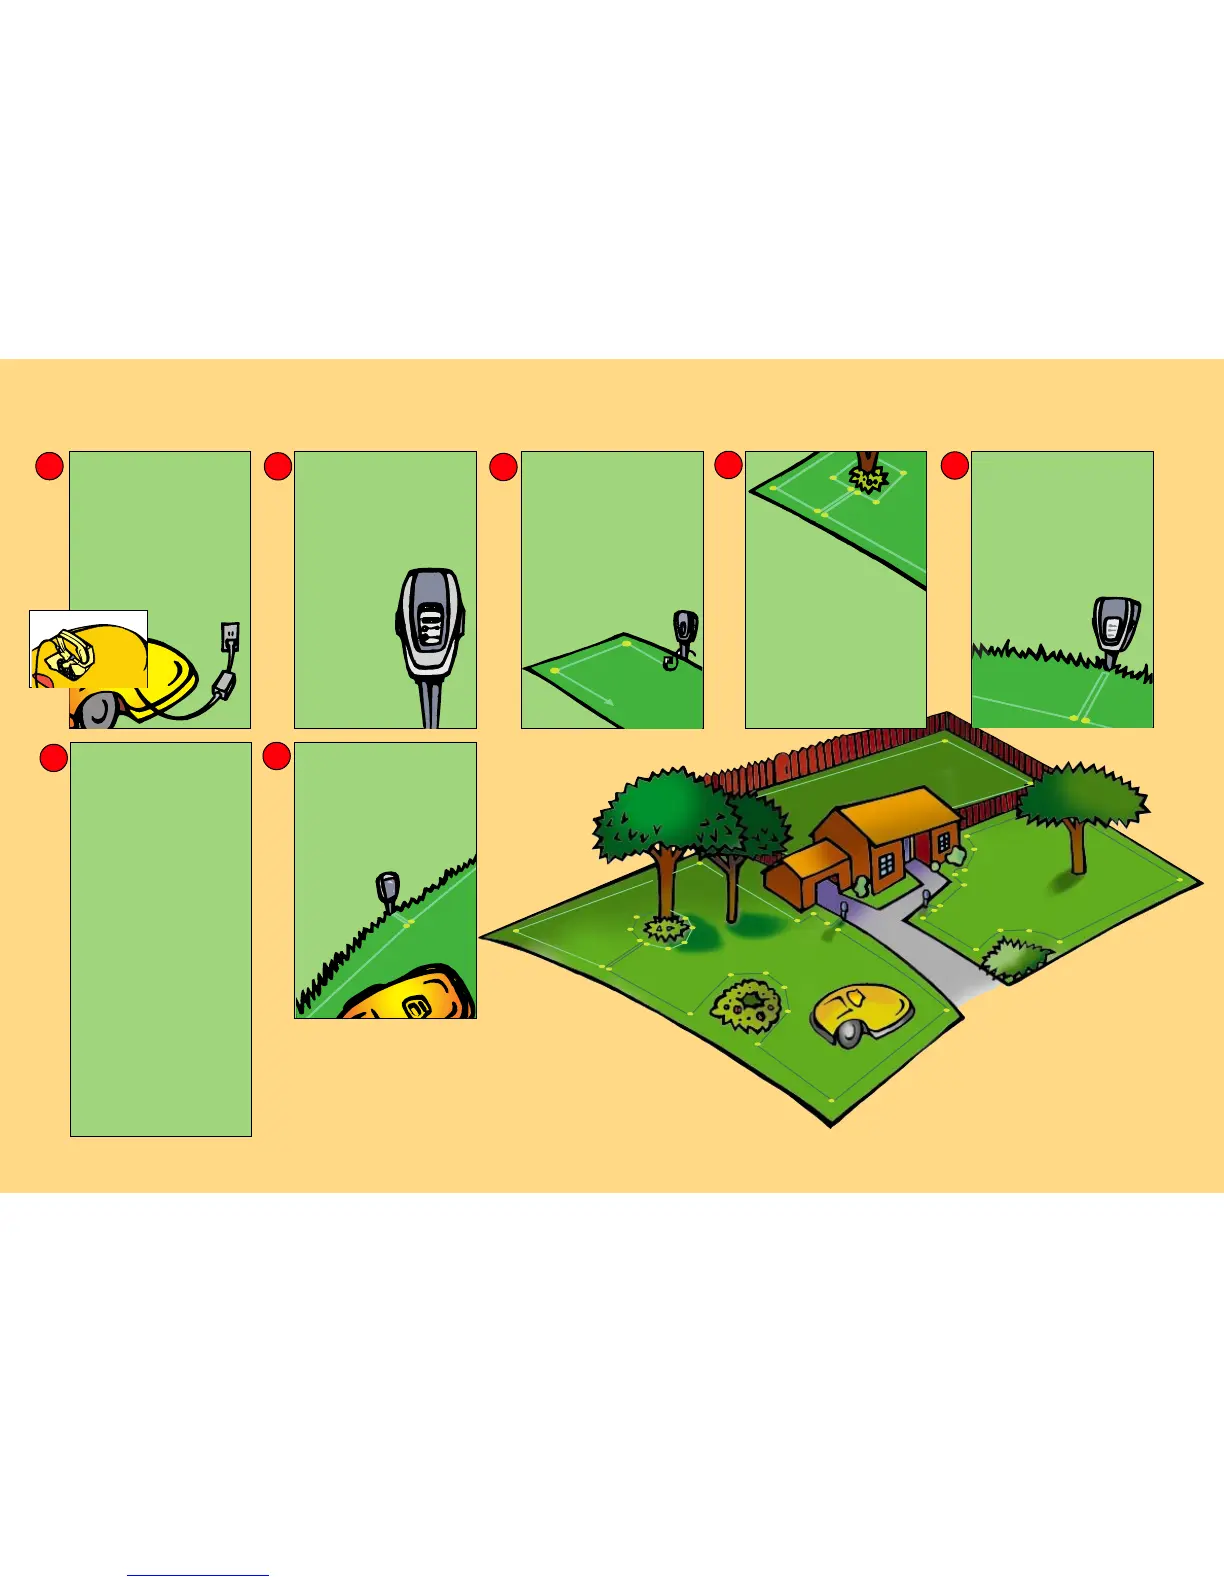
CHARGE THE UNIT
• Raise wheels to highest setting.
• To raise rear wheel, move adjustment
setting handle located in the rear
battery pack compartment, to its
lowest setting.
• To raise front wheel, rotate front
wheelbase- each “click” represents
one notch of height.
• Insert fuse, place battery pack in unit.
• Plug charger into wall unit.
• Plug charger into manual controller
base plug.
PERIMETER SWITCH
• Open perimeter switch cover.
• Install three (3) C batteries.
• Close perimeter switch cover.
• Install on perimeter switch stake.
(After laying the perimeter around
your designated plots, you will
attach the ends to the green switch
connectors to close the perimeter
loop.)
• Mount vertically in
ground, at least 5
feet from the
perimeter wire.
INSTALL PERIMETER
WIRE
• Lay the wire around lawn edge and
peg down tight.
• Use ruler for appropriate spacing on
all wire installation.
• Narrow areas, less than 5.5 ft. wide
and obstacles closer than 4 ft. from
lawn edges should be left out of the
installed area.
(Helpful hint: Peg the wire at each corner.
Fill back in with additional pegs where the
wire is loose or raised above the
ground.)
PROTECTING
FLOWERBEDS AND
OTHER OBJECTS
• Wire around any area you don’t want
␣
the mower to enter: around trees, flower
beds, ponds, swimming pool, young
trees, holes and ditches etc.
• The two wires leading from the edge to
the protected area and back must be
parallel, touching and pegged down
side-by-side.
• The mower’s bumper will recognize trees
␣ ␣
and solid obstacles higher than 6 inches.
No need to protect them with a wire.
(Helpful hint: Use Roboruler provided for proper
spacing around obstacles)
COMPLETING THE LOOP
• After completing your wire installation:
• The wires leading to the perimeter
switch should be parellel, touching and
pegged tightly to the ground.
• Make sure the perimeter switch and
wires leading to it are at least 5 ft.
from the perimeter wire.
• Strip 1/4 in. of plastic from the wire
ends and insert into the green switch
connector (one wire per hole).
• Tighten screws.
• Press the green “On”
button on the perimeter
switch.
INITIAL SETTINGS
• Place the mower inside the lawn
perimeter on level ground.
• FOR FIRST OPERATION ONLY:
• Press the "GO" button. The display will
read “Warming Up” and then “Set
Country”.
• Press the "GO" button again. The
display should read, ‘Not Set!’
• Scroll to your country and press the
"GO" button.
• Press the “GO” button once again.
'Calibration Req' message will appear.
Press "GO" once more.
'Activate Motors' message will appear.
Press "GO" to activate calibration.
• The Robomower will rotate through
several circles while the calibration
process is occuring, pausing for several
seconds at various points in the circle.
When complete, the message 'Test
Passed - Press C' will display. Press the
'C' button four (4) times.
START MOWING
• Position your robomower inside the
perimeter wire at least four (4) feet
from the wire and not aimed at a
corner.
• Make sure perimeter switch is on
and press the"GO“ button.
IT MOWS. YOU DON’T.
• After mowing, recharge your
battery.
1
For product service please
contact your service dealer
or visit us on the web at
www.friendlyrobotics.com
US customers 1-888-404-7626 (ROBO)