Do you have a question about the Frigidaire FFBD1821MW and is the answer not in the manual?
Read all instructions completely and carefully before starting the installation process.
Key points for installers and consumers, including codes, skills, and warranty considerations.
Essential safety advice, including wearing protective gear and observing all warnings.
Warning for installers to ensure the dishwasher is fully enclosed to prevent electrical shock or injury.
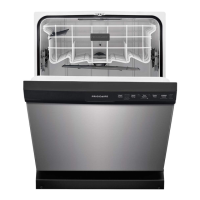
Lists the components provided with the dishwasher for installation.
Lists necessary materials such as fittings, tape, and wire nuts for installation.
Lists essential tools like screwdrivers, wrenches, and measuring tape for installation.
Lists additional materials needed specifically for new dishwasher installations.
Details required cabinet opening size, depth, width, height, and side clearances.
Covers local codes, drain hose distance, air gap, and drain loop requirements.
Instructions for drilling a 1-1/2 inch hole for the drain hose connection in the cabinet wall.
Details voltage, frequency, circuit protection, and wiring type. Includes safety warnings.
Explains proper grounding for both cable direct and power cord models.
Instructions for routing electrical cable through the cabinet opening, ensuring safe passage.
Details how to make electrical connections for cable direct and power cord models.
Describes how the water line enters the cabinet and routing requirements for connection.
Instructions for turning off water, installing a shut-off valve, and connecting the water line.
Procedure to check and adjust dishwasher door spring tension for proper balance.
Procedure to adjust leveling legs for proper height and stable installation.
Instructions on how to remove the dishwasher's toekick panel for access.
Steps for wrapping and installing the 90° elbow onto the water valve fitting.
Guides on positioning water supply line and house wiring on the cabinet floor to avoid interference.
Instructions for inserting the drain hose through the cabinet wall hole.
Procedure for sliding the dishwasher partially into the installation opening, with warnings against panel damage.
Final placement of the dishwasher under the countertop, checking wires and door alignment.
Detailed instructions on leveling the dishwasher using the four leveling legs for optimal performance.
Methods for securing the dishwasher to wood or granite countertops, or cabinet sides.
Steps to connect the hot water supply line to the 90° elbow fitting.
Instructions on cutting the drain hose and connecting it to the air gap, waste tee, or disposer.
Details on Method 1 (Air gap) and Method 2 (High drain loop) for drain line installation.
Instructions for connecting the dishwasher's power supply, including wiring and grounding.
A comprehensive checklist to ensure proper installation and avoid unnecessary service charges.
Procedure to test the dishwasher's operation, including water fill, drain, and leak checks.
Instructions for reattaching the dishwasher's toekick panel after installation.
Instructions to leave the complete literature package and installation instructions with the consumer.
| Style | built-in dishwashers |
|---|---|
| Color | white |
| Load Capacity | 12 |
| Noise level | 55 decibels |
| Control Type | electronic |
| Delay Start | yes |
| Number of Racks | 2 |
| Cycle Signal | no |
| Food Disposer | no |
| Sanitize Settings | no |
| Annual Energy Consumption | 280 kilowatt hours |
| Water Consumption Per Cycle | 4 gallons |
| Voltage | 120 volts |
| Current | 8.5 amperes |
| Depth | 23 inches |
|---|---|
| Height | 34.875 inches |
| Width | 17.625 inches |
| Net Weight | 65 pounds |