Optional Equipment 17
Optional Equipment Con’t.
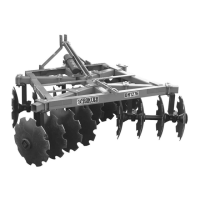
Center Sweep Kit
Figure 3
DH12 Series TL11477
1 TL10601 SHANK BRACKET 3" BEAM MODEL DH12 1
TL10388 SHANK BRACKET 4" BEAM MODEL DH13 1
2 TL10599 SHANK HOLDER 3" BEAM MODEL DH12 1
TL9175 SHANK HOLDER 4" BEAM MODEL DH13 1
3 TL10602 BALK BREAKER SHANK 1
4 TL9192 HEX BOLT, 5/8" X 2
1
/2", GR. 5 1
5TLT-22 HEX NUT, 5/8" 7
6TLT-24 LOCK WASHER, 5/8" 7
7TLT-744 HEX BOLT, 5/8" X 4
1
/2", GR. 2 MODEL DH12 6
TLT-746 HEX BOLT, 5/8" X 5
1
/2", GR. 2 MODEL DH13 6
8 TL13614 4" SWEEP POINT 1
9 TL14984 PLOW BOLT, 7/16" X 1
1
/2"2
10 TL14986 HEX NUT, 7/16" 2
11 TL14987 LOCK WASHER, 7/16" 2
12 TL14985 FLAT WASHER, 7/16" 2
13 TL9354 FLAT WASHER, 5/8" 1
Ref.#Part # Description Qty
Reference Figure 3
To attach balk breaker to disc, remove the two
top bolts from ref. #1 (shank bracket) and slide
on to center tube of frame, behind the strut lug.
Insert top bolts back in ref. #1 and apply lock
washer and hex nut. DO NOT TIGHTEN!
Attach ref. #3 (balk breaker shank) to ref. #2
(shank holder) with hardware supplied, then
tighten this bolt only. Ref. #2 can be adjusted for
different depths. Normal operational depth is
the same as the disc blade depth. Depth
adjustments can be made by putting disc on
the ground, and adjusting bolts in ref. #2 up or
down. Once depth has been set, tighten all
bolts and balk breaker is ready for operation.
*NOTE- Retighten all fasteners after first oper-
ational use.
Center Sweep Kit Mounting Instructions