En-5
When installing with the FRONT of the outdoor unit facing the wall side
Unit: mm
200 or
more
500 or
more
Unit: mm
200 or
more
20 or
more
20 or
more
500 or
more
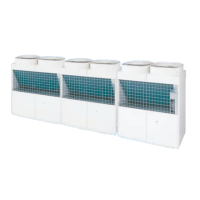
(2) Concentrated Installation
• The wall (without height restrictions) must not exist on the both sides (left / right) of outdoor
unit. Also, must not exist on the both sides (front / rear) of outdoor unit.
• Ventilation resistance can be ignorable when the distance from a wall or product, etc. is
larger than 2 m.
Unit: mm
1,000 or
more
400 or
more
400 or
more
800 or
more
800 or
more
400 or
more
Unit: mm
1,000 or
more
1,000 or
more
400 or
more
400 or
more
500 or
more
400 or
more
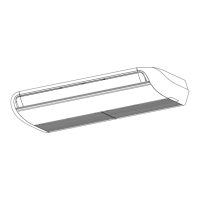
3.3.3 When there are obstacles above the product
When there are obstacles above the product, keep the
minimum installation height as shown in the figure and
install the outlet duct.
When installing the outlet duct, you must set the high
static pressure mode with the push-button switch.
(Similar when installing anti-snow hood)
500 mm
or more
Outlet duct
Setting high static pressure mode
Follow the instructions in the table below to set the high
static pressure mode.
Condition
High static pressure mode
setting (*2)
Static Pressure (SP):
0 ≤ SP ≤ 30 (Pa) (*1)
Set to High static pressure 1
Static Pressure (SP):
30 < SP ≤ 82 (Pa) (*1)
Set to High static pressure 2
*1: Static pressure is the airflow resistance that includes
the discharge duct resistance & the other additional
resistance like discharge grill and so on.
*2: Refer to the section on Push button setting in “7.
FIELD SETTING”.
3.4. Transporting the unit
Hoisting method
• When hanging the outdoor unit and conveying it to installation location, hang the unit
with rope by passing through the 4 opening holes on bottom of front and rear side as
shown in figure.
• Use 2 ropes at least 8 m long. If
used shorter length, it may cause
to damage to the unit
.
• Use the sufficiently strong rope
to bear the unit’s weight.
• Place the protective board or
filler cloth at the place where
the cabinet may come into
contact with rope to prevent from
damages. Without using them,
cabinet may cause to damage
or deform.
• During the hanging unit, make
sure to keep the unit level to
prevent from falling.
• To prevent the unit swing ac-
cident or falling down of the unit,
do not apply any impact to the
unit when it is hanging.
Opening
space
Protective
boards
Product mass (kg)
AJ*072LALDH 252
AJ*090LALDH 252
AJ*108LALDH 275
AJ*126LALDH 275
AJ*144LALDH 275
Lifting by forklift
• When using the forklift to lift
the unit, pass the forklift arms
through the opening space as
shown in below.
Fork (Forklift)
Delivery pallet
Fork (forklift) or
Fork (Manual
forklift)
<Front> <Side>
Front: Bottom of the wooden
delivery pallet.
Side: Space between pallet
and cabinet.
(Enable to remove the pallet
from cabinet.)
• Be careful not to damaged.
Lifting by forklift (Manual forklift: hand-fork)
• When using the manual forklift to lift the unit, pass the forklift arms through to the open-
ing space between pallet and cabinet from side.
3.5. Installing the unit
• Install the unit level. (within 3 degrees).
• Install 4 or more anchor bolts at the 8 locations indicated by arrows (Fig. A).
• Place the left and right anchor bolts at a distance further away than the dimensions of A
in the Table A.
(Excluding the case where anchor bolts are installed at 8 places.)
Fig. A
732
765
80
80
160160
B
A
Holes:
12 × 17
(8 places)
Bottom view
(Unit: mm)
Table. A
Model A B
AJ*072LALDH 610 930
AJ*090LALDH 610 930
AJ*108LALDH 920 1240
AJ*126LALDH 920 1240
AJ*144LALDH 920 1240
9378945708-02_IM_L9.indb 59378945708-02_IM_L9.indb 5 2022/1/20 15:34:372022/1/20 15:34:37
 Loading...