En-7
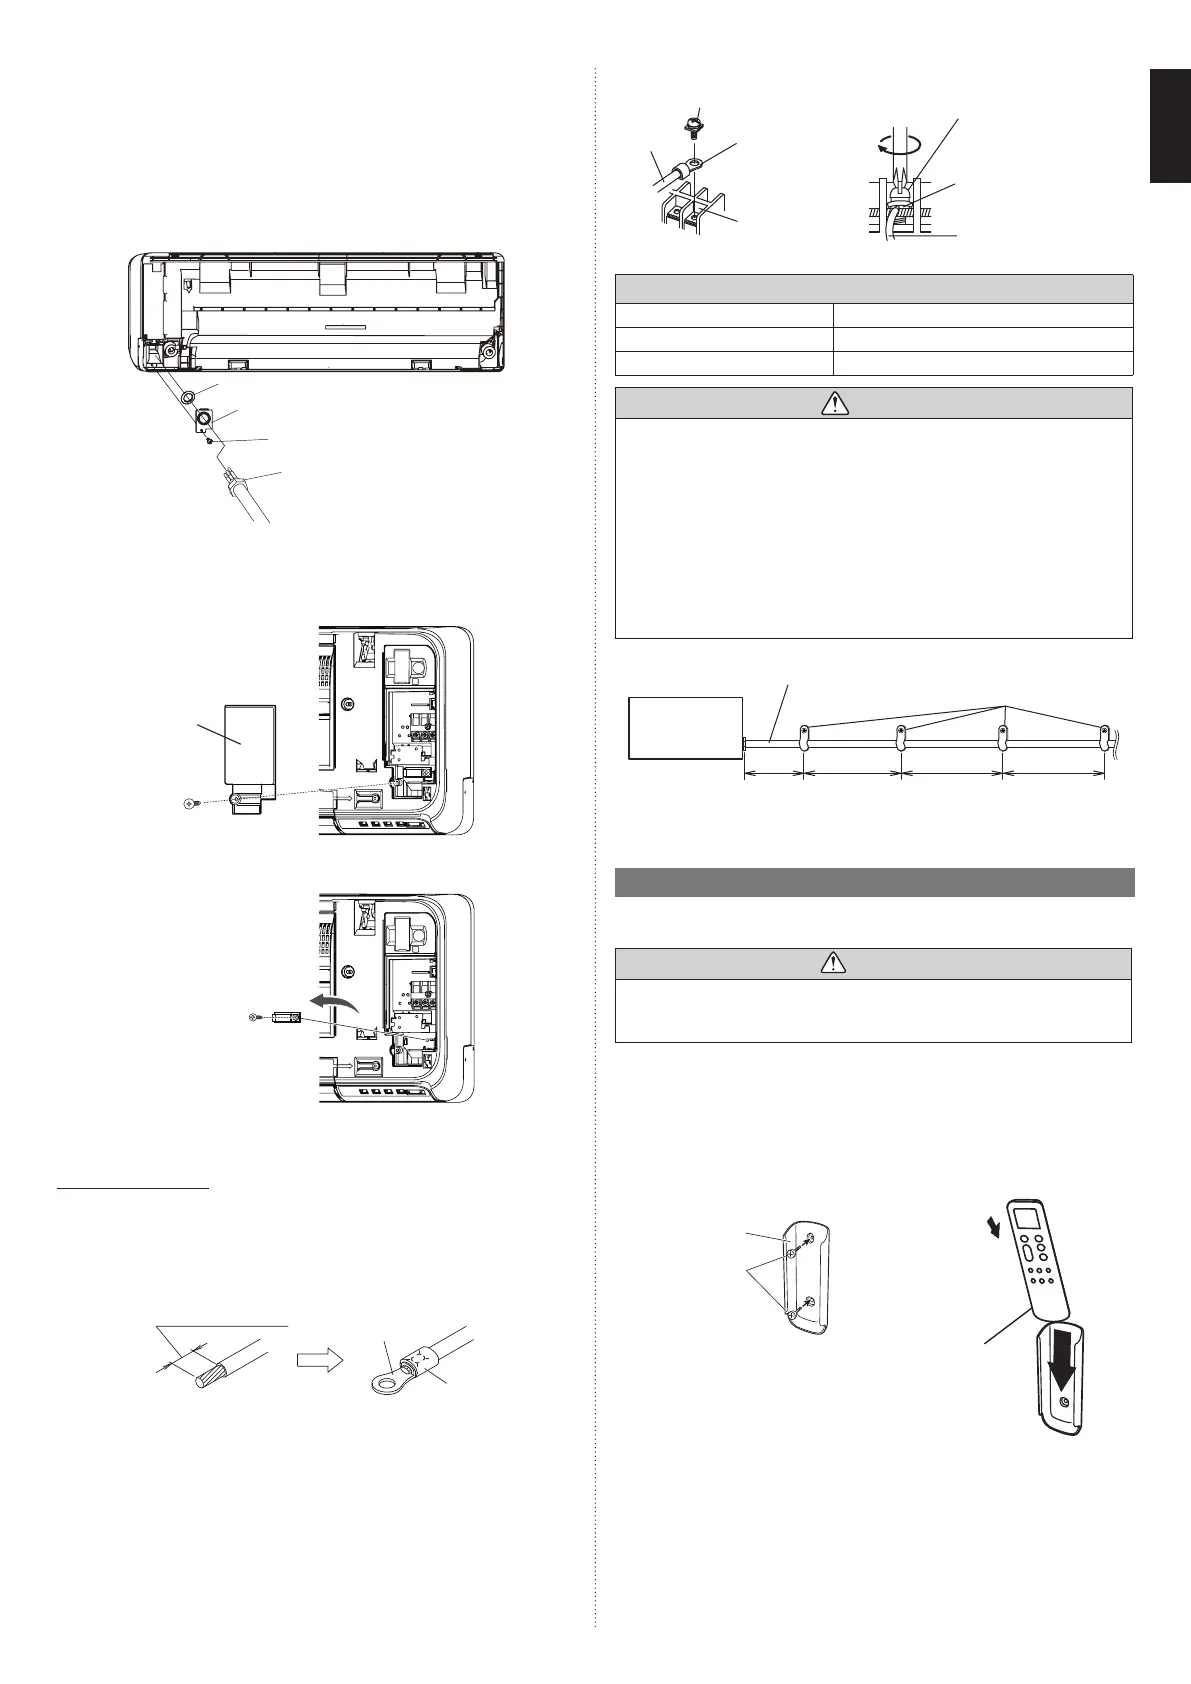
(5) Do not tighten the terminal screws too much, otherwise, the screws may break.
Screw with special washer
Wire
Ring terminal
Terminal blocks
Wire
Screw with special washer
Ring terminal
(6) Refer to the following table for the terminal screw tightening torques.
Tightening torque [lbf·in (N·m)]
M3.5 screw 7.0 to 8.8 (0.8 to 1.0)
M4 screw 10.6 to 15.9 (1.2 to 1.8)
M5 screw 17.7 to 26.5 (2.0 to 3.0)
CAUTION
• Attach the cable clamp fi rmly by holding the connection cable, and make sure that the
clamp is fi xed securely.
Incomplete attachment of the cable clamp might cause a malfunction of the open
panel.
• Match the terminal block numbers and connection cable colors with those of the
outdoor unit or branch box.
Erroneous wiring may cause burning of the electric parts.
• Connect the connection cables fi rmly to the terminal block. Imperfect installation may
cause a fi re.
• Always fasten the outside covering of the connection cable with the cable clamp.
(If the insulator is chafed, electric discharge may occur.)
• Always connect the ground (earth) wire.
• Do not use the ground (earth) screw of the indoor unit for the connection other than a
specifi ed outdoor unit.
(7) Fix the conduit with the supporters as shown below.
Conduit (Power supply cable)
Indoor unit
Supporter
30 in
(756 mm)
or less
54 in
(1,360 mm)
or less
54 in
(1,360 mm)
or less
54 in
(1,360 mm)
or less
3.5. Remote controller installation
• Check that the indoor unit correctly receives the signal from the remote controller, then
install the remote controller holder.
CAUTION
Do not install the remote controller holder in the following conditions:
• Any places exposed in direct sunlight
• Positions aff ected by the heat from a stove or heater
3.5.1. Remote controller holder installation
Install the remote controller a maximum distance of 22 ft (7 m) m from the remote con-
trol signal receiver. After installing the remote controller, check that it operates correctly.
I
nstall the remote controller holder to a wall, pillar, etc. with the tapping screw.
(1) Set
Remote controller
holder fi xing
Remote
controller holder
Tapping screws
(small, acces-
sories)
Remote controller
mounting
Remote
controller
(2) Down
3.4.2. How to the install the connection cable
(1) Remove the screws, then remove the conduit holder.
(2) Fasten the indoor unit wire harness to the conduit holder using the lock nut.
IMPORTANT: Refer to “3.4.1. Wiring system diagram” about the length of indoor unit
wire harness.
(3) Use the screws to install the conduit holder provide with the indoor unit.
(4) Remove the screws, then remove the cable clamper.
(5) Connect indoor unit wire harness to the terminal.
Refer to “3.4.1. Wiring system diagram”.
(6) Use the screws to install the cable clamper.
Lock nut
Conduit holder
Conduit connector
Screw
3.4.3. Indoor unit wiring
(1) Remove the intake grille. (Refer to “3.2.1. Intake grille removal and installation”.)
(2) Remove the tapping screw for the wire cover and the wire cover A.
Screw
Wire cover A
(3) Remove the tapping screw and while minding the cable clamp hook, remove the cable
clamp.
Screw
Cable clamp
3.4.4. How to connect wiring to the terminals
■
Caution when wiring cable
Caution when wiring cable
When stripping off the insulation of a lead wire, always use a special tool such as a wire
stripper. If there is no special tool available, carefully strip the insulation with a knife etc.
(1) Use ring terminals with insulating sleeves as shown in the following fi gure to connect
to the terminal block.
(2) Securely clamp the ring terminals to the wires using an appropriate tool so that the
wires do not come loose.
Strip: 3/8 in (10 mm)
Ring terminal
Sleeve
(3) Use the specifi ed wires, connect them securely, and fasten them so that there is no
stress placed on the terminals.
(4) Use an appropriate screwdriver to tighten the terminal screws. Do not use a screw-
driver that is too small, otherwise, the screw heads may be damaged and prevent the
screws from being properly tightened.
9387603217-01_IM.indb 79387603217-01_IM.indb 7 20-Jul-21 16:06:2620-Jul-21 16:06:26
 Loading...