2. Operation / Rinsing 5 seconds
a) Place the sample suction tube in a sample glass filled with the “ -
--
-FUNKE
FUNKEFUNKE
FUNKE
GERBER
GERBERGERBER
GERBER Zero-Diluent“. There should be at least 50 ml of the liquid present.
c) Use the arrow buttons to select the “Rinsing” menu item.
b) Press the “Enter” button -- the rinsing process begins.
During the rinsing process a certain quantity of liquid is pumped through the
measuring cells. Rinsing can be repeated as often as required.
3. Operation / Product Selection / Example
It is possible to calibrate and store 18 different product profiles. The following is
an example of a product selection:
Select product 3:
a) Use the arrow keys to select “Products/Calibration”.
b) Press the “Enter” button . - -
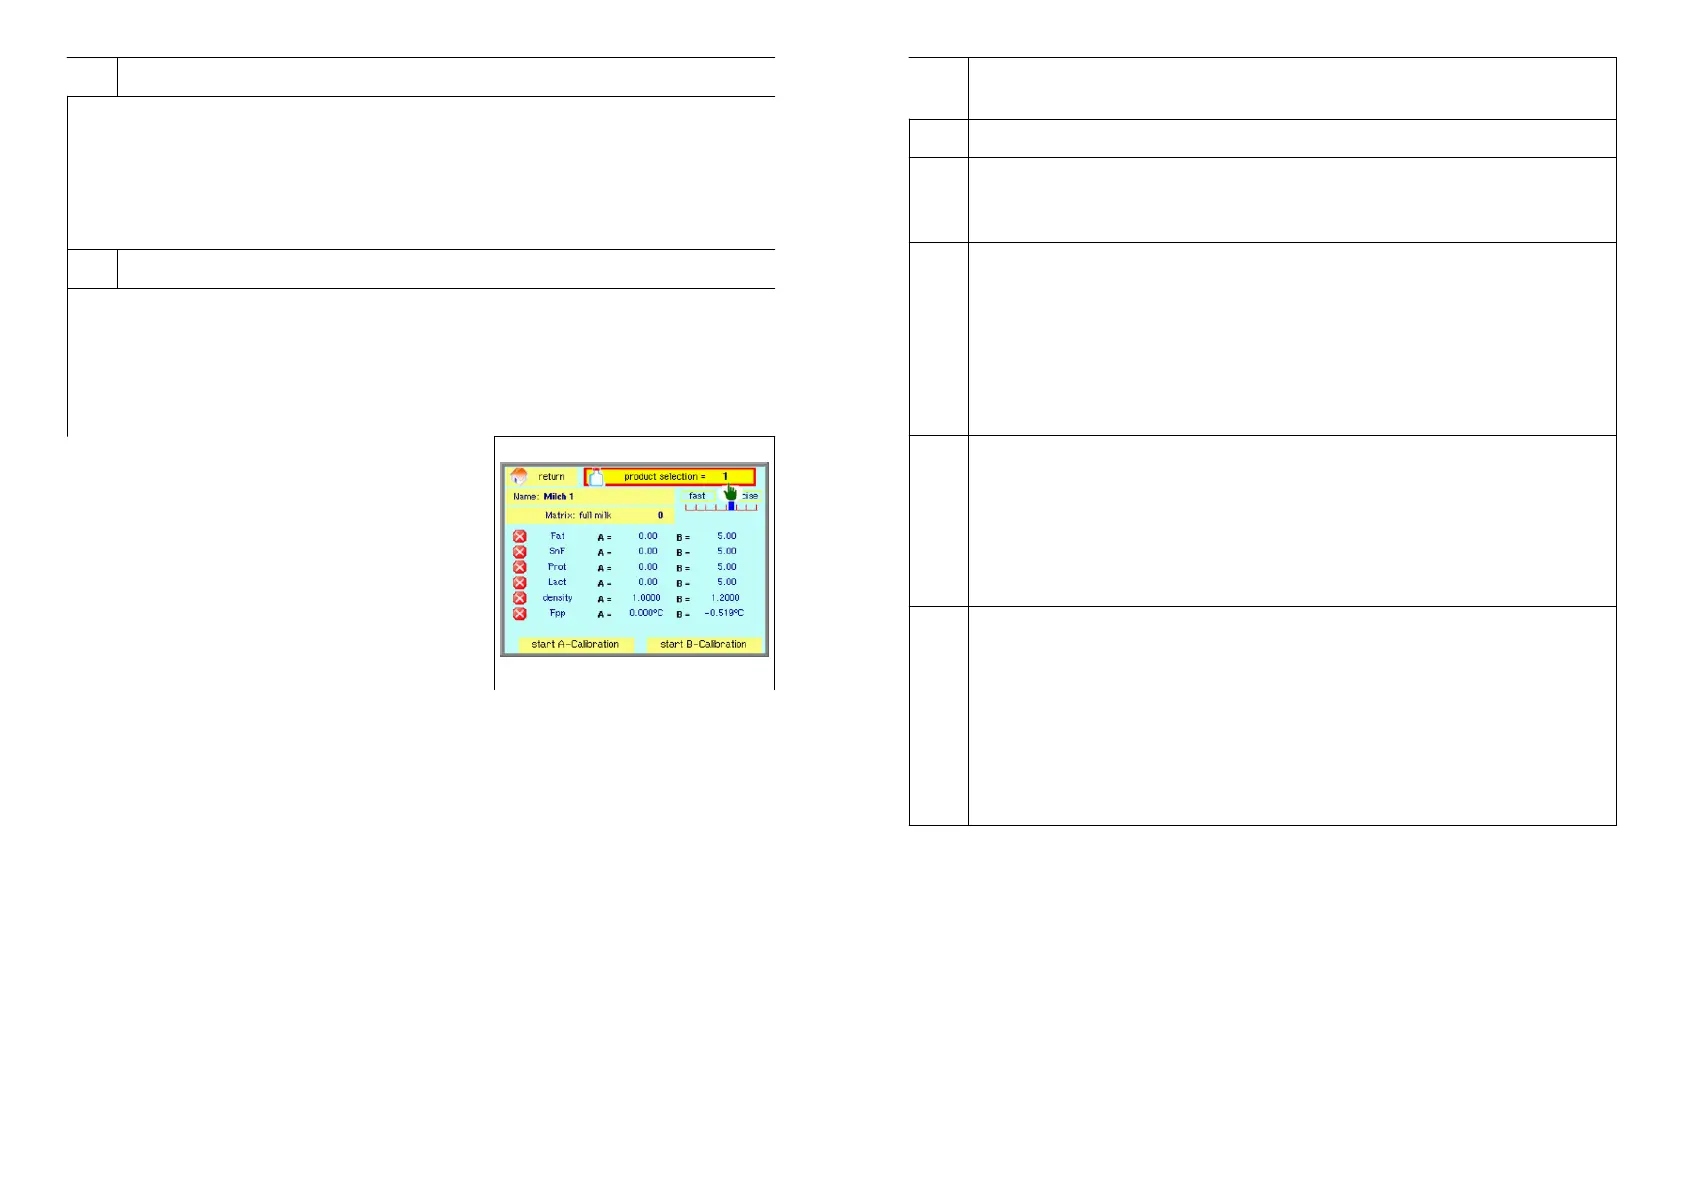
The following image appears:
c) Use the arrow buttons to select “Product
Selection”.
d) Press the Enter button.
e) Use the arrow buttons to select the desired
number. In this case the number “3".
8 LactoFlash 31. Januar 2013
6.4.
Matrix: The device is already calibrated by manufacturer. This
fundamental calibration may be improved by the customer.
6.5.
Product Selection: See 3. “Operation / Product Selection / Example”
6.6.
Fast / precise: The device can be set to “fast measurement”
(35 seconds = 100 samples per hour) and “precise measurement” (60
seconds = 60 samples per hour).
6.7.
Selection of the Substance Parameters to be Calibrated
a) Use the arrow buttons “▲” or “▼” to select the desired substance
(e.g. fat, protein, lactose etc.).
✕b) Press the “Enter” button -- the “√” symbol appears in place of the “ ”
symbol.
c) Continue in the same manner until all of the desired substance
parameters have been selected.
Between 1 and 6 parameters can be selected for calibration.
6.8.
Entering the Reference Values (Reference Milk Values)
a) Navigate with the arrow buttons to the respective B value.
b) Press the “Enter” button.
c) Use the arrow buttons to set the desired value, figure for figure.
d) Press the “Enter” button. This confirms and stores the setting.
e) Continue in the same manner until all of the desired values have
been entered.
6.9.
Starting B Calibration
Place the sample suction hose in a sample vessel filled with reference
milk. There must be at least 80 ml of reference milk available.
a) Navigate with the help of the arrow buttons to the menu item ”Start
B”.
b) Press the “Enter” button -- automatic B calibration begins.
After approximately 5 minutes B calibration is finished. Now it is
possible to measure unknown milks of the same type with the
previously selected profile, e.g. no. 3.
Note: Do not perform any calibrations immediately after cleaning the device
with cleaning liquid or other cleaning agents. Such agents falsify the
measurement results to a significant extent. As they strongly moisten the
surfaces of the measurement chambers, they have to be rinsed very
thoroughly after use.
Never operate the LactoFlash without rinsing or cleaning after finishing the
measurements. The device contains two sensitive measurement chambers
which are kept at a certain temperature. If milk protein precipitates in such a
measurement chamber and is deposited on the walls, the measurement
chamber will be destroyed.
LactoFlash 31. Januar 2013 13