11
ot0
one time mode 0 – mode of transmitting Program Change commands
always when a preset footswitch is pressed
4
ot1
one time mode 1 - mode of transmitting Program Change commands only when
a given preset footswitch is pressed for the first time
tt0
tap tempo 0 – tap tempo function not active
5
tt1
tap tempo 1 – tap tempo function active (Control Change 50h 00h/7Fh)
m3p
midi 3 program change – only Program Change command can be
transmitted to a MIDI 3 device
m3c
midi 3 control change and program change – to MIDI 3 device can be sent seven
Control Change and one Program Change commands.
6
m3A
midi 3 control change and program change – to MIDI 3 device can be sent three
Control Change and one Program Change commands and there is a possibility to
send four Program Change commands to devices MIDI 4 to MIDI 7 (PC4 to PC7)
tu1
tuner 1 – a guitar tuner connected to TUNER output
7
tu2
tuner 2 – used tuner built in MIDI processor, (recalling program No. 100 with
muted signal)
AF1
AUX function 1 – AUX output function No. 1 – controlling AUX 2 x LOOP,
AUX A/B SWITCH, AUX SWITCH 5&6 OUT modules
8
AF2
AUX function 2 – AUX output function No. 2 – working with AUX BANK
UP/DOWN with MIDI IN footswitch (for firmware 2.20 and higher)
d) Pressing the LOOP button will effect in saving settings (text Stored confirms saving).
In case of necessity of escaping without saving while in the point c) should be pressed SWITCH, MIDI 1 or
MIDI 2 button.
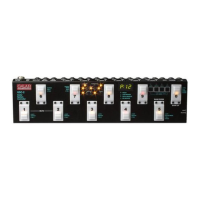
SWITCH button settings
Controller enables to transmit 7 controllers’ numbers. In settings are programmed controllers’ numbers and
for a particular preset (or a MIDI modifier) are programmed values of controllers which should be
transmitted.
a) Memory access lock switch to LOCK position (pressed, LOCK indicator lit).
b) Press and hold SWITCH button and while it is pressed switch memory access lock to UNLOCK
position (LOCK indicator stops to light). SWITCH indicator will start to blink and LOOP, MIDI 1 and
MIDI 2 indicators will start to light. Text SP2 will appear on display
c) Short pressing footswitches numbered from 1 to 7 will effect in displaying actual controller number
assigned to a particular footswitch.
d) Press and hold for longer than 1 second the controller footswitch intended to be changed (blinking
“0” will appear on display). A controller number can be from 0 to 127 range. Press intended
numbered footswitches.
e) Pressing SWITCH button confirms entered number. To edit numbers of other controllers you
should operate according to the points d) and e).
f) Press SWITCH button to save settings (text Stored confirms saving).
In case of necessity of escaping without saving while in the point c) or e) should be pressed LOOP, MIDI 1
or MIDI 2 button.