User’s Guide 53
Diskette A:
Selects the drive type.
IDE Adapter 0 master:
Note: Do
not
change these settings unless you are an advanced user!
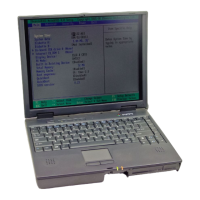
This sub-menu configures the IDE adapter (see Figure 45). Press Enter to
access the sub-menu for this function. Press Esc when you have finished
using the sub-menu, or wish to return to the Main menu.
Autotype fixed disk: — Auto-detects the drive and sets all drive values
to comply with ANSI specifications.
Type: — Change from Auto to User to edit Cylinders, Heads, Sectors/
Track, etc.
32 bit I/O: — Enables or disables 32-bit data transfers.
IDE Adapter 1 master:
This sub-menu is only used with more than one hard drive. It functions the
same as IDE Adapter 0 master.
IDE Adapter 1 slave:
This sub-menu is only used with more than one hard drive. It functions the
same as IDE Adapter 0 master.
Display device selection:
Sets the video display device. Use the Spacebar to choose between LCD,
CRT or both LCD & CRT.
Built-in pointing device:
Enables or disables the EZ Pad pointing device. Press the Spacebar to select
Enabled or Disabled.
Memory cache:
Enables or disables external memory cache. Press the Spacebar to select
Enabled or Disabled.
Boot sequence:
Sets the order in which the system searches for the boot drive. Press the
Spacebar to choose between A: then C:, C: then A:, C: only, or CD-ROM.
The system memory and extended memory fields display the actual memory
available. You cannot access and change these fields. These fields will only
change if additional memory or a larger hard drive is installed.
Press the Esc key to access the Exit menu and accept/discard changes. Press
F9 to return to the factory defaults, or F10 to return to the previous settings.
Use the Right Arrow key to move over to the next screen.
à
See page 36.
 Loading...