7
Program custom messages (92)
When you program custom messages:
• If an NX-148 (non-E) is installed on the same system, it
must be used to program the text. All messages are trans-
ferred to other touchpads when you exit this mode.
•Use the * 94 (Set touchpad number and partition) function
to set the touchpad numbers prior to programming custom
messages.
• If a touchpad is added after messages are programmed, you
need to either program all messages in it, or enter custom
message programming on an existing touchpad and press 1
#, #, #, EXIT.
•Refer to * 93 (Set touchpad options) to prevent overwriting
the custom message.
To program custom messages, do the following:
1. Enter * 92.
2. Enter your program code.
3. The LCD will prompt you to enter the message number
followed by #. Zones 1 through 192 custom messages are
message numbers 1 to 192 respectively.
Message 193 = Custom message top line.
Message 194 = Custom message bottom line.
Message 195 = Shutdown message top line.
Message 196 = Shutdown message bottom line.
Enter the message number and press #. The display will
show the zone number on the top line and a description on
the bottom line. Refer to Table 7 for information on editing
character data.
4. Press EXIT to exit.
Set touchpad options (93)
To set touchpad options, do the following:
1. Press * 93.
2. Enter your program code.
3. Follow the instructions on the bottom line of the display to
select the options you want (see Table 8). If you do not want
to change an option, press * to advance to the next option.
4. To exit, press #.
Set elapsed time since the last autotest (95)
To set the elapsed time (in minutes) since the last autotest, do the
following:
1. Enter * 95.
2. Enter your program code.
3. Enter the elapsed time in minutes using three digits. For
example, enter 005 for 5 minutes.
4. To exit, press #.
Set system time and date (97)
To set the system time and date, do the following:
1. Enter * 97.
2. Enter your program code.
3. Press
or to scroll for the proper hour.
4. Press * to advance to the next selection (minutes).
5. Repeat steps 3 and 4 until the time and date are set.
6. To exit, press #.
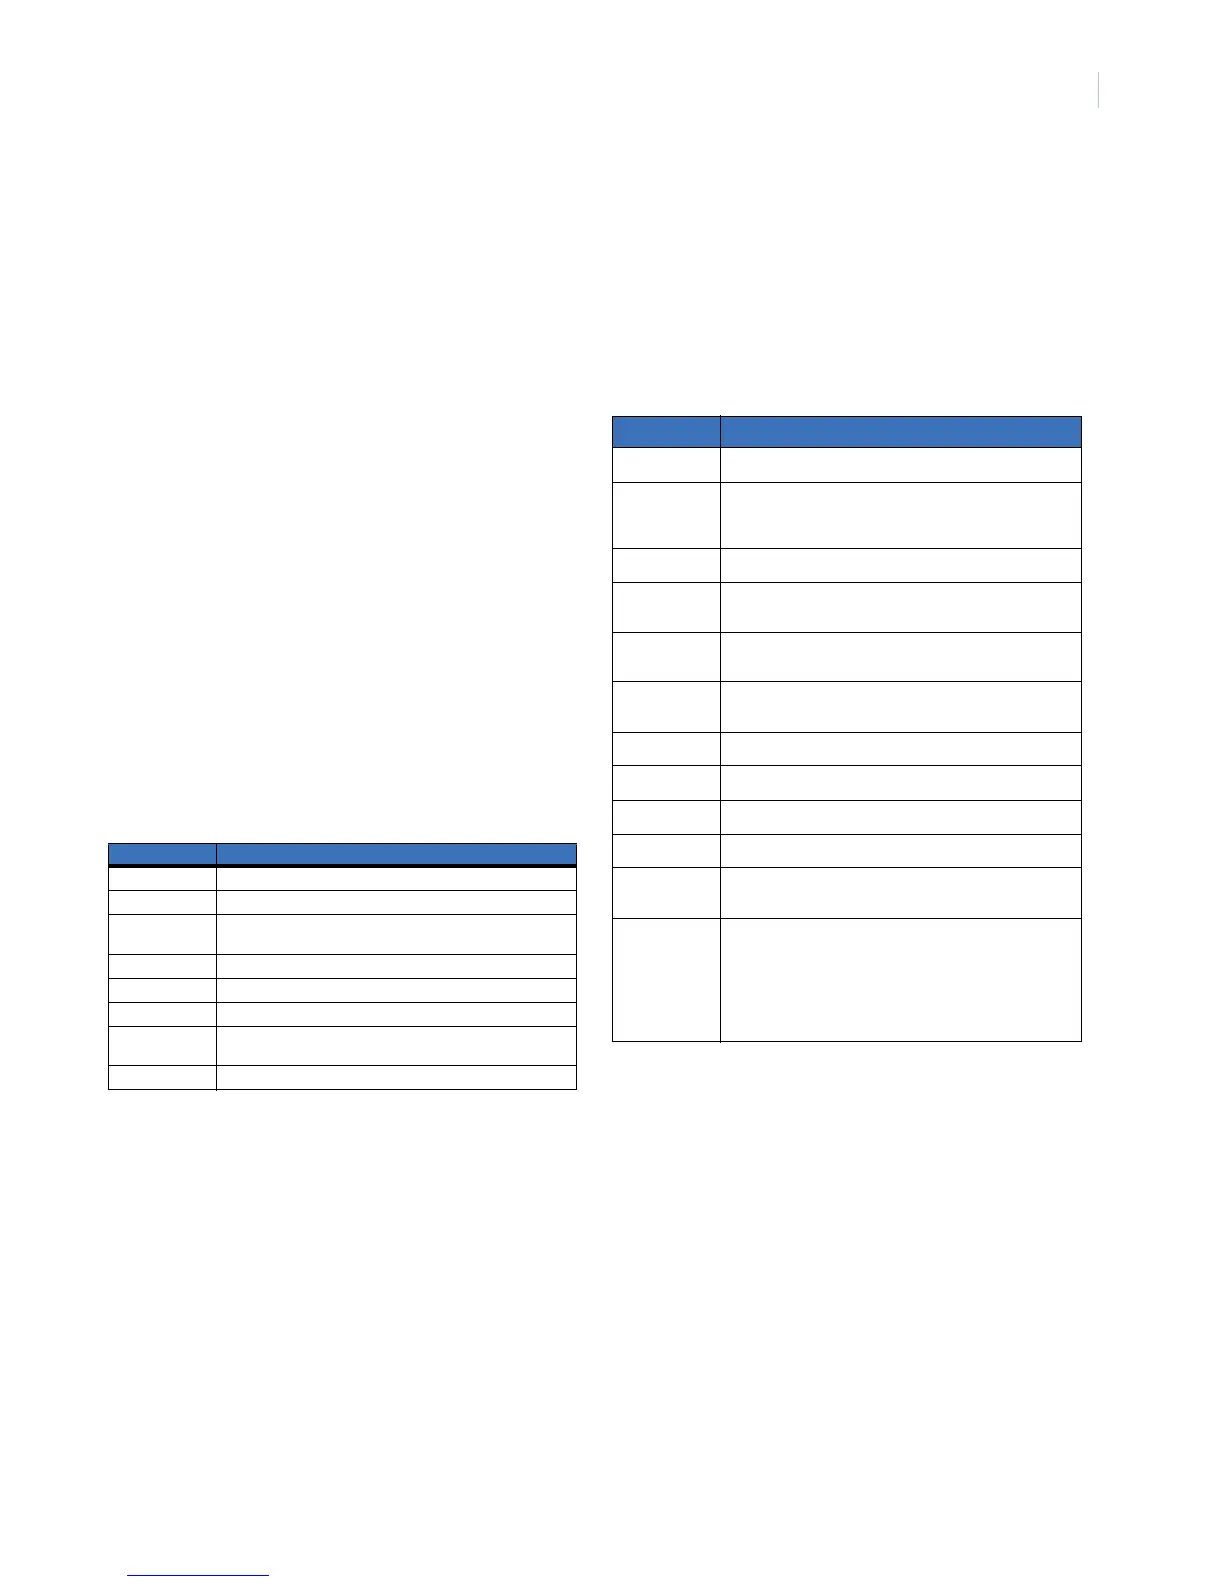
Table 7. Editing character data
Command Action
* Saves character or word. Moves cursor to the right.
CANCEL Moves cursor to the left.
or Scrolls through available characters. In library mode, scrolls
through available words.
STAY Inserts a black space.
CHIME Deletes characters.
EXIT Accesses the library page.
BYPASS Makes the character flash. If you are in library mode, it will
make the entire word flash.
#Exits.
Table 8. Touchpad options
Option Touchpad features
1Not used
2 Silent touchpad - Enables silent touchpad option. If
enabled, only the entry/exit and sounder chime are
silenced.
3 Ding dong chime - Enable the ding dong sound for chime.
4 5 second silence - Silences the pulsing touchpad sounder
for 5 seconds when a key is pressed.
5 Armed zone info - Touchpad will display faulted or
bypassed zone information when the system is armed.
6 Beeps on panics - Will sound a short beep when the
keypress is accepted.
7 Disable service - Suppresses the Service message.
8 Master touchpad - Enables multi-partition mode.
9 Custom message - Enables custom message display.
10 Clock - Enables clock display.
11 Custom message lock - Prevents over-writing the custom
message during touchpad copy.
12 Select an option - Programs special characteristics.
1 = Display Press * For Help
2 = Disable LED extinguish on this touchpad
3 = On if PIN should be hidden when programming
4 = On suppresses beeps when an RF Transmission is lost.
5-8 = Reserved (do not program)