Installation Instructions
[STEP 121 INSTALL 1/4" FRAMED PANELS Goto Step12AforOverlayPanels
g0
!]_!]_!]_!]_!]_!]_!]_!]_!]_!]_!]_!]_!]_!]_!]_!]_!]_!]_!]_!]_!]_!]_!]_!]_!]_!]_!]_!]_!]_!]_!]_!]_!]_!]_!]_!]_!]_!]_!]_!]_!]_!]_!]_!]_i!_
!]!]!]!]!]!]!]!]!]!]!]!]!]!]!]!]!]!]!]!]!]!]!]!]!]!]!]!]!]!]!]!]!]!]!]!]!]!]!]!]!]!]!]!]i!
!]!]!]!]!]!]!]!]!]!]!]!]!]!]!]!]!]!]!]!]!]!]!]!]!]!]!]!]!]!]!]!]!]!]!]!]!]!]!]!]!]!]!]!]i!
!]!]!]!]!]!]!]!]!]!]!]!]!]!]!]!]!]!]!]!]!]!]!]!]!]!]!]!]!]!]!]!]!]!]!]!]!]!]!]!]!]!]!]!]i!
_l_l_l_l_l_l_l_l_l_l_l_l_l_l_l_l_l_l_l_l_l_l_l_l_l_l_l_l_l_l_l_l_l_l_l_l_l_l_l_l_l_lil_l_l
I
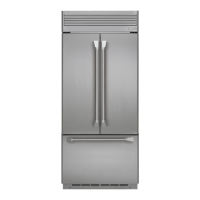
Install door panels:
. Open the door to 90°. Remove the 6 Phillips head screws
from the door handle,
. Remove the handle. Retain all screws.
. Remove the 6 screws holding the trim, then lift off
the trim. Retain the screws.
. Slide the framed panel into the door trim.
Dispenser Models Only:
. The dispenser controls protrude beyond the face
of the freezer door. To avoid damage to the dispenser,
the trim at the top of the door should be removed,
. Remove the screws holding the top trim in place.
. Place the freezer panel into the bottom channel
and slide into the hinge side trim,
. Reinstall the top trim piece with screws.
. There are two sets of holes in the handle side trim.
Replace the handle side trim by installing the original
screws in the FRONTscrew holes.
. Secure the handle to the door using the REARscrew
holes,
. Follow the same procedures to install the opposite panel.
. Check to be sure the handles are evenly aligned with
each other at the top. To adjust, loosen the handle
screws and slide up or down. Tighten the screws.
NOTE:Aluminum cover trim is supplied for use with
custom handles on overlay panels, It is not intended for
use with 1/4" panels. Discard the cover trim when using
1/4" framed panels.
Handle
Trim
Suppfied
H_Jndle Shown
in 7/4" P_ne/
Position
Door Trim
Refrigerator
Door
I_\\\\ \\\\\\\\\\\\\\\\\'1
\
'\\\
// Use Front Hole
to Secure Trim
Use Rear Holes
to Secure Handle
15
 Loading...