Page 12 Revision I FROM 2012-09-20
02 – door opening sensor exists, open at open door
03 – temperature sensor at window
Lighting activation methods:
01 – light controlled only by the door sensor
02 – light controlled only by the keyboard
03 – light controlled by both the door sensor and the keyboard
Time elapsed after door opening until alarm activation.
After 30 seconds from door opening the “dr” message is shown. For
the controllers with buzzer installed, a short beep is emitted and
repeated every 30 seconds.
After the ‘r8’ time is elapsed the alarm is activated and indicated by
flashing “dr” message on display, and for the controller equipped
with buzzer – an acoustic signal is emitted; the compressor is
switched off.
0 – means immediate alarm activation
Door opening sensor connection location:
01 – sensor connected to the actuator module
00 – sensor connected to the control module. Note: in this
configuration you have to order a special cable with plug!!!
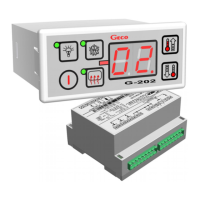
IX. G-202 OPERATION - USER INSTRUCTIONS
1. After connecting the device to the power supply the display will show two dots for one second, then
the software release, and the dots again for another second. Following that, two dashes will be shown
in the middle segments of the display, indicating that the device is powered. The device is started by
pressing the key. The display shows value of the temperature indicated by the chamber sensor.
3. Setting of the temperature.
Press and hold one of the keys for at least 0.5 second to enter the temperature programming
mode. The display will start to flash and show the previously programmed setting.
Use the keys to change the temperature setting. Press and hold a key to fast change the
displayed value.
If you don’t press any of the keys for 5 seconds, the Controller exits the programming mode
and stores the new settings.
3. You can activate and deactivate the operating mode with drying using the key; the greed LED
lights to indicate activation of the operating mode with drying.
NOTE – IMPORTANT !!!
If you need to perform additional defrosting due to difficult operating conditions, press the key.
The green LED at the key will light, the display will show “dF” instead of temperature, and the
device will enter the defrosting cycle.
The defrosting procedure will be finished automatically when its time elapses or upon reaching of the
temperature set by the manufacturer of the cooling appliance.
Performing unauthorised repairs will invalidate the warranty and may lead to electric shock
and hot vapour burns. Therefore refer all repairs to authorised and trained service
technicians!!!
 Loading...