Step 7 REVIEW YOUR WORK
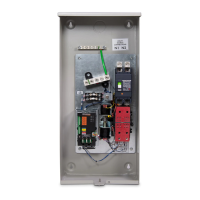
1. PWRview should be mounted firmly in the panel
2. Antenna should be mounted in the knockout with the extension cable
connected to the side of PWRview
3. Voltage Cable should be connected properly and securely
Black and Red wires to 2 breakers
White wire to neutral to bus bar
4. CT Connectors should be connected properly and securely
Connectors should be clamped around the mains
Make sure the labels are facing the utility
5. Turn the main breaker to the 'ON' position. The next steps will guide you
through configuration and confirming the operation of the PWRview meter
PWRVIEW PORT PWRVIEW CONNECTION PANEL CONNECTION PANEL POSITION
Voltage Connector
Black Empty Breaker 1 Phase A
Red Empty Breaker 2 Phase B
Blue* No connection Capped (wire nut)
White Neutral Bus bar NA
Port 1 CT1 Utility line Phase A
Port 2 CT2 “ Phase B
Port 3* NA NA NA
Port 4* NA NA NA
Antenna connector Antenna harness Antenna knockout Antenna (through encl.)
NOTE: These are used for additional installation types. Refer to www.generac.com/service-support/PWRview