English
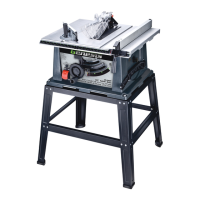
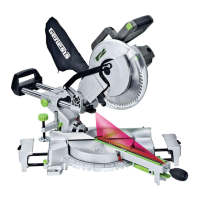
10" Table Saw
Operator’s Manual GTS10SB
20
Bevel Cross Cutting
WARNING:Make sure the blade guard assembly is properly installed to
avoid serious personal injury.
1.Removetheripfencefromthetablesurface.
2.Adjustbevelangletothedesireddegree.(0°-45°).
3.Setthebladetothecorrectdepth.RefertoBladeHeightAdjustment.
4.PositionMiterGaugeto0°.(RefertoMiterGaugeAdjustment).Usethemitergaugeinthegrooveto
theRIGHToftheblade.ItcannotbeusedinthegroovetotheLEFTbecausethebladeguardwill
interferewiththecut.
5.Makesureallloosepieceshavebeenremovedfromthetablesurfaceandworkpieceisnotin
contactwithblade.
6.TurnON/OFFswitchtotheONposition.
7.Positiontheworkpieceatonthetablewithedgeushagainstmitergaugefence.Waituntilblade
reachesfullspeedbeforefeedingtheworkpieceintotheblade.
8.Usetwohandstoslowlyfeedtheworkpieceandmitergaugetowardtheblade.Usethehand
furthestfromthebladetokeeptheworkpieceushagainstmitergaugefenceanduseyourother
handtopushthemitergaugeandworkpiecetowardtheblade.Standslightlytothesideofblade
toreducetheriskofinjuryshouldkickbackoccur.
9.Continuefeedingtheworkpieceintothebladeuntilthecuthasbeencompleted.
10.Oncethecuthasbeencompleted,pulltheworkpiecebacktowardyou.
11.Turntheswitchoff.
12.Afterbladehasstoppedcompletely,removethecutoffpiece.
Compound Miter Cross Cutting
WARNING:Make sure the blade guard assembly is properly installed to
avoid serious personal injury.
1.Removetheripfencefromthetablesurface.
2.Adjustbevelangletothedesireddegree.(0°-45°)(refertoBevelAdjustment).
3.Setthebladetothecorrectdepth..
4.PositiontheMiterGaugetothedesireddegree.(0°-60°)(RefertoMiterGaugeAdjustment).Usethe
mitergaugeinthegroovetotheRIGHToftheblade.ItcannotbeusedinthegroovetotheLEFT
becausethebladeguardwillinterfere.
5.Makesureallloosepieceshavebeenremovedfromthetablesurfaceandworkpieceisnotin
contactwithblade.
6.TurnON/OFFswitchtotheONposition.
7.Positiontheworkpieceatonthetablewithedgeushagainstmitergaugefence.Waituntilblade
reachesfullspeedbeforefeedingtheworkpieceintotheblade.
8.Usetwohandstoslowlyfeedtheworkpieceandmitergaugetowardtheblade.Usethehand
furthestfromthebladetokeeptheworkpieceushagainstmitergaugefenceanduseyourother
handtopushthemitergaugeandworkpiecetowardtheblade.Standslightlytothesideofblade
toreducetheriskofinjuryshouldkickbackoccur.
9.Continuefeedingtheworkpieceintothebladeuntilthecuthasbeencompleted.
10.Oncecuthasbeencompleted,pulltheworkpiecebacktowardyou.
11.Turntheswitchoff.
12.Afterbladehasstoppedcompletely,removethecutoffpiece.
Non-Through Cutting
Non-throughcuttingareincuttinggrooves,rabbetsanddados.Thisistheonlytypeofcutmadewith
thebladeguardassemblyremoved.Youmustmakesuretheentirebladeguardassemblyisreinstalled
properlyaftercompletionofthistypeofcut.
 Loading...