Do you have a question about the Gigabyte GA-2CEWH and is the answer not in the manual?
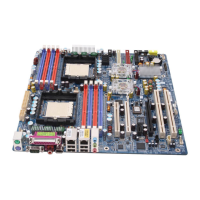
Highlights the main specifications and capabilities of the GA-2CEWH motherboard.
Guide to accessing and configuring the BIOS setup utility for system operation.
Instructions for installing essential drivers and utility software for optimal system performance.
Detailed instructions for mounting the CPU and its associated cooling solution.
Procedure for inserting and securing RAM modules into the motherboard's DIMM slots.
Guidance on installing PCI, PCIe, and PCI-X expansion cards into their respective slots.
Instructions for connecting internal data cables, case wires, and power connectors.
Identification and description of ports and connectors on the motherboard's rear panel.
Detailed pinout and function descriptions for various onboard internal connectors.
Primary BIOS screen displaying system time, date, and basic hardware overview.
Detailed configuration options for CPU, chipset, memory, and peripheral settings.
Settings for system passwords, boot sector protection, and other security features.
Options for managing system power states, ACPI features, and power failure recovery.
Configuration for boot device priority, boot behavior, and boot menu options.
Options for saving or discarding BIOS changes and exiting the setup utility.
Real-time monitoring of system temperatures, voltages, and fan speeds for system health.
Enables system error logging and provides access to DMI event logs for diagnostics.
Displays installed CPU information and allows configuration of multiprocessor specifications.
Advanced settings for CPU HT-LINK frequency and memory error checking configurations.
Configuration options for DRAM bank interleaving, memory interleaving, and ECC memory checking.
Enables or disables the floppy diskette controller and its automatic configuration settings.
Configuration for P-ATA and SATA interfaces, including channel selection and SATA mode.
Enables/disables onboard LAN controllers and configures related options like ROM scan.
Enables or disables the onboard AC97 audio interface for sound functionality.
Configuration for USB 1.1, USB 2.0 controllers, and legacy USB support.
Enables or disables the integrated 1394 (FireWire) controller.
Configuration settings for serial and parallel ports, including modes and addresses.
Settings for PCI and PCI-Express slots, including device enablement and latency timers.
Allows setting or changing the supervisor password for system access control.
Allows setting or changing the user password for limited system access.
Enforces password entry upon system startup for enhanced security.
Enables or disables the system's ability to boot from a floppy disk drive.
Enables or disables the system's ability to boot from an IDE hard disk drive.
Enables or disables the system's ability to boot from an IDE CD-ROM drive.
Protects the BIOS from unauthorized modifications by enabling write protection.
Provides virus protection for the hard disk's boot sector.
Controls whether data can be written to flexible (floppy) disks.
Enables or disables the prompt to enter BIOS setup during system boot.
Monitors the system housing for intrusion, providing chassis alert notifications.
Allows waking the system from ACPI S3 state using PS/2 keyboard or mouse.
Enables the S3 ACPI power mode, saving system state to RAM for quick resume.
Enables the system to wake up from a low-power state via specific PME events.
Sets system behavior (Power On, Off State, Last State) after AC power loss and restoration.
Allows the system to be shut down using the keyboard's power button.
Controls whether the system halts or attempts to continue booting upon Power-On Self-Test errors.
Speeds up the system boot process by skipping certain initialization tests.
Minimizes the display of information during the system boot process.
Enables users to select an alternate boot device via an F12 menu during startup.
Defines the sequence in which the system attempts to boot from available devices.
Exits BIOS setup and saves all current configuration changes to CMOS memory.
Exits BIOS setup without saving any configuration changes made during the session.
Restores all BIOS setup items to their original factory default values.
Loads the previously saved BIOS configuration values from CMOS memory.
Saves current setup data to CMOS and exits the BIOS utility.
Visual representation of the motherboard's functional blocks and component interconnections.
Step-by-step instructions for installing NVIDIA chipset drivers from the included CD.
Instructions for installing the Broadcom network adapter drivers from the provided CD.
Guide to installing the Realtek AC97 audio drivers from the provided CD.
Procedure for installing the AMD System Interrupt Controller driver via Device Manager.
Steps to install DirectX 9.0, crucial for multimedia and gaming performance.
Glossary of technical terms and acronyms used throughout the manual for reference.
| Memory Type | DDR4 ECC Registered |
|---|---|
| Memory Slots | 16 |
| M.2 Slots | 2 x M.2 |
| Network | 10GbE |
| Video Outputs | 1 x D-Sub |