Do you have a question about the Gigabyte R282-Z93 and is the answer not in the manual?
Essential safety guidelines and procedures for installing server hardware.
Comprehensive details on CPU, memory, storage, networking, expansion slots, and dimensions.
Visual overview of system components, connectivity, and data flow.
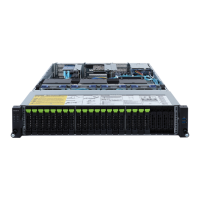
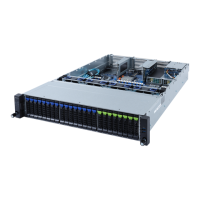
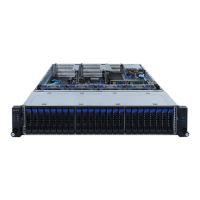
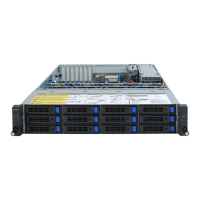
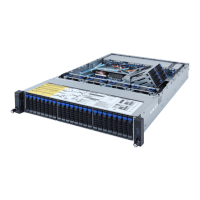
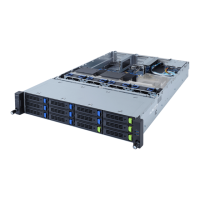
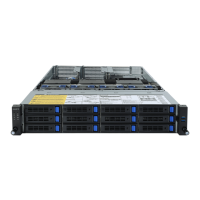
Identification and description of front panel components, including drive bays and ports.
Identification and description of rear panel components, including I/O ports and slots.
Explanation of front panel LEDs for status indication and buttons for system control.
Details on the status indicators for the rear system LAN ports.
Explanation of the LED indicators for the server's power supply unit.
Description of HDD LED status for normal, fault, and rebuilding states.
Critical guidelines to prevent damage and injury before commencing hardware installation.
Step-by-step procedure for safely removing and reinstalling the server's chassis cover.
Instructions for accessing and replacing the server's fan duct assembly.
Detailed guide for removing and installing the CPU heat sink, including tightening torque.
Procedure for safely installing and removing CPU processors, including orientation.
Guidelines for installing and removing DDR4 memory modules (DIMMs) correctly.
Steps for installing and removing PCIe expansion cards and riser brackets.
Instructions for installing OCP 3.0 and OCP 2.0 mezzanine network cards.
Procedure for installing and removing 3.5" and 2.5" hot-swappable hard disk drives.
Guide for installing M.2 SSDs, including thermal pad placement and screw configuration.
Steps for safely removing and replacing the server's fan assembly.
Procedure for removing and installing redundant power supply units.
Diagrams illustrating proper cable management for various system connections.
Detailed identification and description of connectors and features on the motherboard.
Explanation of jumper configurations and their effects on system settings.
Introduction to the BIOS Setup interface and navigation controls.
Configuration options for advanced hardware features and system settings.
BIOS settings specific to AMD CPU features and configurations.
BIOS settings for AMD Platform Build Solution (PBS) related features.
Configuration options for the system's SoC and chipset functionalities.
Settings for server management features, BMC, and system event logging.
Options for setting administrator and user passwords to secure the system.
Configuration of boot device priority, boot mode, and startup options.
Options for saving configuration changes or discarding them before exiting BIOS setup.
Interpretation of beep codes generated during the Power-On Self-Test for diagnostics.
| Processor family | AMD |
|---|---|
| Processor socket | Socket SP3 |
| Built-in processor | No |
| Motherboard chipset | - |
| Compatible processor series | AMD EPYC |
| Number of processors supported | 2 |
| Hot-swap HDD bays | Yes |
| Storage drive sizes supported | 2.5, 3.5 \ |
| Supported storage drive types | HDD & SSD |
| Number of storage drives supported | 12 |
| Supported storage drive interfaces | Serial ATA III |
| PCI Express x16 slots | 6 |
| PCI Express slots version | 4.0 |
| PCI Express x8 (Gen 3.x) slots | 1 |
| Power supply | 2000 W |
| Input current | 10 - 12 A |
| AC input voltage | 100 - 240 V |
| AC input frequency | 50 - 60 Hz |
| 80 PLUS certification | 80 PLUS Platinum |
| Memory channels | Octa-channel |
| Number of DIMM slots | 32 |
| Supported memory types | DDR4-SDRAM |
| Maximum internal memory | 128 GB |
| Supported RDIMM clock speeds | 2933, 3200 MHz |
| Discrete graphics card model | Not available |
| On-board graphics card model | Aspeed AST2500 |
| Chassis type | Rack (2U) |
| Fan diameter | 80 mm |
| Product color | Black |
| Number of fans | 4 fan(s) |
| LAN controller | Intel® I350-AM2 |
| Ethernet LAN data rates | 10, 100, 1000 Mbit/s |
| Ethernet interface type | Fast Ethernet, Gigabit Ethernet |
| Sustainability certificates | RoHS |
| USB 2.0 ports quantity | 0 |
| USB 3.2 Gen 1 (3.1 Gen 1) Type-A ports quantity | 4 |
| Storage temperature (T-T) | -40 - 60 °C |
| Operating temperature (T-T) | 10 - 35 °C |
| Storage relative humidity (H-H) | 20 - 95 % |
| Operating relative humidity (H-H) | 8 - 80 % |
| Package depth | 588 mm |
| Package width | 982 mm |
| Package height | 268 mm |
| Package weight | 25500 g |
| Depth | 730 mm |
|---|---|
| Width | 438 mm |
| Height | 87 mm |
| Weight | 18500 g |