2726
• The appropriate remote control is tuned in to the parasol ex works.
• The power supply line must be provided by the customer on site. It must be
possible to disconnect this for installation and maintenance purposes and
to secure it against unintentional reconnection.
• Set up the connection between the power supply cable and the parasol by
means of the connecting plug supplied. The connector plug can be stowed
away either in the support tube or in the ground sleeve.
• For connection values see the section on Technical Specications.
Assembly and commissioning
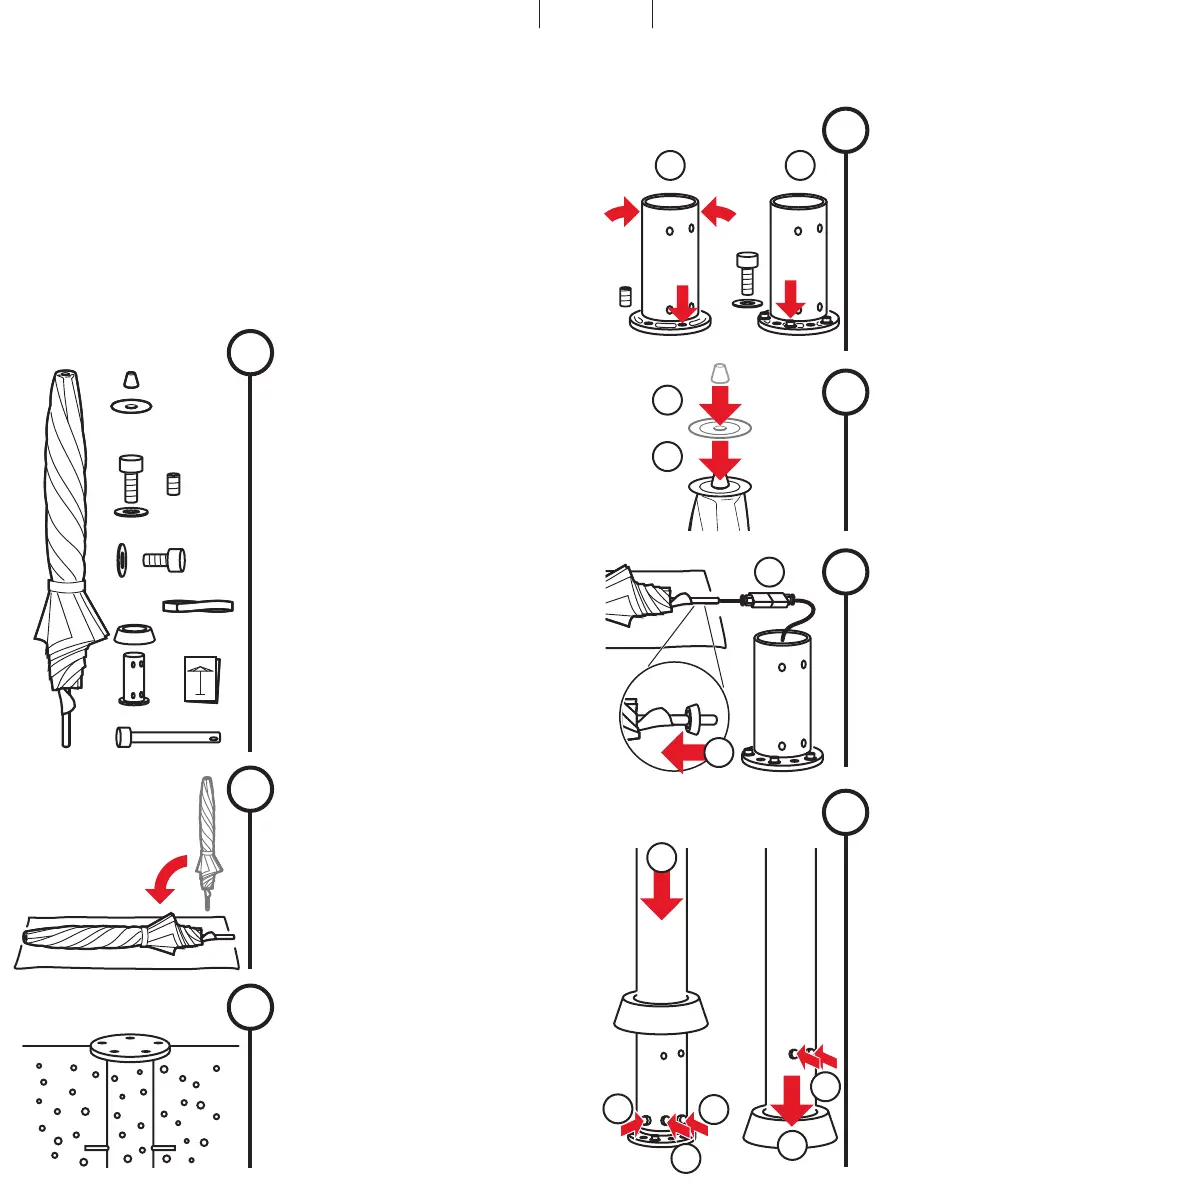
Supplied with:
- Parasol, binding belt, support tube,
top, top disc
- 5 fastening screws
- 5 support screws
- 5 stud screws for levelling
- 4 support tube fastening screws
- 4 special support screws
- Support tube cover
- Installation and operating instructions
- Safety bolt with lock
Unpacking the parasol
1
Dispose of packaging material properly
and keep away from children.
Do not make use of defective material. In
the event of any damage, inform the
transport service provider immediately.
!
5×
4×
2
Placing the parasol down
Carefully place the parasol on a clean, hori
-
zontal surface. The parasol is very heavy.
Work in a threesome and hold the parasol
securely.
!
4
1. Place support tube on ground fastening
2. Make sure the notches are aligned
3. Using the 5 stud screws, ensure that the
support tube is vertically aligned
4. Place 5 support screws
5. Pre-assemble support tube with 5 fastening
screws
Pre-assemble support tube
5x
5x
4.1 4.5
The parasol is very heavy. Work in a three-
some and hold the parasol securely. Ensure
that the electrical cable is not damaged or
pinched.
!
Set up parasol
7
1. Lift parasol over the support tube and lower
it carefully.
2. Tighten the two lower screws (34 Nm)
3. In case of need, secure parasol against theft
with a lock
4. Align parasol, then tighten the 5 fastening
screws (56 Nm)
5. Lower support tube cover
6. Tighten the two upper screws (34 Nm)
7.1
7.2
7.2
7.5
7.6
7.3
1. Slide on the support tube cover
2. Establish plug connection. Observe the
polarity of the plug.
Prepare set up
6
Position power cable so there is no strain
on it. Ensure that the cable is not pinched.
!
6.1
6.2
1. Place top disc in position
2. Screw on top
Mount parasol top
5
5.1
5.2
3
Prepare ground fastening
Place the ground sleeve according to the
separate instructions. Observe weights for
base and wind resistance. Note the nal
alignment of the parasol (NB notch)!
!
 Loading...