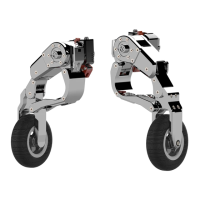
The GLK FLEX GEAR is a motorcycle landing system designed to enhance stability and ease of use for riders, particularly with large motorcycles. This user manual, version 3.0, provides comprehensive instructions for installation, operation, and maintenance of the GLX-FC209 model.
Function Description
The primary function of the FLEX GEAR is to provide additional stability to a motorcycle, allowing it to stand comfortably when stopped without requiring the rider to support it with both legs. This is particularly beneficial in urban environments with frequent stops at intersections or in congested traffic, where repeated stopping can lead to rider fatigue. The system also aids in preventing falls during low-speed maneuvers, such as turning or making U-turns in narrow alleys, by maintaining the motorcycle's balance. It simplifies moving heavy bikes in parking lots or garages, reducing the risk of accidents. Furthermore, it helps prevent slipping on slick surfaces like those found at gas stations or underground parking lots. For passengers, the FLEX GEAR minimizes shaking when the motorcycle is stopped, enhancing comfort.
The system operates through a manual switch, which prevents unintentional movement of the FLEX GEAR while the motorcycle is in motion. When the green button on the switch is pressed, the FLEX GEAR lifts, taking approximately 2 seconds to complete the action. Conversely, pressing the red button causes the FLEX GEAR to descend. If no button is pressed, the FLEX GEAR remains stationary.
The control box, equipped with LED sensors, indicates the operating status of the FLEX GEAR. These LEDs provide visual feedback on whether the left or right FLEX GEAR is lifting, landing, or has completed its action. A power LED also indicates the system's overall power status. If an LED sensor does not light up, it signals a potential connection issue with the corresponding cable.
The FLEX GEAR's landing and lifting positions are controlled by limit sensors. Pushing the landing limit sensor into the motorcycle unfolds the FLEX GEAR further, while pulling it outward reduces its unfolding. Similarly, pushing the lifting limit sensor into the motorcycle folds the FLEX GEAR more, and pulling it outward reduces its folding. This allows for precise adjustment of the system's deployment.
An auto fuse, or circuit breaker, is integrated to prevent motor overload. If the auto fuse protrudes by about 10mm, it indicates an overload. After 10 seconds, it can be pressed back to its original position to reset. If the auto fuse protrudes, the FLEX GEAR will not function.
The installation height of the FLEX GEAR can be adjusted using bolts on the sliding bracket. Tightening these bolts raises the FLEX GEAR position, while unscrewing them lowers it. This allows riders to customize the system's height to ensure both FLEX GEAR wheels touch the ground when the rider is on the motorcycle and the system is lowered.
Shock absorption is incorporated through cushioning rubber located at the connection point between the main housing and the middle frame. This design minimizes external shocks from the road, contributing to a smoother ride and increased durability.
In cases where the FLEX GEAR does not work, a manual operation function is available. Using a minus screwdriver, the FLEX GEAR can be manually manipulated: turning clockwise lifts the right FLEX GEAR, and turning counterclockwise lands it.
Important Technical Specifications
- Model: GLX-FC209
- Power Requirement: Motorcycle battery at 12-15V.
- Operation Time: Less than 2 seconds for full lift or land.
- Control System: LED-indicated control box.
- Safety Features: Auto fuse for motor overload protection, manual switch for controlled operation.
- Bracket Components: Sliding bracket, middle bracket, mount bracket, and various bolts (M8, M10, M6) with specific lengths and head types (hex socket, headless, hairless wrench, round head) and nuts (M8, 3/8 inch). Spring washers and bracket covers are also included.
- Compatibility: Brackets are model-specific, with variations for Goldwing 1800 (after 2018y, before 2017y), Goldwing 1500, Harley Davidson, BMW K1600, Indian, and Kawasaki VN1700 Voyager. Bolt dimensions and bracket modeling are subject to change due to design or modeling modifications.
Usage Features
The FLEX GEAR significantly improves the riding experience for large motorcycle owners.
- Comfortable Stops: Riders can stand comfortably on their motorcycle without needing to put their feet down, reducing effort during frequent stops.
- Ease in Congestion: Navigating congested traffic becomes less fatiguing as the system handles repeated stops.
- Enhanced Low-Speed Maneuverability: Prevents falls during turns, U-turns, and slow-speed riding in narrow spaces.
- Simplified Parking: Moving the motorcycle in parking lots or garages is easier and safer.
- Reduced Slipping Risk: Provides stability on slippery surfaces like those at gas stations or underground parking.
- Passenger Comfort: Minimizes motorcycle shaking when stopped, enhancing passenger comfort.
- Installation Flexibility: Brackets are designed for specific motorcycle models, ensuring a secure fit. The manual provides detailed steps for installing the brackets and the FLEX GEAR unit itself.
- Adjustable Height: The FLEX GEAR's height can be adjusted to ensure optimal ground contact when deployed, accommodating different rider preferences and motorcycle setups.
Cautions for Use:
- Mastery Required: Riders must practice using the FLEX GEAR to become proficient.
- Pre-Practice: During initial practice, riders should keep their legs on the ground before operating the FLEX GEAR.
- Departure Check: Always confirm that the FLEX GEAR is fully lifted before departing.
- Speed Limit: Do not use the FLEX GEAR while driving at high speeds (recommended for use under 20km/h).
- Safety Equipment: Always wear safety equipment, including a helmet, when riding.
- Stopped Operation: Operate the FLEX GEAR only when the motorcycle is completely stopped to avoid changes in driving direction or mechanical failure.
- Parking: Avoid using the FLEX GEAR for extended parking, as it can apply continuous load and shorten product life.
- Slopes and Poor Roads: Do not use on slopes or in poor road conditions (unpaved roads, speed bumps) to prevent damage.
- Landing Safety: Do not land your legs on the ground while the FLEX GEAR is landing, as it can shift the motorcycle's center of gravity and cause accidents.
- Avoid Obstructions: Do not insert fingers or foreign objects into the working area of the FLEX GEAR.
- Water Exposure: As the product contains electronic components, avoid water and moisture.
Maintenance Features
The manual provides troubleshooting steps for common issues:
- Single FLEX GEAR Malfunction:
- Auto Fuse Check: Verify if the auto fuse (circuit breaker) is protruding.
- Manual Operation Check: Attempt to manually operate the FLEX GEAR using a flat-head screwdriver to determine if the motor is functional.
- Cable Check: Inspect the cable connected to the bottom of the FLEX GEAR for disconnections.
- Control Box LED Check: Observe the control box LEDs for normal display of operation status.
- Cross Test: Swap the left and right FLEX GEAR cables at the control box to identify if the issue lies with the control box or the FLEX GEAR unit/limit sensor. If the opposite FLEX GEAR fails after swapping, the control box may be faulty. If the original faulty FLEX GEAR still doesn't work, the PCB or limit sensor might need replacement.
- Both FLEX GEARs Malfunction:
- Power Cable Check: Inspect the yellow power cable for disconnections.
- Control Box LED Check: Verify if the red LED on the control box is displayed when the motorcycle is turned on.
- Switch Check: Press the switch button and check if the green or yellow LED on the control box is displayed.
The manual also emphasizes the importance of maintaining the motorcycle battery at 12-15V for optimal FLEX GEAR performance.
Warranty and Conditions:
- Warranty Period: One year from the date of product delivery.
- Coverage: Covers defects in production, assembly, or defective parts.
- Repair: Defects within the warranty period are repaired without charge.
- Exchange: Product exchange is possible if it fails more than 6 times within the warranty period.
- Voided Warranty: Warranty is void if defects are due to misuse, unauthorized repairs, improper voltage, transit damage beyond GLK's responsibility, cosmetic damage, use with unauthorized accessories, or natural disasters.
- Warranty Card: The warranty card must be kept and presented for service. It must include the item name, date, and serial number, and be completed, signed, and stamped by GLK or the retailer.