2
SAFETY PRECAUTIONS
- hands-free audio terminal with simplified installation (non-polarised 2 wire bus).ART1
- Up to 4 terminals/monitors per apartment (master, slave 1, slave 2 and slave 3).ART1
- Up to32 apartments/ART1 terminals in mixed installations with monitors .(EL632G2+ SE module)
- Up to 128 apartments/ terminals per installationART1 (EL6 2 G2 sound module required).4 +
- Completely private conversation.
- Call reception volume control: min, med, max and off (do not disturb).
-Audio volume control during communication process (4 different levels).
- nput for calls from door."HZ" i apartment front
.
- Output to auxiliary call repeater (maximum 50mA/12Vdc)..
- ifferent ringtones to identify the origin of the call (door panel, intercom orUp to 6 d , guard monitor
front door of the apartment).
- Button for starting/stopping communication. In standby: 2 short press to "intercom" calls (within
the same apartment)and press for 3 seconds to "autoswitch-on" function.
- Button for lock release 1 activation.In standby: activate/ deactivate "Doctor mode"
- Button for lock release 2 activation/ staircase light activation (SAR-G2 SAR-12/24 modules required).+ &
- Button for tone call volume control, "do not distrurb" mode/ configuring ringtones/ communication call
volume control(ART 1 speaker) & in case of call forwarding, cancel call transfer (withART 7Wmonitor).
- Button for guardmonitor calls (if exist).
- DIP switches for setting the terminal's address (call code), master/slave and end of line.
-
Always disconnect the power supply before making modifications to the device.
- The fitting and handling of these devices must be carried out by .authorised personnel
- The wiring must run at least 40 cm away from any other wiring.
- Do not overtighten the screws on the connector.
- Install the terminal in a dry protected location free from the risk of dripping or splashing water.ART 1
- Do not place in humid, dusty or smoky locations, or near sources of heat.
- Before connecting the device to the mains, check the connections between the door panel, power
supply and Nhea terminals.
-Always follow the instructions contained in this manual.
CHARACTERISTICS
SYSTEM OPERATION
- To make a call, the visitor needs to press the button for the apartment, an audible tone indicates
that the call is being made and LED on the door panel illuminates. If vocal synthesis is enabled,
a 'Call is in progress' message appears indicating that a call is being made. At this moment, the
apartment's terminal(s) receives the call. If another apartment is called by mistake, press the
button for the correct apartment and the first call will be cancelled.
- Upon receiving the call, the push button LED of the terminal(s) will blink white. If the call is not
answered within 40 seconds, LED will turn off and the channel will be freed.
- Door panel LEDTo establish communication, press button on any terminal in the apartment.
will turn off and the led turn onwill .
-
Communication will last for one and a half minutes or until button is pressed again. When
communication has finished, LED will turn off and the channel will be freed. If vocaldoor panel
synthesis is , a 'Communication is finished' message will indicate that the call is over.enabled
- To open the door, press button (if it exists and, to open the second door, press button )
during the call or communication processes: one press activates the lock release for seconds3
and LED on the door panel will also illuminate for seconds. If vocal synthesis is enabled, a3
'Door en' message will be indicated on the door panel.is op
- Description of the function buttons can be found on p. 3.
*
( )
*
( )
3
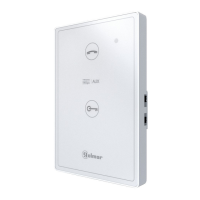
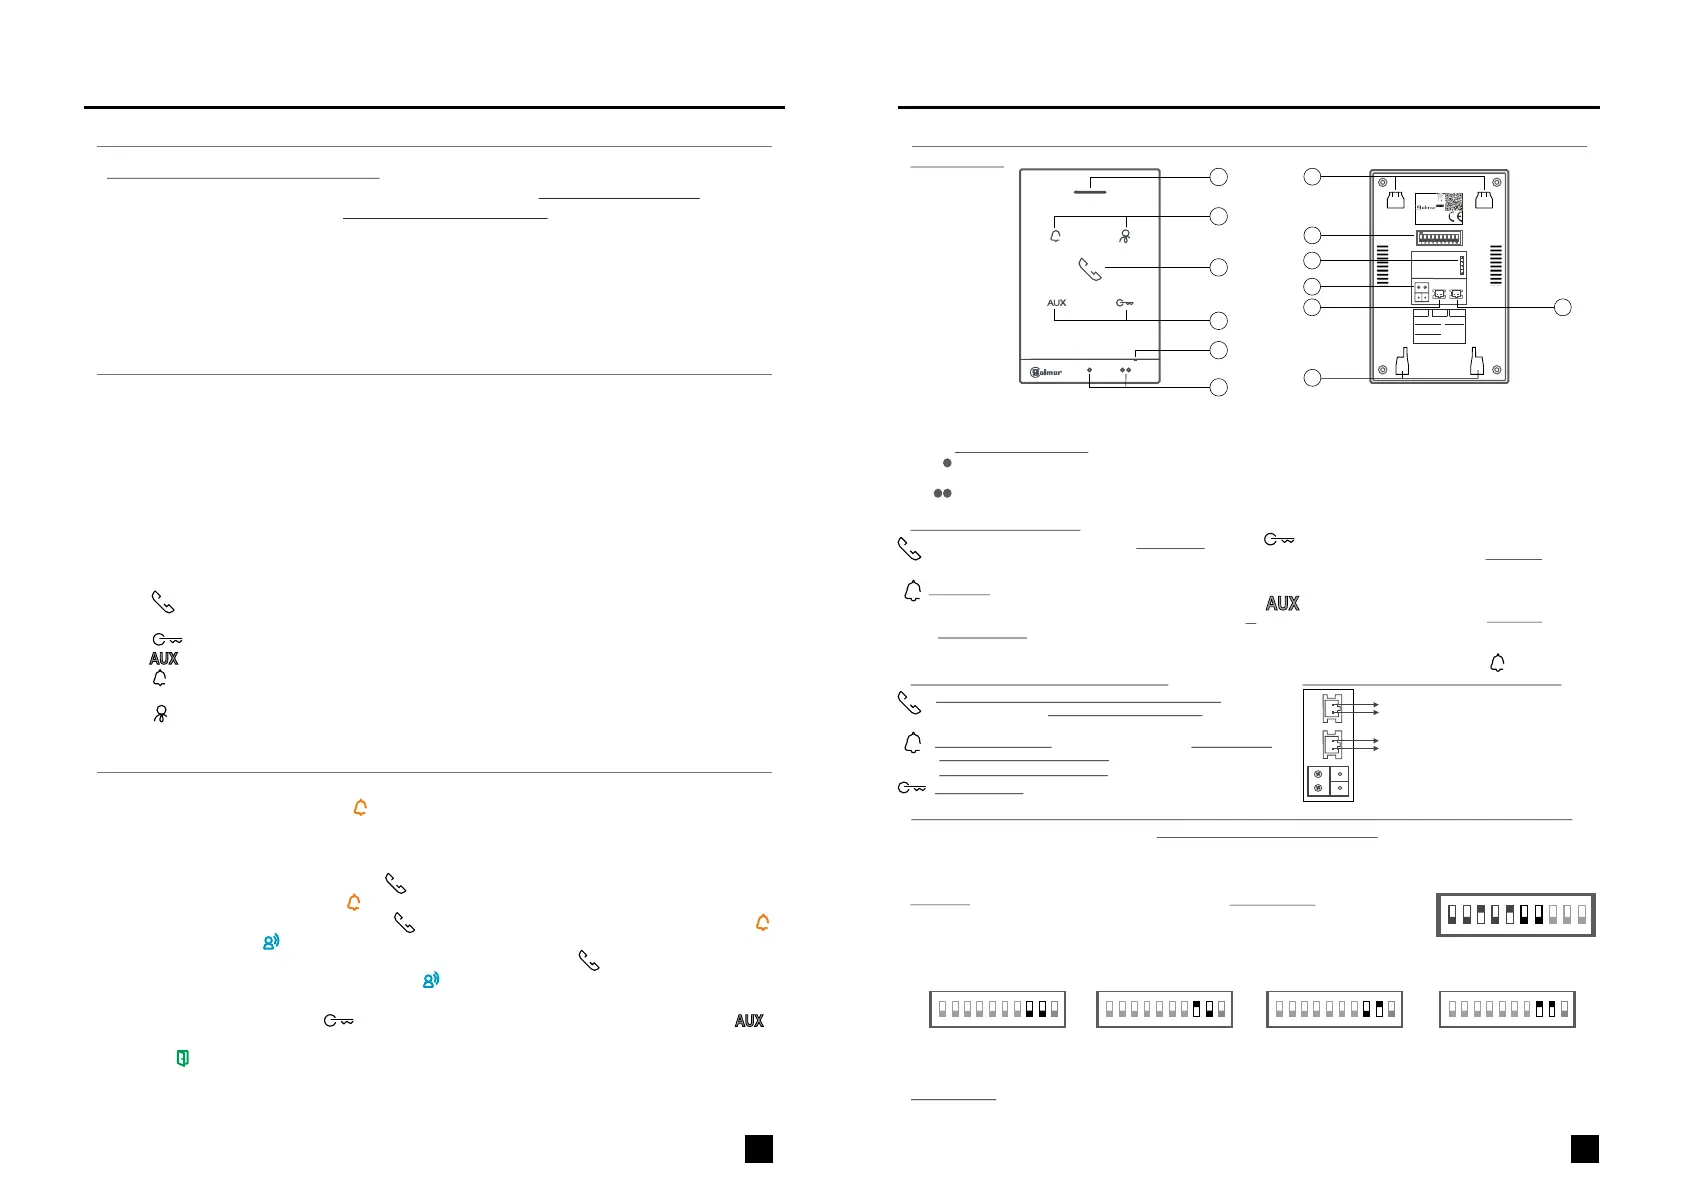
DESCRIPTION OF THE TERMINAL
*
( )
*
( )
Description of the DIP switch and conf guration of the terminal address (code):i ART 1/G2+
*
( )
Description:
ENEN
ART 1/G2+ HANDS-FREE AUDIO TERMINAL ART 1/G2+ HANDS-FREE AUDIO TERMINAL
For more information, see T user manual (code 5012 29)." ART 1/G2+" 25
https://doc.golmar.es/search/manual/5012 2925
For more information, see T user manual (code 5012 29)." ART 1/G2+" 25
https://doc.golmar.es/search/manual/5012 2925
Building / Villa (Nexa Door Panel)
Dip1 Dip :- 7 Note:Sets the address (addresses to ).terminals 1 128 Mixedinstallations with monitors (addresses 1 to 32).
The switches set to OFF have a zero value. The values of the switches set to ON are shown in the table below. The
terminal code is the sum of the values of the switches set to ON.
.
Dip -Dip :8 9 terminal only terminalThese define whether the is master or slave. Eachapartment musthave one master .
.
Master Slave 1 Slave 2 Slave 3
.
.Dip :10 Configures the end of line. In installations with terminals only, it must always be in the OFF position. In
mixed installations of monitors with terminals in the same apartment, set to ON for the terminals inART 1/G2+
which the BUS cable ends and leave in the OFF position for intermediate terminals.
.
IMPORTANT: ART 1/G2+ terminal in , see corresponding Kit Soul userVilla installation with SOUL door panel
manual for Kit features as maximum number of apartments and monitors/ART1 G2+ terminals.
Table of values
Important:
Apartment 1 (Dip1 to ON & Dip2-Dip7 to OFF).
Apartment 128 (Dip1-Dip7 to OFF).
1 2 3
ON
Example: 0+ 0+4+0+16 0+0+ = 20
Switch number: 1 2 3 4 5 6 7
Value when ON 1 2 4 8 16: 32 64
4 5 6 7 8 9 10
1 2 3
ON
4 5 6 7 8 9 10 1 2 3
ON
4 5 6 7 8 9 10 1 2 3
ON
4 5 6 7 8 9 10 1 2 3
ON
4 5 6 7 8 9 10
DIP 8,9
00 - Master
10 - Slave 1
OFF = 0 | ON = 1
01 - Slave 2
11 - Slave 3
DIP 1 to 7
Monitor address
DIP 10
End of line resistor
GND
BUS HZ
SA
GOLMAR S.A. C/ Silici, 13. 08940-SPAIN
ART 1/G2+
12210140
V03
MADE IN CHINA
WARNING TO PREVENT
FIRE OR ELECTRIC SHOCK,
DON’T EXPOSE THIS DEVICE
TO RAIN OR MOISTURE
g
i
a.
b.
c.
Speaker.
Function push buttons.
Raised dots for the visually impaired people.
In call :/communication
Above this raised dot is the 'Start/ nd communication'E
button.
Above these raised dots is the 'Door opening' button.
f
Microphone.
Wall mounting connector fixing (x4)
Configuration switches.
Golmar use.
Bus connection terminals.
Apartment front door button input.
Auxiliary call repeateroutput (max. 50mA/12Vdc)
d.
e.
f.
g.
h.
i.
j.
b
b
a
d
c
e
h
e
AUX
b
j
Function push button:
Start/stop communication button. 2 shortIn standby:
press to "intercom" call (within the same apartment) and
pressfor 3 seconds to "autoswitch-on" function.
During the call or communication processes: one press
will activate the lock release 1 :. In standby press the
button for 5 sec. to activate/deactivate the "Doctor
mode" function.
In standby: short press, it allows to change tone call volume,
on every short press terminal reproduces the selected
volume (cyclic min/ med/ max/ off "do not disturb"). In
communication: on every short press, it allows to change
the speaker of the ART 1 audio volume (cyclic 4 audio
levels). Other settings see "TART 1/G2+ user manual.
HZ: ( )Black
Function push button status LED: Description connection terminals:
During the call or communication processes: one press
will activate the lock release 2 : press the. In standby
button for 3 sec. to activate the light thestaircase ( SAR-
G SAR-12/24 ).2+ & modules required 5 short press to
default tones& tones volume (led blink5 times).
*
( )
HZ: ( )Red
GND: (Black)
SA: (Red)
(Auxiliary call repeater
, max. 50mA/12Vdc).output
(Door bell connection).
BUS (non-polarised)connection .
*
( )
- : Led willDuring call door panel, guard or intercom process
blink (white color). : Led switchTerminal in communication
on (white color).
- : Led switch on (red color)."Do not disturb" mode Call forwarding
process (withART 7W monitor):Led blink(red color).
"Defaulttones& tones volume": Led blink 5 times(red color).
- Led switch on (red color)."Doctor mode":
*
( )
 Loading...