6
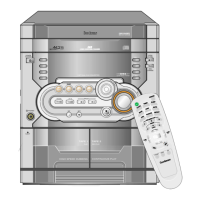
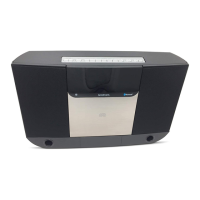
FEATURES AND CONTROLS
1. SPEAKER
2. CD DOOR
3. FM MODE (STEREO / MONO) BUTTON
4. DISPLAY / REMAIN BUTTON
5. MEMORY / C-ADJ. BUTTON
6. REPEAT / MEMORY UP BUTTON
7. TIMER / SLEEP BUTTON
8. TUNING / SKIP / SEARCH REV. BUTTON
9. TUNING / SKIP / SEARCH F.F. BUTTON
10. STOP / BAND BUTTON
11. VOLUME KNOB
12. PLAY / PAUSE BUTTON
13. CD DOOR (OPEN / CLOSE) BUTTON
14. PHONES SOCKET
15. IR SENSOR
16. POWER STANDBY / ON BUTTON
17. POWER STANDBY LED INDICATOR
18. CD FUNCTION SELECT BUTTON
19. LCD DISPLAY WINDOW
20. TUNER FUNCTION SELECT BUTTON
21. AUX FUNCTION SELECT BUTTON
22. PRESET EQ BUTTON
23. MUTE BUTTON
24. MEMORY BACK-UP BATTERY DOOR
25. UNIT STAND
26. AUX (LEFT & RIGHT) JACK
27. AM ANTENNA TERMINALS
28. FM ANTENNA
29. RESET BUTTON
30. SPEAKER TERMINALS
31. AC POWER SWITCH
32. AC CORD
REMOTE CONTROL
1. POWER / STANDBY BUTTON
2. PLAY / PAUSE BUTTON
3. TUNING / SKIP / SEARCH REW. BUTTON
4. TIMER BUTTON
5. SLEEP BUTTON
6. RANDOM BUTTON
7. MUTE BUTTON
8. VOLUME DOWN BUTTON
9. STOP / BAND BUTTON
10. TUNING / SKIP / SEARCH F.F. BUTTON
11. FUNCTION SELECT
(TUNER / AUX / CD) BUTTON
12. PRESET EQ BUTTON
13. REPEAT / MEMORY UP BUTTON
14. SNOOZE BUTTON
15. VOLUME UP BUTTON
16. BATTERY DOOR
PUTTING THE BATTERIES INTO
THE REMOTE CONTROL UNIT
Press down of the compartment cover, and slide
the cover off to open the compartment.
Place the two (UM3), (AA), (R6) batteries in the
remote control according to the polarity markings
("+" and "--') inside the compartment and on the
batteries.Place the cover over the compartment,
press down lightly, and push it upward until it
clips into place.
NOTE : Replace all batteries at the same time.
Remove the batteries if the remote control is
not in use for long periods. Do not mix normal
batteries with rechargeable batteries. When the
batteries become weak, the remote control will
not function, replace with new batteries if this
happens.
** BATTERIES NOT INCLUDED **