Fluidemittedunderhighpressurehomleaksorrupturedcompo
-
nents can penetrate the skin and cause extremely serious bodily
injury, inciudingthe need for amputation.
AIs0,fluid injected into
or splashed into the eyes can cause serious damage.
The
MMMUM
WORKiNG
PRESSURE
Of
your hose reel assem-
System Pressure
biy
is determined
by
the lowest
-
rated component in the assem
-
bly. The HOSE REEL MODEL charts on pages
4
to
6
give the
maximum working pressure of the assemblies listed there.
If
you
are adding a
sewice hose and dispensing valve to a bare hose
reel,
be
sure you know the maximum working pressure of all
components1
To reduce the risk of serious bodily injury, including fluid
Pressure
Rellef Procedure
from moving parts. always follow this procedure whenev-
injection. splashing in the eyes or
on
the skin, or injury
er you shut
off
the pump, and before inspecting, remov
-
ing, cleaning or repairing any part of the pump or system.
2.
Close the supply pump's bleed
-
type master air valve
1.
Close the supply pump's air regulator.
3.
Open the dispensing valve until pressure is fully
(required in pneumatic systems).
If
you suspect the dispensing valve, extension or grease
relieved.
fitting
coupier is dogged, or that pressure has not been
fully relieved after foiiowing
all the steps above, VERY
SLOWLY
lwsen the couoier or hose end CouDiina and
allow pressure to be relieved gradually, then
ibs&
the
part completely. Now clear the clog.
Do
not modify any part of the dispensing valve. Only use exten-
Dispensing Valve Safety
siansandgreasefittingcouplerswhicharedesignedforusewith
your dispensing valve. Modifying parts can cause a malfunction
and result in serious bodily injury.
Flexible Extension
Safety
extension you are using. Never exceed that pressure, even
if
Be
sure you knowthe maximum working pressure of the flexible
your dispensing valve
and/or pump
is
rated for higher working
pressures.
..
Never use a low pressure, flexible extension, designed for low
pressure dispensing valves or hand
-
powered lubricatingequip
ment,
on
a high
-
pressure dispensing valve.
Never attempt to force the lubricant into
a
fitting1
If
the lubricant
is not flowing, STOP DISPENSING IMMEDIATELY.
The
fitting
may be clogged. Forcing lubricant may cause excessive back
pressureintheflexibieextension,whichcouidcauseittoNpture
and result in serious bodily injury, including
fluid
injection and
eye injury.
Grease Fitting Coupler Safety
Use
extreme caution when cleaning or changing grease fitting
couplers.
if
the coupler clogs while dispensing, STOP
DIS
-
PENSING IMMEDIATELY.
Follow
the Pressure Relief Proce-
buildup around the coupler until pressure is fully relieved.
dure
,
at left. Then remove the coupler to clean it. Never wipe
off
General Safety
Check the operation of all equipment safety devices before each
use.
NEVER point the dispensing valve at anyone or any
parl
of
the
body.
NEVER put your hand or fingers over the grease fitting coupler.
NEVER alter or modify any part of this dispensing equipment;
doing
so
could cause
it
to malfunction.
CHECK
all dispensing equipment regularly. Repair or replace
worn or damaged parts immediately.
NEVER
try
to stop or deflect leaks
with
your hand or body,
Medical
Treatment
. . .
-
-.
-
-.
.
.
-
-
..
.
.
-. .
.
If
any fluid appears to penetrate your skin, get EMERGENCY
.
MEDICAL CARE AT ONCE.
DO
NOT TREAT AS A SIMPLE
CUT1
Tell
the doctor exactly what fluid was injected.
Note
to
Physician: injection into the skin is a traumatic
injuw
It
is important tolreat the injury surgically
as
soon
as
possl-
ble.DonotdeiaytreatmenttoresearchtoxicityToxicityisacon-
cern with some exotic coatings injected directlyinto the blood
stream. Consultation with a plastic surgeon or reconstructive
hand surgeon may be advisable.
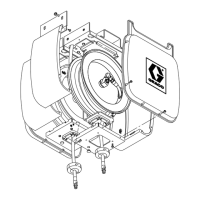
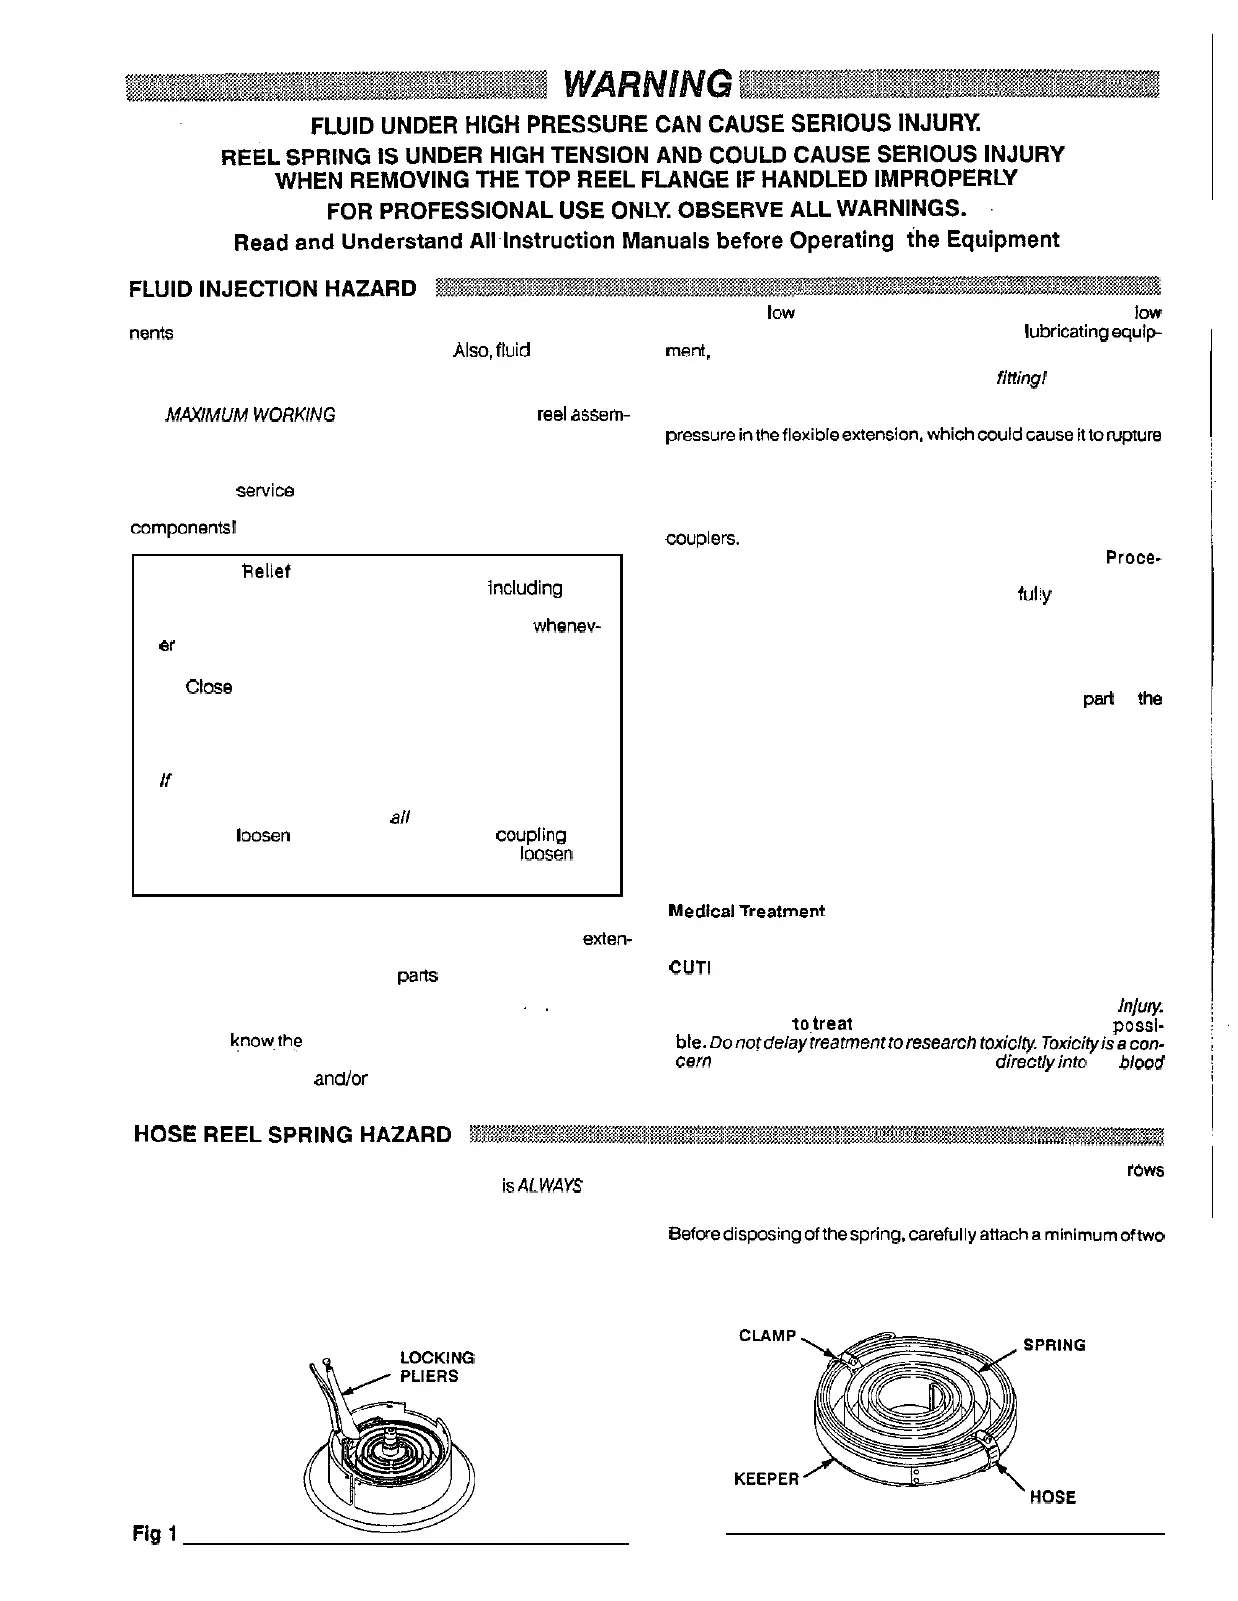
USE
EXTREME CAUTION WHEN HANDLING THE SPRING!
The spring, which is located behind the flange,
isALWAYS under
great tension and could be propelled from the lower flange
with
TO reduce the risk of serious bodily injury when replacing the
enough force to cause serious bodily injury.
spring, use extreme caution when removing the top reel flange.
flange to expose the spring.
Be sure the reel
is
laying flat, and then carefully lift
up
on
the
ALWAYS use locking pliers to compress and hold several
row
of the spring together when removing and when installing a
spring. See Fig
1.
Beforedisposingofthespring,carefullyanachaminimumoftwo
hose clamps around the keeper and spring bands as shown in
Fig
2.
HOSE
Fig
2
CLAMP
307
-
694
3
 Loading...