34
Grant Vortex Indoor/Utility, System and Boiler House Oil Boilers
2 Connect the flexible fuel hose to the rigid supply
using the adaptor supplied. The supply enters
through one of the holes in the casing plinth.
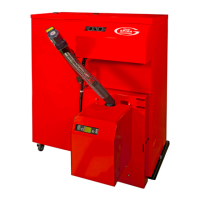
1 Automatic air vent(s) are fitted to the top of the boiler (see
Fig. 15). Check that the small cap on the top of each air vent
is screwed on fully, then unscrew it one complete turn - the
cap remains in this position from now on.
2 If the flexible filling loop is used to fill the system, ensure
it is connected and that the valve connecting it to the
boiler is open and the valve at the front is closed.
A valve is open when the operating lever is in line with
the valve, and closed when it is at right angles to it.
3 Ensure that the mains cold water supply valve is open
(operating lever in line with the valve), then turn on the
mains cold water supply and gradually open the front
valve on the filling loop until water is heard to flow.
4 Vent each radiator in turn, starting with the lowest
one in the system, to remove air.
5 It is important that the pump is properly vented to
avoid it running dry and damaging its bearings. To
gain access to the pump for venting it is necessary
to remove the control panel.
Loosen the four fixing screws securing the panel to the
casing, push the panel towards the rear of the boiler and
lower the control panel to expose the pump.
Remove the cap, then unscrew and remove the plug from the
centre of the pump. Using a suitable screwdriver rotate the
exposed spindle about one turn. Replace the plug and cap.
6 Check the operation of the safety valve by turning
the head anticlockwise until it clicks. The click is
the safety valve head lifting off its seat allowing
water to escape from the system.
Check that this is actually happening.
7 Continue to fill the system until the pressure gauge
indicates between 0.5 and 1.0 bar. Close the fill point
valve and check the system for water soundness,
rectifying where necessary. Water may be released
from the system by manually operating the safety
valve until the system design pressure is obtained.
8 The system design pressure (cold) should be between 0.5
bar and 1.0 bar. The pressure is equivalent to the maximum
static head in bar + 0.3 (1 bar = 10.2 metres of water), where
the static head is the vertical height from the centre of the
expansion vessel to the highest point of the system.
9 Close the valves either side of the filling loop and
disconnect the loop.
Fill the sealed system
6.11
6 - BOILER INSTALLATION
The neutral (blue) wire from the burner supply
must be linked to the incoming neutral of the
switched mains supply using a single connector
(not supplied).
Do not connect the neutral wires to either of the
two thermostats.
5 Connect a link between terminal 2 on the overheat
thermostat and terminal C on the control thermostat.
6 There is no connection to terminal 1 on the
overheat thermostat or terminal 2 on the
control thermostat.
7 Position the support bushes so as not to strain the
connections when the cover is replaced.
Place the cover in position locating the bushes at
the same time.
Note: It may be necessary to rotate the thermostat
knob to engage it on the operating spindle as the
cover is replaced.
8 Secure the cover in position by tightening the three
screws. Refit the overheat thermostat reset cap. Tighten
the cable support bush nuts to secure the cables.
9 Ensure all external wiring is adequately supported.
Do not switch on the electricity supply at this stage.
Indoor/Utility and System models are supplied with
the burner fitted. Fit the burner to a Boiler House
model as follows:
1 Remove and retain the burner fixing nut from the stud
on the burner mounting flange on the front of the
boiler, see Fig. 22. Leave the small nut in position
(ensure it is located up against the mounting flange).
Note: Do not remove the mounting flange from the boiler.
2 Check that the 'O' ring is in position (around the collar
of the burner combustion head). Position the burner
on the boiler by sliding the combustion head into the
mounting flange on the boiler. With the burner level
and correctly located over the fixing stud, secure it in
position using the nut previously removed.
3 Balanced flue - Fit the air tube over the air tube spigot
and secure in position using the clamp supplied.
See Fig. 7
If a two pipe system is to be used refer to Section 4.4.6.
1 Remove the oil inlet plug from the fuel pump and
connect the elbow of the flexible fuel hose supplied
with the boiler.
Fit the burner
6.9
Connect the fuel supply
6.10
 Loading...