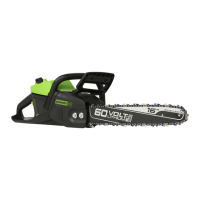
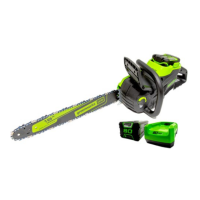
This document describes the Greenworks Pro CS60L810 chainsaw, a 60V DC battery-operated chainsaw designed for cutting branches, trunks, logs, and beams of a diameter determined by the cutting length of the guide bar. It is intended solely for cutting wood in outdoor, domestic applications by adults.
Important Technical Specifications:
- Voltage: 60 V DC
- No load speed: 25 m/s
- Guide bar length: 20" (508 mm)
- Chain pitch: 0.325" (8.25 mm)
- Chain gauge: .050" (1.27 mm)
- Drive links: 78
- Chain oil capacity: 250 ml
- Weight (without battery pack): 12.4 lbs. (5.6 kg)
- Chain: 20LPX078X/95TXL078X
- Guide bar: 200PXBK041/200MLBKO41
- Battery model: 60BA08 and other BAC series
- Charger model: CAC801/CH60R00/CH60DP01/60DPC10A and other CAC series
- Recommended ambient temperature range:
- Appliance storage temperature range: 32°F (0°C) - 113°F (45°C)
- Appliance operation temperature range: 32°F (0°C) - 113°F (45°C)
- Battery charging temperature range: 39°F (4°C) - 104°F (40°C)
- Charger operation temperature range: 39°F (4°C) - 104°F (40°C)
- Battery storage temperature range: 32°F (0°C) - 113°F (45°C)
- Battery discharging temperature range: 32°F (0°C) - 113°F (45°C)
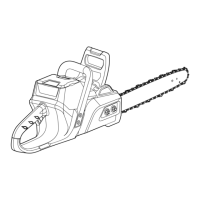
Usage Features:
The chainsaw is equipped with a scabbard, chain brake, front handle, lock out button, trigger, oil cap, oil window, bucking spikes, chain, guide bar, wrench, rear handle, chain tension screw, chain cover, and chain cover nuts.
Safety Warnings:
- Always read and understand all safety warnings, instructions, illustrations, and specifications provided with the power tool to prevent electric shock, fire, and serious injury.
- Keep the work area clean and well lit.
- Do not operate power tools in explosive atmospheres.
- Keep children and bystanders away.
- Ensure power tool plugs match the outlet and avoid body contact with earthed or grounded surfaces.
- Do not expose power tools to rain or wet conditions.
- Use personal protective equipment, including eye protection, dust mask, non-skid safety shoes, hard hat, or hearing protection.
- Prevent unintentional starting by ensuring the switch is in the off-position before connecting to power source/battery pack.
- Remove any adjusting key or wrench before turning the power tool on.
- Do not overreach.
- Maintain proper footing and balance.
- Do not wear loose clothing or jewelry.
- If devices are provided for the connection of dust extraction and collection facilities, ensure these are connected and properly used.
- Do not force the power tool.
- Ensure the switch is off and the battery pack is removed before clearing jammed material, storing, or servicing the chain saw.
- Only use replacement guide bars and saw chains specified by the manufacturer.
- Follow manufacturer's sharpening and maintenance instructions for the saw chain.
- Always hold the chain saw with your right hand on the rear handle and your left hand at the front handle.
- Hold the chain saw by insulated gripping surfaces only.
- Do not operate a chain saw on a ladder, from a rooftop, or any unstable support.
- Be alert for spring back when cutting a limb under tension.
- Use extreme caution when cutting brush and saplings.
- Carry the chain saw by the front handle with the chainsaw switched off and away from your body, and always fit the guide bar cover when transporting or storing.
- Cut wood only; do not use the chain saw for purposes not intended.
- Do not attempt to fell a tree until you understand the risks and how to avoid them.
- Do not operate a chain saw in a tree unless specifically trained.
- This appliance is not intended for use by children or persons with reduced physical, sensory or mental capabilities or lack of experience or knowledge, unless they have been given supervision or instruction.
Kickback Prevention:
Kickback can occur when the nose or tip of the guide bar touches an object or when the wood closes in and pinches the saw chain. To prevent kickback:
- Maintain a firm grip with both hands, thumbs and fingers encircling the handles.
- Position your body and arm to resist kickback forces.
- Do not overreach and do not cut above shoulder height.
Battery Disposal:
The batteries used in this machine contain Lithium-ion, a toxic and corrosive material. Discard all toxic materials in a specified manner to prevent environmental contamination. Contact your local waste disposal agency or the local Environmental Protection Agency for information and specific instructions. Take batteries to a local recycling and/or disposal center certified for lithium-ion disposal. Do not charge or use damaged batteries, do not open, do not dispose of with normal household waste, and do not incinerate.
Installation:
- Unpack the machine, ensuring all parts are present and undamaged.
- Add bar and chain oil to the oil tank, monitoring the oil window to prevent dirt ingress. The oil tank will last for approximately 20-40 minutes. Use only clean, new bar and chain oil.
- Assemble the guide bar and chain:
- Switch off the chainsaw and engage the chain brake.
- Remove the battery.
- Remove the chain cover nuts with the wrench and remove the chain cover.
- Ensure the chain is put on in the correct direction (cutters facing forward).
- Put the chain drive links into the bar groove.
- Put the chain cutters in the direction of chain operation.
- Position the chain so the loop is behind the guide bar.
- Hold the chain and bar.
- Put the chain loop around the sprocket.
- Ensure the chain tension pin hole on the guide bar fits correctly with the bolt.
- Install the chain cover.
- Tighten the chain (refer to chain tension adjustment).
- Tighten the nuts when the chain is correctly tensioned.
- Install the battery pack:
- Align the ribs on the battery pack with the grooves in the battery compartment.
- Push the battery pack into the compartment until it locks into place with a click.
- Remove the battery pack by pushing and holding the battery release button and pulling the battery pack from the machine.
Operation:
- Hold the machine: Grip area is within 100 mm behind the lock out button. Hold the chainsaw with your right hand on the rear handle and left hand on the front handle, thumbs and fingers around them. Ensure your left hand holds the front handle and your thumb is below the handle.
- Operate the chain brake:
- Start the machine.
- Push the guard forward to engage the chain brake.
- Pull the handle guard/chain brake backwards to disengage the chain brake.
- If the chain brake does not stop the chain immediately or does not stay in the disengaged position without aid, call an approved service center for repair.
- Start the machine:
- Press the on/off switch.
- Press the lock-out button.
- Press the trigger while holding the lock-out button.
- Release the lock-out button.
- The chain brake must be disengaged for the chain saw to start.
- The unit will stay on for 2 minutes after pressing the on/off switch; turn it off if not used immediately.
- Stop the machine: Release the trigger.
- Adjust the oiler: Find the adjustment screw at the bottom of the machine. Turn clockwise to increase oil amount, counterclockwise to decrease.
- Fell a tree:
- Ensure the minimum distance between bucking and felling areas is two times the height of the tree felled.
- Ensure the operation does not cause injury, hit utility lines, or cause property losses.
- Ensure the user is not in the danger area and escape paths are clear.
- Control felling direction by natural lean, larger branches, and wind direction.
- Ensure no dirt, stones, loose bark, nails, or staples on the tree.
- Make a lower level notching cut (1/3 width of diameter, perpendicular to felling direction) to prevent pinching.
- Make the felling cut (no less than 2 in. (50 mm) or higher than the notching cut, parallel to notching cut, leaving a hinge of 2 in. (50 mm) or 1/10 diameter).
- If the tree falls incorrectly or pinches the bar, stop the felling cut.
- Use a felling wedge to open the cut and let the tree fall.
- When the tree starts to fall, remove the chainsaw, stop the machine, leave it, and move away through escape paths, observing the tree's fall.
- Limb a tree: Remove branches from a fallen tree.
- Keep larger lower branches to hold the log off the ground.
- Remove small limbs in one cut.
- Limb branches with tension from the bottom up.
- Keep larger lower branches as support until the rest of the trunk is limbed.
- Buck a log: Cut a log into lengths.
- Do not let the chainsaw touch the ground.
- Maintain proper footing and balance.
- When the log is held along its full length, cut it from the top.
- When the log is held on one end, cut the first 1/3 of the diameter from the bottom, then the second time from the top.
- When the log is held on two ends, cut the first 1/3 of the diameter from the top, then the second time lower 2/3 from the bottom.
- When the log is on an uphill slope, stand on the uphill side, control the chainsaw completely, hold handles tightly, and release cutting pressure near the end of the cut.
- When bucking is complete, wait for the chain to stop, ensure the chainsaw is turned off, and check for hazards before moving to another tree.
Maintenance:
- Do not let brake fluids, gasoline, or petroleum-based materials touch plastic parts.
- Do not use strong solvents or detergents on plastic housing or components.
- Remove the battery pack from the machine before maintenance.
- Adjust the chain tension: The chain lengthens with use, so adjust it regularly. Tension the chain so it can just be pulled away from the bar at its center point. A correctly tensioned warm chain will hang approximately 1/16 in. (1.58 mm) out of the bar groove.
- Switch off the chainsaw and engage the chain brake.
- Remove the battery pack.
- Loosen the chain cover nuts with the wrench.
- Hold the bar nose up and turn the chain adjustment screw clockwise to increase tension, or counterclockwise to decrease tension.
- Pull the chain in the middle of the guide bar at the bottom away from the bar; the gap between the chain guide and the guide bar should be between 3 mm and 6 mm.
- When the chain is at the wanted tension, tighten the lock nuts.
- A slack chain may jump off and cause serious or fatal injury.
- Wear protective gloves when touching the chain, bar, or areas around them.
- Sharpen the cutters: Sharpen if the chain does not cut into wood easily. It is recommended that a service center with an electric sharpener perform this work.
- Tension the chain.
- Sharpen the cutters corner with a 5/32 in. (4 mm) diameter round file.
- Sharpen the top plate, side plate, and depth gauge with a flat file.
- File all cutters to specified angles and the same length.
- Replace the chain if the length of cutting edges is less than 1/5 in. (5 mm), there is too much space between drive links and rivets, or the cut speed is slow.
- Guide bar maintenance: Turn the bar over periodically for symmetrical wear.
- Lubricate the bearings on the nose sprocket (if present) with a syringe.
- Clean the bar groove with a scraping hook.
- Clean the lubrication holes.
- Remove burr from the edges and level the cutters with a flat file.
- Replace the bar if the groove does not fit with the height of the drive links, or the inside of the guide bar is worn and makes the chain lean to one side.
Transportation and Storage:
- Before moving the machine, always remove the battery pack, engage the chain brake, keep hands clear of the lock-out button, and put the scabbard on the guide bar and chain.
- Before storing the machine, always remove all residual oil from the machine, remove the battery pack, and clean all unwanted material.
- Store in an area not available to children and away from agents that can cause corrosion.