EasyManua.ls Logo

GreenWorks PS24B00 - User Manual

GreenWorks PS24B00
26 pages
Print Icon
To Next Page IconTo Next Page
Loading...
24V 8” POLESAW
Read all safety rules and instructions carefully before operating this tool.
Owner’s Manual
TOLL-FREE HELPLINE: 1-888-90WORKS
(888.909.6757)
www.greenworkstools.com
PS24B00

Other manuals for GreenWorks PS24B00

Questions and Answers

Summary

Product Specifications

Key Product Specifications

Details key specifications like voltage, bar length, chain pitch, and unit weight for the polesaw.

General Safety Rules

General Safety Precautions

Covers general safety guidelines for operating power tools, including environment and user conduct.

Polesaw Safety Rules

Polesaw Specific Safety Rules

Outlines safety rules specific to operating the polesaw, including body positioning and handling.

Symbols

Safety Symbols and Explanations

Explains various symbols used on the product and their meanings for safe operation.

Signal Words and Service

Signal Word Definitions

Defines signal words like DANGER, WARNING, and CAUTION to indicate risk levels.

Service Recommendations

Provides guidance on product servicing and when to contact authorized service centers.

Know Your Polesaw

Polesaw Component Identification

Familiarizes users with the parts of the polesaw and their locations through illustrations.

Assembly - Unpacking

Unpacking and Parts Inspection

Instructions for unpacking the product, checking contents, and inspecting for shipping damage.

Assembly - Fitting

Fitting and Extending the Polesaw

Steps for assembling the polesaw head and extending its reach using extension poles.

Assembly - Removal & Applications

Removing Saw Head and Applications

Procedure for detaching the saw head and listing the product's intended uses like limbing and pruning.

Operation - Lubrication

Adding Bar and Chain Lubricant

Guide on how to fill the oil reservoir for proper bar and chain lubrication before use.

Operation - Battery

Battery Pack Management

Instructions for removing, installing, and handling the battery pack for safe operation and charging.

Operation - Controls

Starting and Stopping the Motor

Details on how to safely start and stop the polesaw motor using the safety lock and trigger.

Operation - Cutting

Cutting Preparation and Basic Procedure

Guidance on preparing for cuts, proper grip, and basic procedures for cutting limbs safely.

Operation - Limbing

Limbing and Pruning Techniques

Specific techniques and precautions for limbing and pruning branches effectively and safely, including angles and branch removal.

Maintenance - General

General Maintenance Guidelines

Advice on general cleaning and care of the polesaw, avoiding damaging chemicals and using correct parts.

Maintenance - Chain Tension

Chain Tension Adjustment

Steps for checking and adjusting the chain tension for optimal cutting performance and safety.

Maintenance - Bar;Chain Replacement

Bar and Chain Replacement

Instructions on how to replace the guide bar and chain assembly on the polesaw.

Maintenance - Oiler

Chain Oiler Maintenance

Procedure for refilling the automatic chain oiler reservoir with lubricant.

Maintenance - Chain Care

Chain Maintenance and Sharpening

Information on identifying dull chains and maintaining them for efficient cutting.

Maintenance - Cutter Sharpening

How to Sharpen Cutters

Detailed steps for sharpening the saw chain cutters using appropriate tools and angles for optimal performance.

Environmentally Safe Battery Disposal

Battery Disposal Procedures

Guidelines for the safe and environmentally responsible disposal of lithium-ion battery packs.

Troubleshooting

Common Problems and Solutions

Lists common issues encountered with the polesaw and provides step-by-step solutions for troubleshooting.

Limited Warranty

Warranty Coverage and Service Information

Details warranty period, exclusions, helpline, and transportation charges for service and repairs.

Exploded View

Polesaw Parts Diagram

Illustrates the polesaw with numbered parts for easy identification and reference.

Parts List

Component Part Numbers and Descriptions

A detailed list of all polesaw parts with their respective part numbers and quantities.

Overview

This document is an owner's manual for the Greenworks 24V 8" Polesaw, model PS24B00. It provides comprehensive instructions for assembly, operation, and maintenance, along with crucial safety rules.

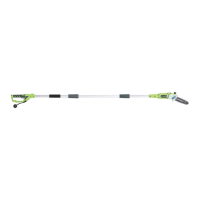
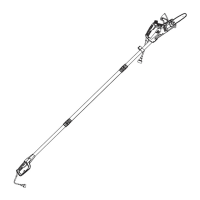
The polesaw is a cordless, battery-operated tool designed for limbing and pruning small branches and limbs up to 6 inches (15.2 cm) in diameter. Its primary function is to allow users to cut branches at a distance, enhancing safety by keeping the operator away from falling debris and high-reach cutting areas. The tool features an extension pole, enabling a maximum reach for overhead tasks. It is intended for personal use and not for industrial or commercial applications.

Usage Features:

Before operating the polesaw, users must ensure proper assembly. The saw head can be mounted directly onto the polesaw handle for a standard length, or an extension pole can be fitted between the handle and the saw head for maximum reach. Assembly involves inserting the polesaw handle into the saw head and sliding a collar upwards, then turning it clockwise until it is completely tightened. When using the extension pole, the same collar tightening procedure applies. To remove the saw head, the polesaw should be rested on the ground, the coupler loosened, and the saw head taken off.

The polesaw requires bar and chain lubricant before use, as it comes from the factory without oil. Users need to remove the oil cap, carefully pour bar and chain oil into the tank, and wipe off any excess. The oil level should be checked and refilled every 30 minutes of use. It's important to use only clean, undiluted bar and chain lubricant to prevent damage to the bar or chain. The manual notes that it's normal for oil to seep from the saw when not in use; to prevent this, the oil tank should be emptied after each use and the saw run for one minute. For long-term storage, the chain should be lightly lubricated to prevent rust.

The polesaw is powered by a Lithium-ion battery pack, which is not charged upon purchase and must be fully charged before first use. The battery pack is installed by aligning its tongue with the cavity in the handle and pushing it until it locks into place with a "click." To remove the battery, the latch button is pressed down while pulling the battery pack out. The manual emphasizes that the battery pack fits snugly and may require a strong pull. The battery pack is equipped with an internal circuit breaker that automatically shuts off power during overload and resets once cooled. If an overload occurs, the user should release the power switch, restart the tool, and if necessary, remove the battery for approximately one minute to cool before reinstallation.

To start the motor, the battery pack must be fitted, the small safety lock button pulled upward with the thumb, the safety lock button squeezed, and then the trigger squeezed. To stop the motor, the trigger is simply released.

For cutting, the manual provides a basic cutting procedure to prevent damage to tree bark. This involves making a shallow first cut (1/4 of limb diameter) on the underside of the limb, followed by a second cut from the top side outboard from the first cut until the limb separates. A final cut is then made close to the trunk. The front cutting guide should be held against the limb to steady it, and only light downward pressure should be exerted, allowing the chain to cut naturally. Forcing the cut can damage the bar, chain, or motor. If the bar and chain bind, the motor should be stopped, the battery removed, and the limb lifted if reachable to release the pinch. If the saw remains trapped, professional assistance is recommended.

When limbing and pruning, users are advised to plan cuts carefully, be aware of the branch's fall direction, and avoid standing directly under the branch. Long branches should be removed in several stages, starting with lower branches. The unit should be positioned at an angle of 60° or less. Users should work slowly, maintaining a firm grip with both hands, secure footing, and balance. Cutting from a ladder is strongly discouraged due to extreme danger. The polesaw should not be used for felling or bucking. To prevent electrocution, operation within 50 ft (15 m) of overhead electrical lines is prohibited, and bystanders should be kept at least 50 ft (15 m) away.

Maintenance Features:

Regular maintenance is crucial for the polesaw's performance and longevity. Users are warned to always wear safety goggles or glasses with side shields when operating or cleaning the tool, and a dust mask if operation is dusty. Before any inspection, cleaning, or servicing, the motor must be stopped, all moving parts must cease, and the battery must be removed to prevent accidental starting or injury.

General maintenance involves cleaning plastic parts with clean cloths to remove dirt, dust, oil, and grease, avoiding solvents that can damage plastic. All servicing beyond the instructions in the manual should be performed by competent polesaw service personnel.

Chain tension adjustment is a key maintenance task. The manual instructs users to switch off the machine and remove the battery, then wear protective gloves. The side cover lock nuts (1) should be untightened slightly. To increase tension, the chain tensioner adjustment screw (3) is turned clockwise; to reduce tension, it's turned counterclockwise. The chain tension is correct when the gap between the cutter and the bar is between 3mm-4mm when the chain is pulled downwards in the middle of the lower side of the bar. After adjustment, the side cover lock nuts are retightened. New chains tend to stretch, so frequent tension checks are necessary.

For bar and chain replacement, the battery must be removed, and protective gloves worn. The side cover lock nuts are unscrewed, and the side cover removed. The chain should be oriented correctly for rotation; if backwards, the loop must be turned over. The chain is then held in position on the bar, placed around the sprocket, ensuring correct mounting and that the bar hole fits with the chain tension bolt. The side cover is replaced, and the chain tension adjustment screw is turned clockwise until the chain is properly tensioned, pushing the guide bar upwards and rechecking tension. The chain should not be tensioned too tightly, as it will not rotate. After tensioning, the side cover lock nuts are tightened. New chains should be run-in for 2-3 minutes.

Chain maintenance is vital for smooth and fast cutting. Indicators for sharpening include small and powdery wood chips, the chain cutting to one side, or requiring force to cut wood. Improper filing angles can increase kickback risk, and incorrect depth gauge settings affect cutting ability. If cutter teeth hit hard objects, the chain should be sharpened by a service dealer.

To sharpen cutters, the chain tension should be tightened to prevent wobbling, and filing should occur at the midpoint of the bar. A round file and holder should be used, keeping the file level with the top plate of the tooth. Light but firm pressure should be applied towards the front corner of the tooth, lifting the file on each return stroke. A few firm strokes should be applied to every tooth, filing all left-hand cutters in one direction, then moving to the other side for right-hand cutters. Filings should be removed with a wire brush. The manual warns that dull or improperly sharpened chains can cause excessive motor speed and severe motor damage, and improper sharpening increases kickback risk.

Environmentally safe battery disposal is also covered. The Lithium-ion battery pack contains toxic and corrosive material. Users are instructed to contact their local waste disposal agency for information on disposal. Damaged or worn-out battery packs should not be recharged or used and must be disposed of at a certified recycling or disposal center. Terminals should be covered with heavy-duty adhesive tape, and users should not attempt to remove or destroy battery pack components, open the pack, or allow electrolytes to contact eyes or skin. Batteries should not be placed in regular household trash or incinerated.

GreenWorks PS24B00 Specifications

General IconGeneral
Battery Voltage24V
Automatic OilerYes
Power SourceBattery
Battery TypeLithium-ion
Battery IncludedYes
Charger IncludedYes
Bar Length8 inches

Related product manuals