WARNING
WAIT UNTIL THE MOTOR STOPS BEFORE
YOU REMOVE THE BATTERY.
6 MAINTENANCE
This section describes how to maintain the battery,
battery charger, and product.
WARNING
CAREFULLY READ AND UNDERSTAND
THE SAFETY CHAPTER AND OPERATION
INSTRUCTIONS BEFORE YOU DO ANY
MAINTENANCE WORK.
Before you do maintenance:
• Stop the product.
• Remove the battery.
• Allow the motor to cool.
• Use correct clothing, protective gloves, and safety
glasses.
6.1 EXAMINE THE BATTERY AND THE
BATTERY CHARGER
Carefully inspect the battery, battery charger, and
connection cord of the battery charger for any signs
of damage, such as cracks or broken parts. Replace if
necessary.
6.2 CLEAN THE PRODUCT, THE BATTERY,
AND THE BATTERY CHARGER
• Clean the product after each use with a moist cloth
and neutral detergent.
• Do not use strong detergents or solvents like "glass
cleaner" to clean the plastic parts or handles.
• Keep the trimmer head free from grass, leaves, or
excessive grease.
• Keep the air vents clean and free of debris to avoid
overheating and damage to the motor.
• Do not spray water on the motor and electrical
components.
• Clean the battery and battery charger with a dry
cloth. Keep the battery guide tracks clean.
• Prior to inserting the battery into the battery charger,
ensure that the terminals on both the battery and the
battery charger are clean.
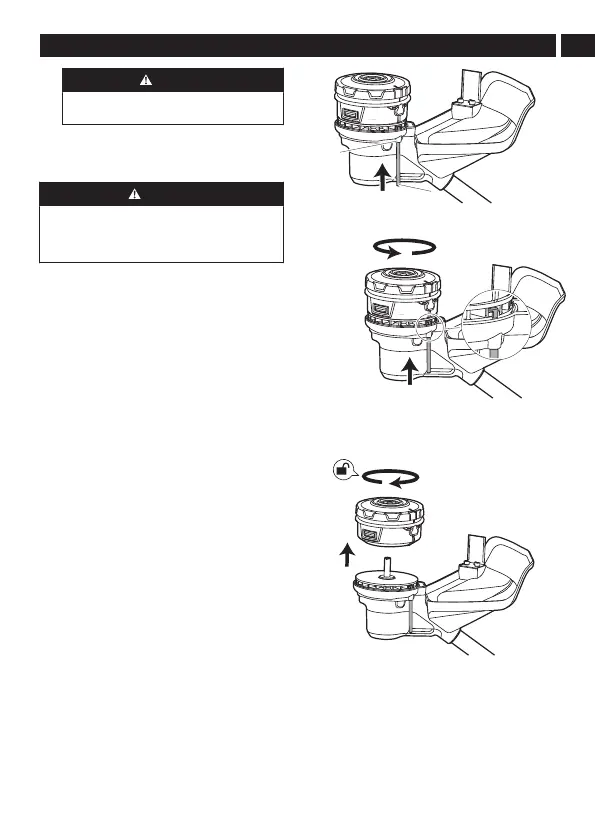
6.3 REMOVE THE TRIMMER HEAD
1. Insert the metal rod (1) into the locking hole (2),
and hold in place.
2. Rotate the trimmer head until the metal rod
blocks rotation of the trimmer head.
3. Turn the trimmer head clockwise to remove.
6.4 INSTALL THE TRIMMER HEAD
1. Insert the metal rod (1) into the locking hole (2),
and hold in place. Turn the center shaft (3) until
the metal rod blocks rotation of the shaft.
11
English
EN