Do you have a question about the Grizzly G8689 and is the answer not in the manual?
Discusses manual accuracy and provides contact details for service and inquiries.
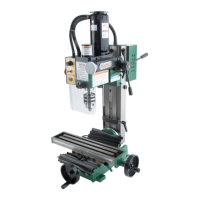
Explains the primary use and operational principles of the mini mill.
Details physical, shipping, electrical, and motor specifications for the machine.
Lists key operational parameters like spindle travel, table dimensions, and motor RPM.
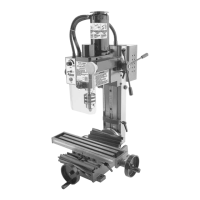
Identifies and labels all external components of the Model G8689 Mini Mill.
Provides critical safety instructions applicable to all machinery operation.
Explains the meaning and importance of safety symbols like DANGER, WARNING, CAUTION, and NOTICE.
Lists detailed safety instructions covering operation, environment, maintenance, and personal protection.
Offers safety guidelines tailored to the G8689 Mini Mill, including tool holding and cleanup.
Details requirements for connecting the machine to a 110V power supply.
Explains proper plug connection and guidelines for using extension cords safely.
Lists items needed for setup that are not included with the machine.
Guides on unpacking the mill and checking for shipping damage.
Instructions for inventorying all included machine parts after unpacking.
Provides a chart to match up hardware during the assembly process.
Covers cleaning procedures and advice on workspace and workbench selection.
Step-by-step instructions for securely bolting the mill to a workbench.
Simple instructions for attaching the handwheel handles to the machine.
Details the safe procedure for removing the drill chuck and arbor from the spindle.
Familiarizes the user with the control panel, power switches, and emergency stop.
Guides on performing the essential break-in procedure for the mill's moving parts.
Explains the correct sequence for safely shutting off power to the mill.
Details how to operate the rapid and micro downfeed controls for spindle height adjustment.
Instructions on how to set the limit block to control head travel depth.
Explains longitudinal and cross table travel and how to lock them in place.
Covers the use of graduated dials and how to correct for backlash in table movement.
Provides steps for adjusting the mill's column angle up to 45 degrees.
Detailed guide for inserting and removing MT#3 collets into the spindle taper.
Explains how to use cutting speed tables and formulas to set the correct RPM.
Lists cleaning degreasers and cutting/tapping fluids for machine maintenance.
Describes milling vises and precision blocks for workholding and setup.
Introduces ball end mill sets, test indicators, and protective sprays.
Features shop stands, face mills, collet sets, and rotary tables.
Outlines daily and monthly checks for optimal machine upkeep.
Provides instructions for cleaning and protecting unpainted cast iron surfaces.
Identifies key areas requiring regular lubrication with oil and grease for smooth operation.
Addresses common problems with their causes and solutions for the mini mill.
Explains how to adjust gibs to eliminate play and ensure smooth slide movement.
Provides steps for replacing worn carbon brushes in the DC motor.
Details the procedure for safely replacing the 5 Amp system fuse.
Warns against adjusting the high-tension counterbalance spring due to injury risk.
Identifies major electrical components like the PCB, transformer, and cooling fan.
Presents a schematic illustrating the machine's electrical connections and layout.
Lists all parts associated with the table assembly of the G8689 Mini Mill.
Lists all parts associated with the head assembly of the G8689 Mini Mill.
Lists all parts associated with the column assembly of the G8689 Mini Mill.
Collects customer details, purchase information, and feedback on product awareness and usage.
Outlines the 1-year warranty, its limitations, and exclusions.
Explains the process for contacting Grizzly and obtaining a return number for warranty service.
| Swing Over Bed | 8" |
|---|---|
| Distance Between Centers | 16" |
| Tailstock Taper | MT2 |
| Voltage | 110V |
| Spindle Taper | MT3 |
| Spindle Travel | 2 inches |