EasyManua.ls Logo

Grizzly G0857 User Manual

Grizzly G0857
65 pages
To Next Page IconTo Next Page
Page #1 background imageLoading...
Page #1 background image
READ THIS FIRST
For questions or help with this product contact Tech Support at (570) 546-9663 or techsupport@grizzly.com
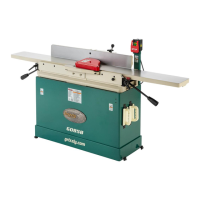
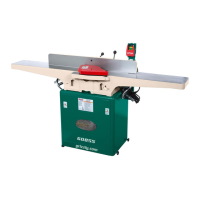
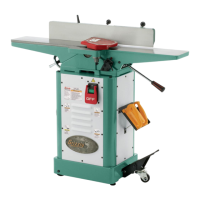
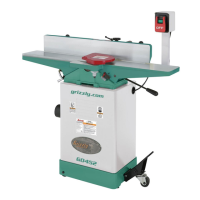
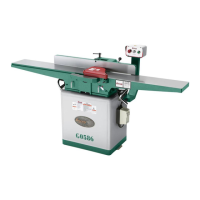
Model G0858
***IMPORTANT UPDATE***
For Machines Mfd. Since 07/19
and Owner's Manual Revised 06/19
COPYRIGHT © NOVEMBER, 2019 BY GRIZZLY INDUSTRIAL, INC.
WARNING: NO PORTION OF THIS MANUAL MAY BE REPRODUCED IN ANY SHAPE
OR FORM WITHOUT THE WRITTEN APPROVAL OF GRIZZLY INDUSTRIAL, INC.
#BL20773 PRINTED IN TAIWAN
The following changes were recently made since the owner's manual was printed:
Machine is shipped without blade guard installed.
Revised Assembly instructions on Page 21. The revised steps below replace existing Step 9.
IMPORTANT: YOU MUST INSTALL GUARD BEFORE OPERATING MACHINE THE FIRST TIME!
Aside from this information, all other content in the owner's manual applies and MUST be read and under-
stood for your own safety. IMPORTANT: Keep this update with the owner's manual for future reference.
For questions or help, contact our Tech Support at (570) 546-9663 or techsupport@grizzly.com.
Revised Assembly Steps
9. Set fence to 90° and move it all the way back.
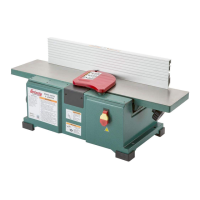
10.
Remove pre-installed button head cap screw
and fender washer from bottom of cutterhead
guard shaft; then loosen shaft lock and insert
shaft into mounting hole, positioned so guard
rests against fence (see Figure 14).
12.
Verify proper operation of cutterhead guard
by setting fence to 90°, moving fence to rear
of table, then pulling cutterhead guard back
and letting it go. It should spring back over
cutterhead and contact fence without drag-
ging across outfeed table.
I f cutterhead guard does not spring back
over cutterhead and contact fence, or if it
drags across outfeed table, then it must
be adjusted (refer to Checking/Adjusting
Cutterhead Guard on
Page 53 for
instructions).
The cutterhead guard is a critical safety
feature of this jointer. You MUST verify its
operation before using the jointer! Failure
to properly install this guard will greatly
increase risk of serious personal injury.
11. Position guard height as low as possible with-
out dragging on infeed table/rabbeting ledge
(approximately
1
16" above infeed table), tight-
en shaft lock to secure setting, then install
button head cap screw and fender washer.
Figure 14. Cutterhead guard components.
Cutterhead Guard
Fence
Shaft Lock

Questions and Answers:

Grizzly G0857 Specifications

General IconGeneral
Motor Power3 HP
WeightI don't know
Cutterhead speed5000 RPM
Number of knives3
Voltage220V
PhaseSingle-phase
Dust Port Size4 inches
Motor3 HP, 220V, single-phase
Maximum cutting width15 inches
Maximum cutting height6 inches
Feed rates16 and 20 FPM
Max Cutting Height at 90°6 inches
Knife size15" x 1" x 1/8"

Summary

Introduction to the Jointer

Contact Information and Manual Accuracy

Guidance on contacting Grizzly support and ensuring manual accuracy.

Model Differences: G0857 vs. G0858

Highlights the key distinctions between the two jointer models.

Machine Identification and Controls

Identifying Jointer Components

Visual guide to the parts and features of the jointer.

Overview of Controls and Operation

Explanation of the jointer's primary controls and their functions.

Machine Data Sheet

General Machine Specifications

Key specifications like dimensions, weight, and electrical requirements.

Detailed Component Specifications

Specifics on fence, cutterhead, knives, tables, and construction materials.

Safety Precautions

General Machinery Safety Instructions

Essential safety guidelines applicable to all machinery operations.

Jointer-Specific Safety Warnings

Critical safety advice tailored for safe jointer operation.

Power Supply and Electrical

Electrical Requirements and Circuit Setup

Details on voltage, amperage, and circuit needs for safe power connection.

Grounding and Extension Cord Guidelines

Proper grounding procedures and recommendations for using extension cords.

Setup and Assembly

Preparation for Setup and Unpacking

Items needed, unpacking process, and inventory check before assembly.

Assembling the Jointer

Step-by-step instructions for the physical assembly of the machine.

Post-Assembly Setup Procedures

Essential setup tasks including test runs, belt tensioning, and switch locking.

Jointer Operations

Operation Overview and Workflow

A general understanding of how to operate the jointer safely and effectively.

Stock Inspection and Preparation

Guidelines for selecting and preparing wood for accurate jointing.

Performing Core Jointer Operations

Instructions for squaring, planing, edge jointing, beveling, and rabbeting.

Setting Depth of Cut and Positive Stops

Adjusting the infeed table for precise depth of cut and using positive stops.

Maintenance and Cleaning

Routine Maintenance Schedule

Recommended ongoing and monthly maintenance tasks for optimal performance.

Cleaning and Protecting Machine Surfaces

Methods for cleaning and protecting unpainted cast iron and steel.

Lubrication Procedures for Moving Parts

Guidance on lubricating fence and carriage ways, and unlubricated bearings.

Service and Adjustments

Troubleshooting Common Jointer Issues

Identifying and resolving problems with motors, electrical systems, and operation.

Cutterhead Knife and Insert Service

Procedures for setting, replacing, or rotating jointer knives and inserts.

Table Alignment and Height Adjustments

Ensuring table parallelism and adjusting outfeed table height for accuracy.

Fence Stops and Depth Scale Calibration

Setting fence stops and calibrating the depth-of-cut scale.

Belt Tension and Pulley Alignment

Procedures for maintaining belt tension and aligning pulleys.

Cutterhead Guard Adjustment

Checking and adjusting the cutterhead guard for proper safety operation.

Wiring, Parts, and Labels

Electrical Wiring Safety and Diagrams

Safety instructions and wiring diagrams for electrical connections.

Parts Identification and Ordering

Lists and diagrams for identifying and ordering jointer parts.

Safety Labels and Machine Identification

Locations and descriptions of all safety and identification labels on the machine.

Warranty and Support

Warranty Claims and Return Process

Information on product warranty, making claims, and returning merchandise.

Contacting Grizzly Industrial for Support

How to get assistance, register your product, and contact customer service.

Related product manuals