English (GB)
12
8. Using the pump electronics
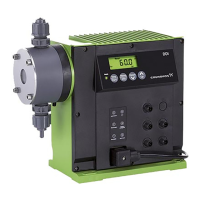
8.1 Control and display elements
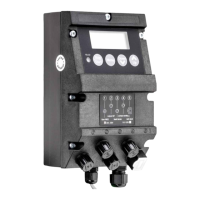
Fig. 10 Display of the AR control unit
8.2 Display test
A display test is performed when the pump is switched on. All the
segments of the display are switched on for 3 seconds and the
software version number is then displayed for 2 seconds.
8.3 Menu levels
Various menu levels are used in the electronics
• First function level: for selecting and setting the operating
modes of the pump (Manual, Contact, Analog) and starting the
pump.
• Second function level: for setting and viewing additional
functions and setting the access code to protect the pump
against unauthorised access to pump settings.
• Service level: for setting the inputs and outputs, thus
modifying the version of the AR control unit. It is possible to
revert to the default settings.
Saving user settings
The pump settings are automatically saved approximately every
10 minutes and remain as they are even after the power supply
has been switched off.
8.4 General functions of the electronics
8.4.1 Deaeration and suction
If the "Start/Stop" button is pressed for more than 1 second, the
pump switches to continuous operation for as long as the button
is held down (e.g. for suction or deaeration).
This happens regardless of the selected operating mode.
8.4.2 Locking "run"
The pump can be locked to avoid manual stopping.
When activating this function (service level), the pump starts
running with the present settings and cannot be stopped using
the "Start/Stop" button.
It is still possible to acknowledge error messages using the "Start/
Stop" button.
Stopping the pump when the locking "run" is activated
• If remote on/off is connected, use remote off.
• Disconnect the pump from the power supply.
8.4.3 Two-stage tank-empty signal
This function is used to provide a warning when the tank is almost
empty and to switch off the pump when the tank is empty. To use
the pre-empty signal, ensure that the suction line is equipped with
two float switches.
Pre-empty signal
The pre-empty signal can be an error signal or a pre-empty signal
at socket 3. For a pre-empty signal, relay 1 must be set to "Pre-
empty signal". See sections 7.2 Connection diagram for the AR
control unit and 8.8.1 Modifying the switch assignment.
When the contact of the corresponding float switch closes,
• The error signal relay or pre-empty signal relay switches on,
but the pump is not switched off.
• The LED flashes red.
• The empty-signal symbol flashes in the display.
Fig. 11 Display: pre-empty signal
Once the error has been corrected,
• The error signal relay or pre-empty relay switches off.
• The pump returns to the state it was in before the error
occurred.
Empty signal
When the contact of the corresponding float switch closes,
• The pump is switched off.
• The error signal relay switches on.
• The LED flashes red.
• The empty-signal symbol lights up in the display.
Fig. 12 Display: empty-signal symbol
Once the error has been corrected,
• The pump starts running again (if it was running before).
• The error signal relay switches off.
• The pump returns to the state it was in before the error
occurred.
See the installation and operating instructions for the
pump. This section only describes the additional
functions.
TM03 6257 4506
Element Description
Light-emitting diode (LED)
• Lights up red when the pump is stopped.
• Lights up green when the pump is started
and briefly turns off during a suction
stroke.
• Lights up yellow when the pump is
switched off remotely.
• Flashes red if an error signal is present.
• Turns off when the pump is in menu
mode.
"Start/Stop"
• Use this button to start or stop the pump.
• Error signals can be acknowledged by
pressing the "Start/Stop" button.
Use the "Menu/Info" button to switch
between the operating modes.
Use the "Down" and "Up" buttons to change
values in the display.
TM03 6356 4506TM03 6357 4506