5.2.3 Motor installation
Use vibration dampers.
The motor must be levelled. If there is a gap between the
foundation and the motor, use a spirit level, a feeler gauge and
shims to level the motor. Then secure the motor by means of
suitable screws depending on the foundation.
5.2.4 Direction of rotation
WARNING
Electric shock
Death or serious personal injury
‐ The electrical installation must be carried out by an
authorised person in accordance with local
regulations.
Connect the power supply, and check the direction of rotation. See
the section on electrical connections. The direction of rotation must
correspond to the direction under normal operation. See the
installation and operating instructions for the motor.
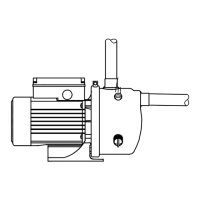
5.2.5 Lifting and handling the bare-shaft pump
Hoist the bare-shaft pump into place, and lower it down slowly.
TM059236
How to lift the pump
To make the pump fit the motor flange, fit the pump support foot
delivered with the product. Lower the pump until the support foot
reaches the floor.
5.2.6
Assembling the motor and the pump
When assembling the pump and the motor, make sure the
inlet pipe points up towards position 12 o'clock and the
drain holes point downwards. The spline couplings must
be aligned when the pump and the motor are joined and
the two parts must be connected gently and carefully.
If necessary, you can change the position of the inlet pipe later. See
the section on the positions of the inlet pipe.
TM060964
Position of inlet pipe (left) and drain holes (right). Note that BMS xl
has no drain holes.
Assemble the motor and the pump before you tighten the screws.
To ensure correct installation, follow this procedure.
1. Fit all four screws for motor and pump connection. Do not
tighten the screws yet.
TM059234
2. Adjust the gap by means of a feeler gauge or similar tool.
Tighten one screw by hand.
TM059232
3. Adjust the gap 180° opposite the screw you just tightened. Do
not tighten the screw. Move the pump to adjust the gap.
TM059351
4. Move the pump, and adjust the gap by means of the feeler
gauge. Tighten the screw by hand. If the inlet pipe has to be
turned, see the section on the position of the inlet pipe.
TM059345
5.
a. All pumps, excluding BMS hs 7-42: when the gap has been
adjusted, cross-tighten all screws to 33 Nm.
TM059346
b. BMS hs 7-42: tighten the M8 screw marked in the photo to 24
Nm and all other screws to 33 Nm.
TM077965
7
English (GB)
 Loading...