Trial Run & Blade Adjustment~
• Route power cord through the slot provided in Top
Assembly and plug into a standard grounded outlet.
The upper Adjustment Screw was factory set. Use the
following steps to make your own adjustment.
• While pressing down gently on the back of the Motor
(to keep tension on the Blade), ip the on/off switch
to the “on” position.
• By tightening the Adjustment Screw you raise the
Motor back and bring the Blade toward the front
of the Upper Wheel. Loosening this screw will bring
the Blade towards the back of the Upper Wheel.
• Tighten the Adjustment Screw until the blade has
minimum wobble but stays in the Guides. If the saw
becomes louder and vibrates, loosen the Adjustment
Screw until the saw quiets down.
• You will not need to adjust the Lower Adjustment
Screw. This control for the tilt of the Lower Wheel was
set at the factory and should not require further
attention.
• Turn the saw off.
Lower Guide Installation~
• Your saw was shipped with the Guide Holder in place. If it has become loose or fallen out in shipment, reinsert it
into slot on inside wall of Chassis. Push rmly into place so that top of Guide Holder is ush with top of Chassis.
• Slide one Guide into slot on Guide Holder (slot on Guide must face out).
• Blade ts in slot of Guide.
Upper Guide Installation~
• Install a Guide into the Upper Blade Guide Holder in the same way as you
installed the Guide into the Lower Guide Holder.
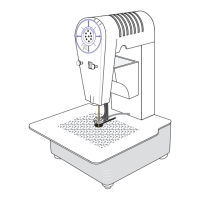
• Install the Upper Blade Guide Holder onto your band saw by inserting it
over the rear right-hand corner of the Motor Cradle as shown.
• The Upper Blade Guide Holder may be removed or reinstalled at any
time.
Blade Guide
Upper
Blade Guide
Holder