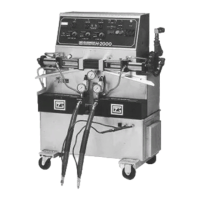
Model H-2000/H-3500 Proportioning Unit
36 159421A-1, Issue 2
MAINTENANCE
To realize full productivity from the Model H-2000/H-3500, it is necessary to perform
certain maintenance procedures daily or periodically.
WARNING:
W
HENEVER WORKING WITH THE EQUIPMENT
,
INSURE THAT EYE PROTECTION IS
WORN AND THAT SKIN IS PROTECTED AGAINST EXPOSURE TO CHEMICALS AND SOLVENTS BEING
USED
. W
ORK SHOULD ALWAYS BE DONE IN A WELL VENTILATED AREA TO PREVENT HARMFUL
FUMES AND VAPORS
. I
NFORMATION CONCERNING THE TOXICITY AND PROPER HANDLING
PROCEDURES OF YOUR CHEMICALS IS AVAILABLE FROM YOUR SUPPLIER
.
WARNING:
U
NLESS SPECIFIED OTHERWISE
,
ALL CIRCUIT BREAKERS SHOULD BE OFF AND
THE MAIN POWER DISCONNECTED AT THE SOURCE TO AVOID SEVERE BODILY INJURY FROM
ELECTRICAL SHOCK
. D
O NOT ENTER ELECTRICAL CONSOLE WITH POWER ON
.
Pump Lube System
To insure that the pump lube will do its job, check its condition on a daily basis. Change
the pump lube before it becomes a gel, or when its color becomes the same as the
Isocyanate.
The gel formation is due to moisture absorption by the pump lube. The time interval
between changes due to gel formation depends entirely upon the environment in which the
equipment is operating. The enclosed pump lube system in the H-2000/H-3500
minimizes exposure to moisture, but moisture contamination is still possible.
Discoloration of the pump lube is inevitable due to the continual weepage of Isocyanate
during pump operation. However, if the packing within the Isocyanate pump is
functioning properly, pump lube replacement due to discoloration should not be more
frequent than 3 or 4-week intervals.
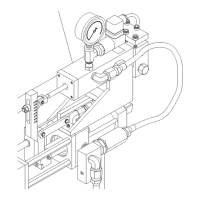
To change the pump lube proceed as follows:
1.
Position the Isocyanate proportioning pump to the extreme right by jogging the pump
switch with the gun or coupling block.
2.
Lift the lube reservoir out of the
bracket and remove the cap from the
container. Holding the Cap over a
suitable container, remove the Check
Valve and allow pump lube to drain.
Reattach the Check Valve to the inlet
hose.
3.
Now drain the reservoir, flush it with
pump lube and refill it with fresh pump
lube.
Figure 28. Pump Lube System
4.
Screw the Lube Bottle back onto the Lube Cap and place in the Bracket.
 Loading...