haaga
677 / 697 / 697 plus
59
EN
9.4 Align bristles
WARNING
Fire hazard due to improper handling of a
fan or the use of an unsuitable fan!
When aligning the bristles, there is a risk of re
if they are heated to too high temperatures.
• Do not use open ames or furnace to heat
the bristles!
• Do not use a hot air blower. If the air is too
hot, the bristles may melt.
Bent bristles can be straightened out again
with heating by means of a warm air fan (e.g.
hairdryer).
• Point the switched-on warm air fan towards
the bent bristles.
» If the heating is su cient, the bristles will
straighten out again by themselves.
9.5 Clean the device
• Do not use a degreasing agent.
• Do not use any aggressive cleaning agents.
• Do not clean the device with a high-pressure
cleaner or under running water. The device
may not be immersed in water or cleaned with
water.
• Protect the bearings against moisture.
• Do not clean the plate brooms and the ne dirt
sweeping roll with compressed air.
» The strong air jet can damage the bristles.
1. Clean the plate brooms, the ne dirt sweeping
roll and the drives with a wet cloth.
2. Clean all plastic parts with a damp cloth.
» Keep the battery clean as a dirty battery can
lead to battery leakage via the terminals over
time.
3. Clean the dust lter.
Fire hazard due to improper handling of a
fan or the use of an unsuitable fan!
When aligning the bristles, there is a risk of re
if they are heated to too high temperatures.
Do not use open ames or furnace to heat
Do not use a hot air blower. If the air is too
hot, the bristles may melt.
10. Decommissioning for Storage/
Safekeeping
10.1 Disassemble push bar
CAUTION
Risk of injury through tipping over of the
push bar!
Tipping over of the push bar may lead to slight
injuries, such as jamming of the nger or
bruising in users or other persons.
• When carrying the device, hold it so that the
push bar cannot tip over.
» In order to save space, the push bar can be
detached from the machine.
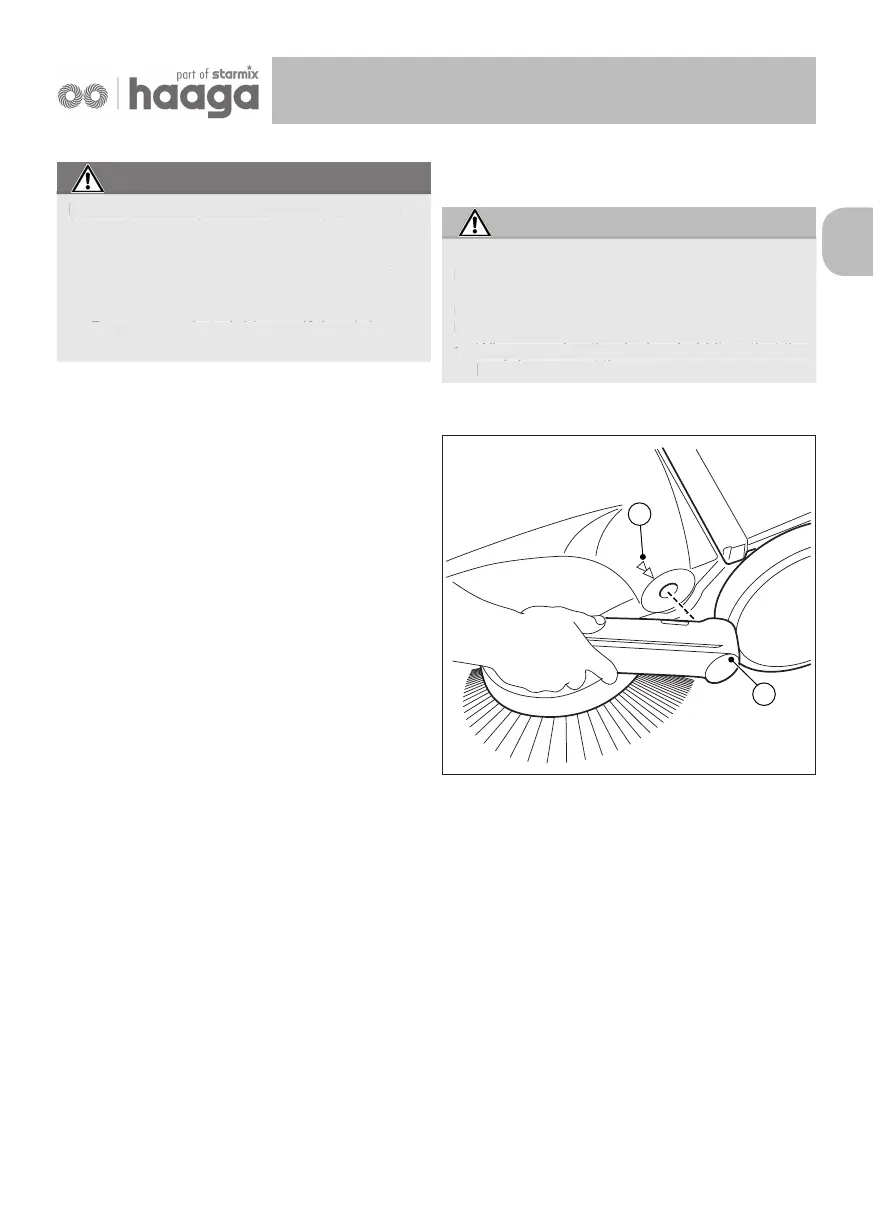
1
2
Fig. 22: Push bar disassembly
1. Align the respective arrows (2) on the housing
with the bar of the handle ttings (1).
2. Position yourself between the push bar in front
of the device.
3. Grip both handle ttings (1) with your hands
and carefully push them out.
4. At the same time pull out the handle ttings
from both receptacles of the device.
Risk of injury through tipping over of the
Tipping over of the push bar may lead to slight
injuries, such as jamming of the nger or
bruising in users or other persons.
When carrying the device, hold it so that the
push bar cannot tip over.
Maintenance and cleaning
Decommissioning