DT-1 - Spindle - Tool Clamp System - Rocker Arm - Removal
1. Jog the Z-Axis down to the bottom of travel. If there is a tool in the spindle, remove it.
2. Remove the C-clip from the clevis pin through the access hole. Pull the clevis pin out from the other
side.
NOTE: Some early assemblies may not include the access hole. In this case, use a
dental pick or similar tool to reach in and work the C-clip off of the pin.
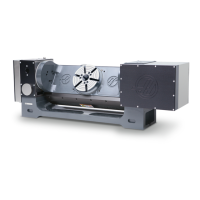
Air Cylinder Clevis Access Example
3. Unhook the tension spring from the rocker arm.
4. Remove the four fasteners from each of the pivot blocks at the front of the rocker arm assembly. Use a
1/4-20 screw to remove the dowel from each block. If the dowel is difficult to remove, use some washers
to space the screw out from the surface of the pivot block, then tighten the bolt to loosen the dowel.
5. At this point, the entire rocker arm assembly is loose, and can be worked out of the spindle head cast-
ing. Take care to prevent the right-side pivot block from dropping—the block and manual release arm can
be disassembled from the shaft to ease removal.
DT-1 - Spindle - Tool Clamp System - Rocker Arm - Installation
1. Assemble the left-hand, two-part pivot block to the rocker arm shaft with the front two screws in the
block (there is insufficient clearance to install them when the block is in place). Work this assembly into
place and secure the pivot block.
2. Slide the manual release arm onto the shaft and into its notch in the rocker arm.
3. Install the wave washer to the shaft. Slide the right-hand pivot block onto the shaft with the front two
screws in the block (there is insufficient clearance to install them when the block is in place).
NOTE: The right-hand pivot block has a specific top and bottom; do not install it upside
down. Identify the top of the block by the larger dowel pin locator hole that al-
lows the dowel to enter easily. The lower hole is close-fitting to the dowel.
4. Secure both pivot blocks with four screws each, then install the dowel pins, making sure the pins are
threaded-end up.
5. Reinstall the tension spring.
6. Reconnect the manual release arm to the air cylinder clevis. Replace the clevis pin and C-clip.
© Copyright 2015 by Haas Automation, Inc. No unauthorized reproduction.
 Loading...