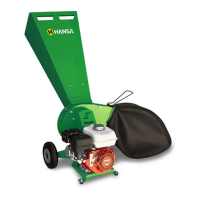
The Hansa C4 is a wood chipper designed for intermittent use by suburban gardeners, built to process organic material, specifically wooden branches not exceeding 50 mm in diameter. It is not intended for any other purpose.
Function Description:
The chipper is self-feeding and features a large inlet opening. It processes organic materials such as prunings, stalks, roots, vegetable matter, hay, grass, bark, dry manure, branches, palm fronds, and even dead and hard timbers (though these will dull the knives faster). It can also process paper or cardboard. The machine's cutting disk is cantilevered, supported by two bearings on the engine side, which prevents fibrous material from wrapping around the shaft and bearings. When processing fibrous material, the output may not be as consistent as with branch material due to its nature. For optimal processing of fibrous materials, blades must be sharp, and the material is best introduced as a bundle, slowly, teasing it in and out to ensure proper cutting. Fibrous material is processed more effectively when green rather than dried. A wooden stick (approx. 50 mm diameter x 600 mm long) can be helpful for pushing in short, brushy, and leafy materials and keeping the inlet chute clear.
Important Technical Specifications:
- Chipping Capacity: Maximum 50 mm branch diameter.
- Engine: Honda GX160, 5.5 HP.
- Disc Speed: 3600 RPM.
- Disc Dimensions: 260 x 6 mm.
- Shaft Diameter: 24 mm.
- Knives: 1.
- Feed Type: Gravity fed, self-feeding.
- Inlet Chute Opening: 100 x 130 mm.
- Discharge Height: 450 mm.
- Outlet Chute Type: Fixed.
- Dimensions (C4 Model):
- Length: 900 mm
- Width: 500 mm
- Height: 1120 mm
- Weight: 66 kg
- Fuel Requirement: 91 unleaded or E10 petrol.
Usage Features:
- Assembly: The chipper may come pre-assembled or in two boxes, requiring approximately 30 minutes for two people to assemble. Tools required include a knife and two 13 mm spanners. The chipper body weighs 53 kg, so cutting the box open is recommended instead of lifting it out.
- Safety: Operators must read and understand the manual. Only persons aged 18 or older (or as restricted by local regulations) with full physical, sensory, and mental capabilities should operate the machine. Modifications to the chipper's design are prohibited.
- Setup: Position the chipper in an open area on firm, level ground. The outlet chute should discharge onto soft ground or into an enclosed container to prevent ejected material from rebounding. Keep children, pets, and spectators clear. The exhaust should point away from the operator and onlookers.
- Operation: Wear safety glasses and hearing protection at all times. Work gloves are recommended. Tie long hair up and wear tight-fitting clothing to avoid entanglement. Keep face and body away from the inlet chute and stand clear of the discharge zone. Maintain proper balance and footing. Feed only freshly cut material, butt-end first, to guide limbs and reduce spinning/ejection. Avoid feeding materials covered in gravel, stones, or dirt, as this can cause injury and damage. Do not process old, dried wooden branches as they are harder, more awkward, and dull knives faster.
- Starting Procedure: Turn the choke lever, fuel lever, and engine switch to the "on" position. Turn the throttle lever to "max." Pull the pull cord in one smooth motion to start the engine. After approximately 10 seconds of warming up, turn the choke lever to "off."
- Shutdown Procedure: Turn the throttle lever to "min," then turn the engine switch to "off."
- Prohibited Materials: Do NOT process bones, soil, root balls, sand, grit, stones, or metal, as these will damage the cutting knives and can rebound, injuring the operator. Do NOT exceed 50 mm branch diameter.
- Storage: Allow the chipper to cool before storing. Store out of reach of children and away from open flames or sparks. Switch the fuel lever to "off"; for extended storage, run the engine dry of fuel. Store out of the rain to prevent rust.
- Transportation: The C4 is designed for one-person movement using the handles at the top of the inlet chute to lean it back onto its wheels. Remove the optional chip catcher bag during transport to avoid damage.
Maintenance Features:
- General Maintenance: Keep the chipper clean. Before servicing or changing accessories, switch off the engine, allow it to cool, wait for the rotor and engine to stop, disconnect the spark plug wire, and switch the fuel lever to "off."
- Initial Check (after 2 working hours): Check for loose nuts and bolts, belt tension (new belts stretch), and grease the rotor bearing (1-2 pumps of bearing or all-purpose grease, avoid over-greasing).
- Regular Check (every 20 working hours): Check for loose nuts and bolts, belt tension, grease the bearing, and check knife sharpness and belt guard condition. Replace damaged guards immediately.
- Knife Re-sharpening/Replacement:
- Indicators: Chipper loses self-feeding action, material needs to be pushed in, or material comes out in long strips. Do NOT operate with blunt knives as this causes excessive vibration and damage.
- Procedure:
- Remove the inlet chute (two 13 mm spanners).
- Open the cutting rotor housing (four 16 mm spanners).
- Gently dislodge the housing with a nylon hammer.
- Remove knives (13 mm spanner, hold bolt head with 6 mm hexagonal Allen key if it turns).
- Measure knife width; replace if shorter than 35 mm.
- Sharpen knives on a surface grinder at a 40° cutting angle, using plenty of coolant to prevent softening.
- Reinstall knives: Clean mounting surfaces. Tighten three nuts by hand with a 13 mm spanner and 6 mm hexagonal Allen key. Do NOT tighten bolts with the Allen key.
- Rotor Balancing: After sharpening, material is removed, affecting weight distribution. The manual provides diagrams for adjusting heavy and light washers on inner, center, and outside bolts based on blade width (e.g., at 38.5 mm, insert one heavy washer onto the center bolt; at 37.6 mm, insert one heavy washer onto the outside bolt; at 37 mm, insert one heavy washer onto the outside bolt and one light washer onto the center bolt; at 36 mm, insert one heavy washer onto the outside bolt and one heavy washer onto the center bolt; if knife is at 35 mm, replace it).
- Anvil Adjustment: Adjust the anvil as the knife edge location changes after sharpening/replacement. The anvil is reversible and typically lasts over 200 operating hours per edge. Replace when both edges are worn. The clearance between the knife and anvil should be approximately 1 mm on the inside (closest to bearing) and 3 mm on the outside (closest to rotor edge). Adjust anvil position by loosening mounting bolts and tighten to 22 Nm with a torque wrench.
- Engine Oil: Check oil level every time before use. Unscrew dipstick, clean, reinsert without screwing in, then check. Change oil every 100 operating hours or 12 months. To change: warm engine for 1-2 minutes, switch off, place container, remove oil filler cap/dipstick and drain plug (10 mm spanner), drain oil. Refill with 0.45 Litres of SAE 10W30 or SAE 10W40.
- Belt Tension: Remove belt guard (two cap screws with 6 mm Allen key). Engage belt. There should be approximately 5 mm deflection when pressing firmly. Adjust tension by loosening two 16 mm clamping nuts, then adjusting the center bolt with a 13 mm spanner. Tighten clamping nuts and recheck tension.
- Belt Replacement: If belts are cracked, split, soft/swollen, or worn, replace them.
- Remove belt guard (two cap screws with 6 mm Allen key).
- Unbolt and remove engine (four M8 nuts with two 13 mm spanners).
- Replace belt (A21 vee belt).
- Reinstall engine and fasteners.
- Check pulley alignment with a straight-edge.
- Adjust belt tension as described above.
- Bolt Torque: The manual provides a table for recommended tightening torque for different bolt sizes (M8, M10, M12, M16, M20) based on relative strength bolt marking (4.6 and 8.8). For example, M8 bolts with 8.8 marking require 22 Nm (16 lb ft). Knife clamping bolts must be replaced after every six sharpens.