17
3-90-00674R28_12/13
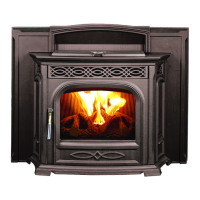
Installation
• Thestovebodymustbepulledoutofthemountingframe
severalinchestoinstallthecastsidepanels.
• Slidethecastsidepaneldownoverthehingepins.
• Slidethestovebodyinandlatchintoplace.
Note:Thecastsidepanelsmustbeleftintheopenposition
toallowaccesstothelatches.
• Slidetheashlipintoplace.(Thiswouldbeinwarduntilthe
rearofthecastirontouchesthemountingframefront.)
• Closethecastsidepanels.
• Check the gap alignment and the top and bottom gap
spacing.
• Thetopandbottomspacingcanbeadjustedbyloosening
the 3 bolts and sliding the hinge up or down until the
spacingsuits.
• Withthefrontdoorclosedandlatched,checkthevertical
space alignment. The only method of changing or
adjustingthisgapisbybending(slightly)thehingeangle.
Seeg.39.
• Duetotheuseofallcastironparts,somesmallamountsof
misalignmentareexpected.Sincesomepartsareangled
andsomehaveroundededges,thismisalignmentisvery
seldomnoticeable.
• Itisveryimportant thatthecastside panelsopenand
closefreelyforcontrolboardaccess.
22. Slidethestovebodyintothemountingframe.
• Note:Thetwospringlatchesonthebottom
rightandleftsideofthebodymustbeintheproper
positiontoenterthelatchholes.(Seeg.37).
• Latchthe(2)springlatchesintoplace.
23. Shiftthecasttop/hopperlidassemblyinwardasfaras
possibletoachieveaparalleltwiththesurroundsides.
SeeFig.39.Tightenthecasttop/hopperlidassembly
boltswitha3/8"socket.Seepage9,Fig.12.
24. Installandadjustthesidepanelmagnets.
• Inthehardwarepackare(2)magnets,(2)spacersand
(2)10-32x11/4"boltsandnuts.
• Boltthemagnetsthroughtheholesprovidedinthecast
ashlip.
Important:Thespacermustbeontopofthehole,themagnet
ontopofthespacer,withtheboltgoing,down,throughthe
hole,withthenutatthebottom,undertheashlip.Seeg.38.
25. Checkthetofthecastashliptomakesurethatitcan
beslidinandouteasily.Thecastashlipcanremainin
placeatthistime.Note:Thecastsidepanelhingescan
bemovedupwardifnecessarytogainclearanceforthe
castashlip.
Fig.39
Sidepanelgap
Fit cast
top/hopper
lid parallel
with
surround.
Cast Side Panel Installation
Fig.38
Magnet
Fig.37
Spring Latch
Latch Hole
Magnet