"'( (#"
6
Form No. DHLM-1010
3<3@/:
Use the following information and procedures to install
Decorative Heat Lamps.
(&'#.&
L )<7B ;CAB 03 7<AB/::32 0G / ?C/:74732 3:31B@717/<
<AB/::/B7=<;CAB1=<4=@;B=/:::=1/:3:31B@71/:1=23A
<AB/::/B7=<0GC<?C/:74732>3@A=<<3:E7::D=72B63C<7B
E/@@/<BG/<2;/G:3/2B=3:31B@71A6=19=@0C@</AE3::
/A2/;/53B=C<7B/<2=@7BAAC@@=C<27<5A
L (C@< >=E3@ # /B ;=C<B7<5 :=1/B7=< 034=@3
7<AB/::/B7=<=4C<7B
L /7:C@3B=5@=C<2C<7B>@=>3@:G1=C:2@3AC:B7<A3@7=CA
>3@A=</:7<8C@G=@23/B6
L )<7B7A<=BE3/B63@>@==4 =1/B3B63C<7B7<2==@A
&.&
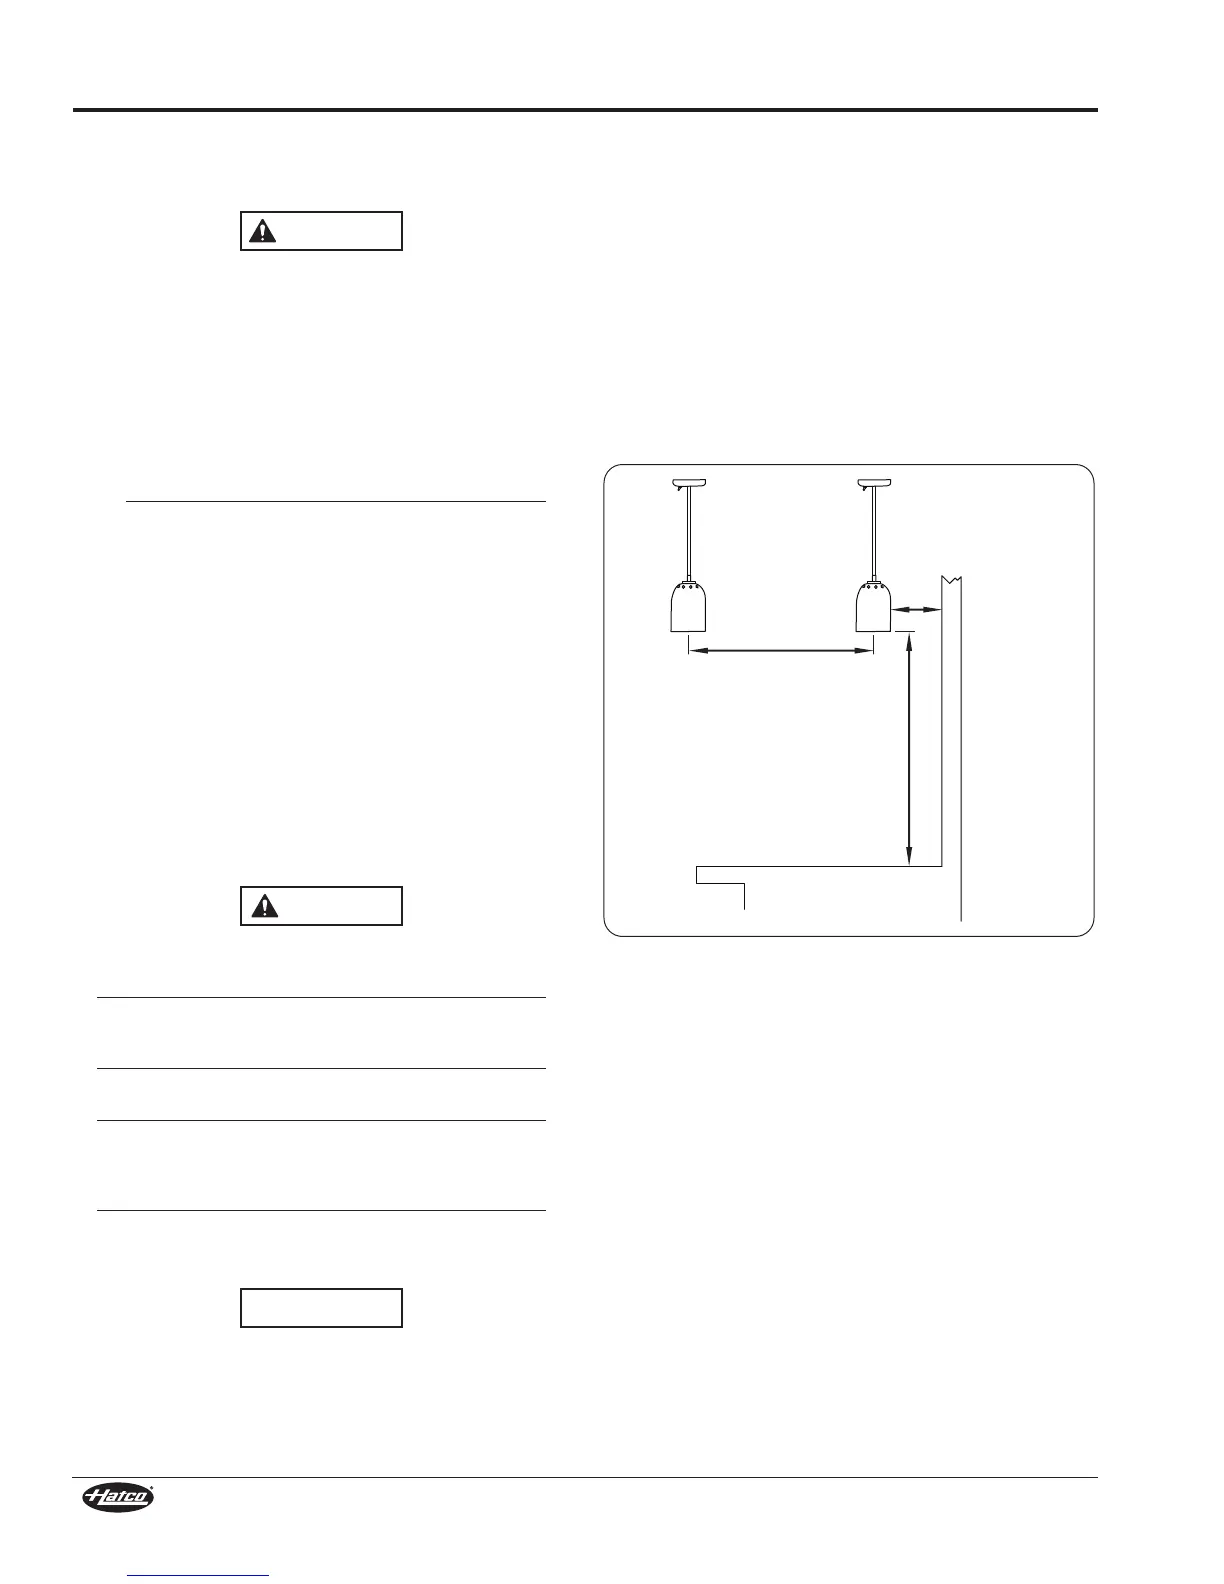
L =1/B3C<7B/;7<7;C;=4R;;4@=;1=;0CAB70:3
E/::A /<2 ;/B3@7/:A 4 A/43 27AB/<13A /@3 <=B
;/7<B/7<3227A1=:=@/B7=<=@1=;0CAB7=<1=C:2=11C@
L AB/<2/@2 E/BB 63/B :/;>A + 0C:0 /<2
:C;7</7@3A + 0C:0 ;/F7;C; ;CAB 6/D3 /
;7<7;C;=4R;;/0=D3/1=;0CAB70:3AC@4/13
=@;7<7;C;1:3/@/<13=4R;; /0=D3/<=<
1=;0CAB70:3 AC@4/13 4 A/43 27AB/<13A /@3 <=B
;/7<B/7<3227A1=:=@/B7=<=@1=;0CAB7=<1=C:2=11C@
L 6756E/BB63/B:/;>A+0C:0;CAB6/D3/
;7<7;C;=4R;;/0=D3/1=;0CAB70:3AC@4/13
=@;7<7;C;1:3/@/<13=4R;; /0=D3/<=<
1=;0CAB70:3 AC@4/13 4 A/43 27AB/<13A /@3 <=B
;/7<B/7<3227A1=:=@/B7=<=@1=;0CAB7=<1=C:2=11C@
L =<=B7<AB/::/+63/B0C:07<B=/ AB/<2/@2E/BB
63/B:/;>=@/:C;7</7@3C<7B
!C:B7>:37<AB/::/B7=<A=431=@/B7D33/B /;>A;CAB6/D3
/;7<7;C;1:3/@/<13=4;;=<13<B3@=4A6/23
03BE33<3/16C<7B
::1/<=>G;=C<BC<7BA/@323A75<32B=47B/AB/<2/@2R
;;=1B/5=</:8C<1B7=<0=FC<1B7=<0=F;CAB03
/<16=@32A31C@3:GB=0C7:27<5AB@C1BC@3
=1/B3B63C<7B/BB63>@=>3@1=C<B3@63756B7</</@3/B6/B
7A1=<D3<73<B4=@CA3
=@ <=< C<7BA "#( 3?C7>>32 E7B6 / /B1=AC>>:732
AE7B16/?C/:747323:31B@717/<;CAB16==A3/</>>@=>@7/B3
AE7B164=@B63/>>:71/B7=<0/A32=</;>3@/53/<27<@CA6
@/B7<5=4B63AE7B16
=@/::C<7BA/?C/:747323:31B@717/<;CAB16==A3/<2
7<AB/::/</>>@=>@7/B32=C0:3>=:3AE7B164=@B63/>>:71/B7=<
0/A32=</;>3@/53/<27<@CA6@/B7<5=4B63AE7B16
/;/53B=1=C<B3@B=>;/B3@7/:AC16/A=@7/<
M
/<2A7;7:/@
>@=2C1BA1/CA320G63/B53<3@/B324@=;/B1=3?C7>;3<B
7A <=B 1=D3@32 C<23@ B63 /B1= E/@@/<BG =<B/1B B63
;/<C4/1BC@3@=4B631=C<B3@B=>;/B3@7/:4=@/>>:71/B7=<
7<4=@;/B7=<
1. Remove the decorative lamp assembly from the carton.
2. Remove tape and protective packaging from all surfaces
of unit. Remove literature from the carton.
NOTE: To prevent delay in obtaining warranty coverage,
complete online warranty registration. See the
IMPORTANT OWNER INFORMATION section for
details.
3. Make sure the installation site provides the proper
installation clearances for the unit (see below).
NOTE: For even heating, install multiple units a distance of 12″
on center of shade between units.
NOTE: Non-CE Decorative Heat Lamps can be installed over
a steam table. Follow the clearance requirements
appropriate for the installation.
Figure 3. Safe Mounting Distances
NOTE: For 120 V units, the remote ON/OFF switch is capable
of handling up to nine 200 W luminaires, seven 250 W
heat lamps, or five 375 W heat lamps.
For 240 V units, the remote ON/OFF switch is capable
of handling up to four 250 W heat lamps or three
375 W heat lamps.
Minimum of 12″
(305 mm) on
center of shade
between units.
Minimum of 1″ (25 mm)
from combustible
walls and materials.
Minimum height above
combustible surface:
DL and Luminaire = 16″ (406 mm)
DLH = 27″ (686 mm)
Minimum height above
non-combustible surface:
DL and Lumimaire = 5″ (127 mm)
DLH = 5″ (127 mm)
Countertop