Seite | Page 4
die Beschlagnut muss gratfrei sein
the fitting groove must be free of burrs
M5 x 30
349
47
50
Ø 5,5
Ø 4,2
24
64
24
16.8
(1)
(2)
(3)
(4)
mit Standard Flügel
with standard sash
47
Ø 5,5
1.1
1.2
2.1
2.2
– (1) Den Schiebeflügel im Bereich des Festflügels in die Führungs-
schiene einhängen und in das Element schwenken.
– (2) Griff in „Geöffnet“-Stellung bringen und den Schiebe flügel in
den Durchgangsbereich schieben.
Achtung: Verletzungsgefahr durch umfallenden
Flügel! Zur Vermeidung der Verletzungsgefahr führen
Sie die folgenden Arbeitsschritte zu zweit aus.
– (1) Set down the sliding sash onto the guide track in the area of the
fixed sash and swivel it into the element.
– (2) Bring handle into „Open“ position and slide the sliding sash to
the transit area.
Attention: Risk of injury due to fallen sash!
To avoid the risk of injury, perform the following
steps with two workers.
Montage Flügel und Blendrahmen Mounting sash and frame
ATRIUM
®
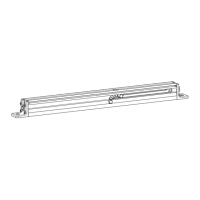
comfort close, verdeckt | concealed, Alutech SL 130 mit Standard Flügel für S 270 | with standard sash for S 270 | 501211
Griffseite
Handle side
– (1) Montage des comfort close auf der Nichtgriff-Seite.
– (2) Die Beschlagnut muss gratfrei sein.
– (3) Halteblech (16.8) am Flügel positionieren. Löcher mit Ø 5,5
vorbohren. Halteblech mit Schrauben M5 x 30 (7.1) befestigen.
– (4) Bohrungen für Anschraubwinkel (16.7) mit Ø 5,5 / 4,2 bohren.
– (1) Mounting of the comfort close at non-handle side.
– (2) The fitting groove must be free of burrs.
– (3) Position bracket (16.8) at the sash. Pre-drill the holes with
Ø 5,5. Fasten bracket with screws M5 x 30 (7.1).
– (4) Drill holes for screw-on bracket (16.7) with Ø 5,5 / 4,2.
Bearbeitung Flügel, Montage Flügel und Blendrahmen
Preparation sash, Mounting sash and frame
Nicht-Griffseite
Non-handle side
Befestigung siehe auch Schnitt S. 6
Fastening refer to section page 6, too
Der Flügel muss leichtgängig gleiten können.
The sash has to slide smooth-running.
kundenseitig
supplied by the customer
 Loading...