EasyManua.ls Logo

Hayward PVC Series - User Manual

Hayward PVC Series
8 pages
Print Icon
To Next Page IconTo Next Page
Loading...
Hayward Flow Control www.haywardflowcontrol.com 1-888-HAY-INDL (1-888-429-4635)
SBIOM Rev A 10/9/2019
Page 1 of 8
HAYWARD FLOW CONTROL
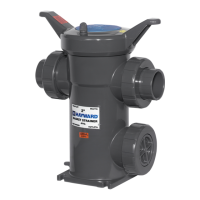
PVC, CPVC, & GFPP SB SERIES SIMPLEX BASKET STRAINER
INSTALLATION, OPERATION AND MAINTENANCE INSTRUCTIONS
PLEASE READ THE FOLLOWING INFORMATION PRIOR TO INSTALLING AND USING ANY HAYWARD PRODUCT. FAILURE TO FOLLOW
THESE INSTRUCTIONS MAY RESULT IN PRODUCT DAMAGE, PROPERTY DAMAGE, PERSONAL INJURY, OR EVEN DEATH.
1. Hayward Flow Control (Hayward), a division of Hayward Industries, guarantees its products against defective material and workmanship only.
Hayward assumes no responsibility for property damage or personal injury resulting from improper installation, misapplication, or abuse of any
product.
2. Hayward assumes no responsibility for property damage or personal injury resulting from chemical incompatibility between its products and the
process fluids to which they are exposed. Determining whether a particular PVC, CPVC, or GFPP product is suitable for an application is the
responsibility of the user. Chemical compatibility charts provided in Hayward literature are based on ambient temperatures of 70°F and are for
reference only.
3. Hayward products are designed for use with non-compressible liquids.
WARNING
Hayward PVC, CPVC, or GFPP products should NEVER be used or tested with compressible fluids such as compressed air or
nitrogen. Use of PVC, CPVC, or GFPP products in compressible fluid applications may result in product damage, property
damage, personal injury, or even death.
4. The maximum recommended fluid velocity through this Hayward product is five feet per second (5 ft/s). Higher fluid velocity can result in damage
due to the water hammer effect.
5. Piping systems must be designed and supported to prevent excess mechanical loading on Hayward products due to system misalignment, weight,
shock, vibration, and the effects of thermal expansion and contraction.
6. The effect of temperature on plastic piping systems must be considered when the systems are initially designed. The pressure rating of plastic
systems must be reduced with increasing temperature. Maximum operating pressure is dependent upon material selection as well as operating
temperature. Before installing any Hayward product, consult Hayward product literature for pressure vs. temperature curves to determine any
operating pressure or temperature limitations.
7. PVC, CPVC, and GFPP plastic products become less ductile below 34°F. Use caution in their installation and operation below this temperature.
WARNING
Hayward PVC and CPVC products should not be used in services with operating temperature below 34°F. Hayward GFPP
products should not be used in services with operating temperature below 20°F.
8. Due to differential thermal expansion rates between metal and plastic, transmittal of pipe vibration and pipe loading forces, DIRECT
INSTALLATION OF HAYWARD FLOW CONTROL PRODUCTS INTO METAL PIPING SYSTEMS IS NOT RECOMMENDED. Wherever
installation of Hayward product into metal piping systems is necessary, it is recommended that at least 10 pipe diameters in length of plastic pipe
be installed upstream and downstream of the product to compensate for the factors mentioned above.
9. Published operating requirements are based on testing of new products using clean water at 70°F. Performance is affected by many factors
including fluid chemistry, viscosity, specific gravity, flow rate, and temperature. These should be considered when sizing Hayward products.
10. Systems should always be depressurized and drained prior to installing or maintaining any Hayward product.
WARNING
Failure to depressurize and drain system prior to installing or maintaining any Hayward product may result in product damage,
property damage, personal injury, or even death.
11. Always follow your site and/or company procedures for any safety training and/or site specific precautions or warnings in addition to those in this
document.
The most recent revision to this document is available at http://www.haywardflowcontrol.com/images/flowcontrol/PDF/iom/SBIOM.pdf

Questions and Answers

Summary

Hayward Flow Control SB Series Simplex Basket Strainer Installation, Operation, and Maintenance Instructions

Installation

Transporting the Basket Strainer

Instructions for storing and moving the basket strainer prior to installation, emphasizing care to prevent damage.

Mounting the Strainer to Floor or Skid

Details on mounting the SB-Series Basket Strainers to a floor or skid using specified bolts and torque.

Installing the Strainer into a System

Guidance on installing the strainer into a piping system, including connection types and proper sealing methods.

Operation

Installing the Basket

Procedure for correctly placing the basket inside the strainer vessel, ensuring proper alignment.

Filling and Pressurizing the Basket Strainer

Steps for filling and pressurizing the strainer, including vent operation and leak inspection.

Operating the Basket Strainer

Safe operation guidelines, including fluid velocity limits and pressure drop monitoring for fouled baskets.

Depressurizing and Draining the Vessel

Procedure for safely reducing pressure and draining the strainer vessel before maintenance.

Removing, Replacing, or Cleaning the Strainer Basket

Detailed steps for removing, cleaning, and replacing the strainer basket, including necessary safety precautions.

Vessel Maintenance

Cleaning Internal Threads

Instructions for cleaning and inspecting threads on the cover and body, and when to replace damaged parts.

O-Ring Inspection and Replacement

Guidance on cleaning and inspecting o-rings and their grooves, emphasizing replacement of damaged components.

Troubleshooting

Product Specifications

Parts List

Warranty Terms and Conditions

Overview

This document describes the Hayward Flow Control SB Series Simplex Basket Strainer, available in PVC, CPVC, and GFPP materials. It provides detailed instructions for installation, operation, and maintenance, along with important safety warnings and technical specifications.

Function Description:

The Hayward SB Series Simplex Basket Strainer is designed to filter non-compressible liquids by removing solid particles from the flow. It features a removable basket that collects debris, preventing it from entering downstream equipment and protecting the system from damage. The strainer is intended for use in liquid service only and should not be used with compressible fluids like compressed air or nitrogen, as this can lead to product damage, property damage, personal injury, or even death. The design allows for easy removal and cleaning or replacement of the basket, facilitating routine maintenance.

Important Technical Specifications:

  • Maximum Pressure: 150 psi @ 70°F. Pressure ratings decrease with increasing operating temperature, as detailed in the provided pressure vs. temperature chart.
  • Maximum Differential Pressure: 5 psid (pounds per square inch differential). The basket should be cleaned or replaced when the differential pressure across the strainer reaches this limit.
  • Maximum Temperature:
    • GFPP: 240°F
    • CPVC: 190°F
    • PVC: 140°F These temperatures are specified at 0 psi.
  • Maximum Flow Velocity: 5 ft/s (1.5 m/s). Exceeding this velocity can cause damage due to water hammer effect.
  • Material Ductility: PVC, CPVC, and GFPP plastic products become less ductile below 34°F. Hayward PVC and CPVC products should not be used below 34°F, and GFPP products should not be used below 20°F.
  • Mounting: The strainer is equipped with a slotted bolt pattern on the base for direct mounting to a skid or floor. Hayward recommends using 3/8" diameter bolts or studs with flat and lock washers, torqued to 5 ft-lb in an alternating sequence.
  • End Connections: Available with threaded, solvent-weld, or flange connections.
    • Threaded End Connectors: Require PTFE tape for sealing. Pipe dope, liquid sealant, or thread sealant should not be used on PVC, CPVC, or GFPP threaded connections due to potential material weakening.
    • Solvent-Weld End Connectors (PVC and CPVC only): The strainer body must be disassembled from nuts and end connectors prior to solvent cementing. Primer, solvent cement, or their fumes should not come into contact with the strainer body or end connector o-rings. The strainer body should not be installed until the solvent cement has fully cured.
    • Flange Connections: Flange bolts should be tightened in an alternating sequence to compress the gasket and create a good seal without distorting the flanges. Recommended torque values vary by flange size, ranging from 10-15 ft-lbs for 1/2" bolts on 1/2" to 1-1/2" flanges, to 20-25 ft-lbs for 5/8" bolts on 2-1/2" to 4" flanges.
  • Chemical Compatibility: The user is responsible for determining chemical compatibility. Charts in Hayward literature are based on ambient temperatures of 70°F and are for reference only.

Usage Features:

  • Upright Installation: The SB-Series Basket Strainer must be installed in an upright position.
  • Piping System Design: Piping systems must be designed and supported to prevent excess mechanical loading from misalignment, weight, shock, vibration, and thermal expansion/contraction. The vessel should not be used as a pipe support or system anchor.
  • Metal Piping Integration: Direct installation into metal piping systems is not recommended due to differential thermal expansion rates. If necessary, at least 10 pipe diameters of plastic pipe should be installed upstream and downstream of the product.
  • Expansion Joints: Use of expansion joints or loops may be necessary to minimize differential thermal expansion/contraction stresses.
  • Valves for Maintenance: It is highly recommended to install valves upstream and downstream of the vessel to allow for routine maintenance (e.g., basket changes/cleanout).
  • Filling and Pressurizing:
    • Ensure cover o-ring, groove, and sealing surface are clean.
    • Open the vent thumbscrew on top of the cover to allow air to escape as the vessel fills.
    • Install the cover firmly onto the vessel body, hand-tight plus approximately 1/8-turn (45°). Do not over-tighten or strike the cover.
    • Slowly open the upstream valve and start the system pump (if applicable).
    • Close the vent once process media starts flowing through it.
    • Allow pressure to slowly increase to system operating pressure.
    • Carefully inspect for leaks at the cover, end connectors, end caps, and vent. If leaks occur, shut down, relieve pressure, and drain before tightening connections.
  • Depressurizing and Draining:
    • Always depressurize and drain the system before any maintenance.
    • Slowly close upstream and downstream valves.
    • Slowly open the vent thumbscrew to release pressure.
    • Remove the plug from the drain port at the bottom of the strainer body to drain completely. The nut of the lower end cap port can also be loosened for faster draining.
    • Properly capture and dispose of vented chemicals.

Maintenance Features:

  • Basket Removal and Cleaning:
    • Depressurize and drain the strainer.
    • Remove the cover and place it in a clean location, inspecting threads and o-ring for damage.
    • Grasp the basket handle and lift it out of the strainer body, allowing any fluid to drain.
    • Empty collected debris into an appropriate container.
    • Wash the basket with water and/or use a wire brush to gently remove trapped particles. Do not strike the basket against objects.
  • Basket Replacement: After cleaning, install the basket back into the strainer body, aligning its shoulder with the vessel body's shoulder.
  • Vessel Maintenance:
    • Clean internal cover threads and external body threads with a soft brush or cloth each time the cover is removed.
    • Replace damaged cover or nuts if threads are damaged.
    • Never pressurize the basket strainer with damaged threads on the cover, body, or assembly nuts, as this can cause property damage, personal injury, or death.
    • Clean and inspect o-ring grooves and o-rings each time the cover or end connector is removed. Replace damaged o-rings immediately.
    • If nuts or the cover fail due to over-pressurization or water-hammer, the entire unit must be replaced.
  • Troubleshooting Guide: The manual includes a troubleshooting section that lists common problems (e.g., leaks, increase in pressure drop, reduction in flow), their causes (e.g., damaged o-ring, debris, loose cover, fouled basket), and corresponding solutions (e.g., replace o-ring, clean groove, tighten cover, clean/replace basket).

Hayward PVC Series Specifications

General IconGeneral
BrandHayward
ModelPVC Series
CategoryControl Unit
LanguageEnglish

Related product manuals