20
Hardware conguration
Congure the HELIX DSP PRO MK3 as follows
Caution: Carrying out the following steps will re-
quire special tools and technical knowledge. In or-
der to avoid connection mistakes and / or damage,
ask your dealer for assistance if you have any
questions and follow all instructions in this manual
(see page 18). It is recommended that this unit will
be installed by an authorized HELIX dealer.
1. Setting the input voltage range (“Voltage
Range”) of the analog signal inputs
ATTENTION: When using the highlevel
input as signal input, it is mandatory to
adjust the “Voltage Range” to the output
voltage of the signal source before the rst
start up in order to avoid damage to the
signal processor.
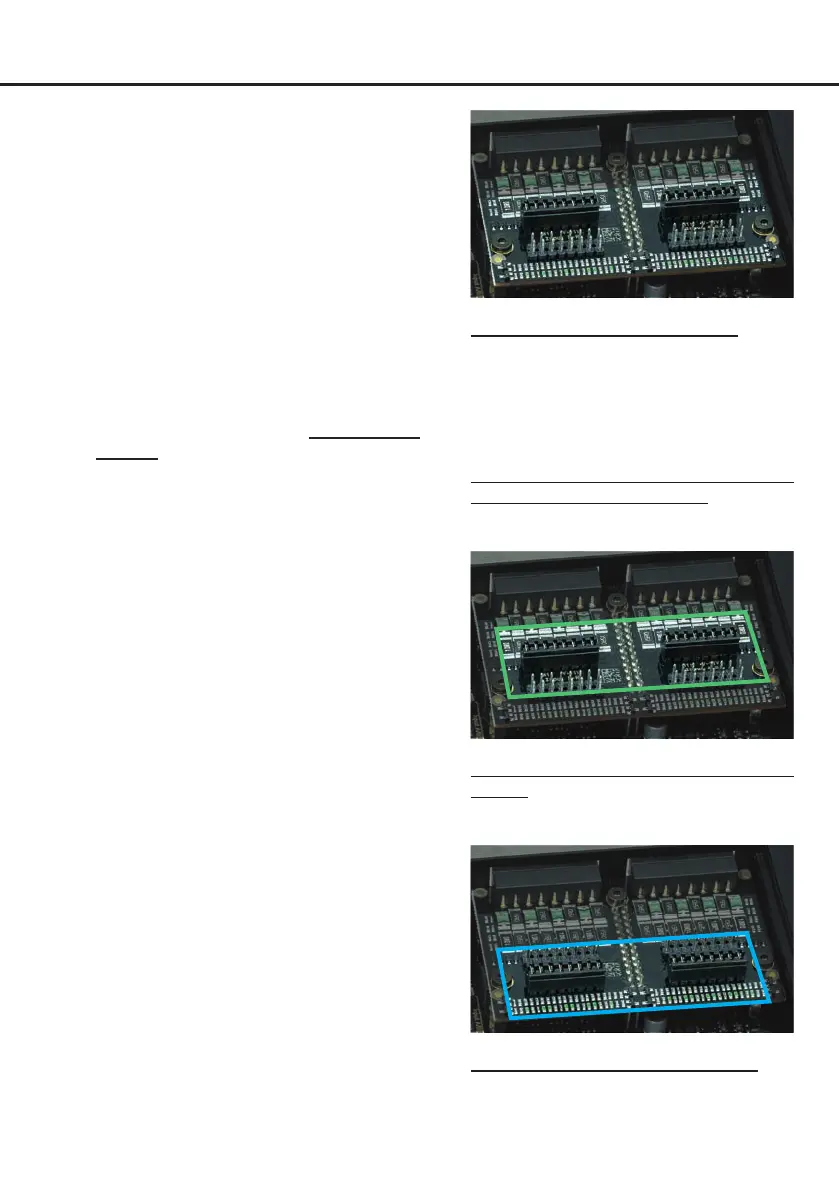
At rst, the “Voltage Range” of the highlevel in-
put has to be set inside the device. Dismantle
the side panel where the USB input is located
by removing the ve Phillips screws and pull
out the bottom plate sideways. Now you have
access to the jumpers (see g. 1). Each jumper
sets the value range for 4 input channels at the
same time (J1 – channel A - D and J2 – channel
E - F).
If you want to connect a conventional OEM or
aftermarket radio as signal source, the jumpers
must be set to the voltage range 4 - 11 Volts
(H1 – Low Voltage Range). This range is preset
by default, see g. 2.
If you want to connect a factory-installed am
-
plier as signal source, we recommend to de-
termine its maximum output voltage previously
with a suitable measuring device or to contact
your authorized HELIX dealer. If you are not
sure, we recommend setting the voltage range
to 12 - 32 Volts (H2 – High Voltage Range) to
avoid possible damage to the device. There
-
fore, both jumpers have to be repositioned to
the factory unused multi-pin connector, see
g. 3.
J 1
J 2
Overview jumper plug-in positions:
Jumper 1 (J 1): Channel A - D
Jumper 2 (J 2): Channel E - H
For repositioning a jumper simply pull it up-
wards and plug it into the desired plug posi-
tion.
Make sure that the jumper is reinserted prop-
erly and all pins are fully inserted.
J 1
J 2
H1 – “Low Voltage Range” conguration (by
default):
Value range: Highlevel 4 - 11 Volts
J 1
J 2
H2 – “High Voltage Range” conguration
Value range: Highlevel 12 - 32 Volts
Figure 1
Figure 2
Figure 3