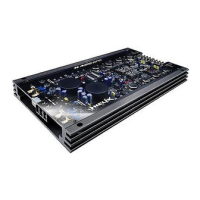
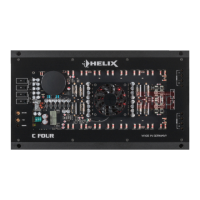
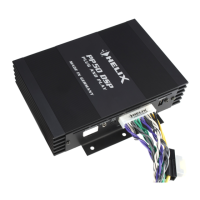
1: Connecting the ground cable
The ground cable should be connected to a central ground refe-
rence point (this is located where the negative terminal of the bat-
tery is grounded at the metal body of the vehicle), or to a bright
bare-metal location on the vehicle chassis, i.e. an area which has
been cleaned of all paint residues.
2: Connecting the batteriy cable
Connect the +12 V power cable to the positive terminal of the
battery. Recommended cross section: min. 25mm
2
.
3: Connecting the remote lead
The remote lead is connected to the automatic antenna (aerial
positive) output of the head unit (radio). This is only activated if
the head unit is switched ON. Thus, the amplifier is switched on
and off with the head unit.
4: Fuses
The input fuses are connected in parallel and provide protection
against an internal equipment fault, i.e. the system must be addi-
tionally protected by a further line fuse located in the vicinity of
the battery (max. distance from battery: 30 cm). The fuse rating
is 3 x 25 A.
5: Power / Status LED
Shows the operation mode of the amplifier.
6: Speaker terminals CH 1-4
To connect the speaker cables.
CAUTION:
Never connect the loudspeaker cables with the car chassis
ground. It damages your amplifier
. Ensure that the loudspeaker
systems are correctly connected (phase), i.e. plus to plus and minus
to minus.
Exchanging plus and minus causes a total loss of bass
reproduction
.The plus pole is indicated on most speakers.
The
impedance per channel should not be lower than 2 ohms
as
overheating could cause a shut down of the amplifier.
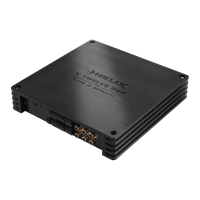
7: Frequency control for High-/Lowpass
CH 3 + CH 4
The control range extends from 40 Hz to 250 Hz
8: Switch for X-Over CH 3 + CH 4
Switch for the internal, active X-Over which can be adjusted to
Highpass, Fullrange or Lowpass. If you switch it to
HPF
(Highpass)
or
LPF (Lowpass)
, you can adjust the exact fre-
quency for High- or Lowpass by using
Control 7
.
9: Level control for input sensitivity CH 3 + CH 4
These controls can be used to match the input sensitivity of the
individual channels to the output voltage of the connected head
unit. These controls are not volume controls and are solely inten-
ded for the purpose of sensitivity trimming. The control range
extends from 400 mV to 6 V.
10: Frequency control for High-/Lowpass
CH 1 + CH 2
The control range extends from 40 Hz to 250 Hz
11: Switch for X-Over CH 1 + CH 2
Switch for the internal, active X-Over which can be adjusted to
Highpass, Fullrange or Lowpass. If you switch it to
HPF
(Highpass)
or
LPF (Lowpass)
, you can adjust the exact fre-
quency for High- or Lowpass by using
Control 10
.
12: Level control for input sensitivity CH 1 + CH 2
These controls can be used to match the input sensitivity of the
individual channels to the output voltage of the connected head
unit. These controls are not volume controls and are solely inten-
ded for the purpose of sensitivity trimming. The control range
extends from 400 mV to 6 V.
13: Input Select CH 3 + CH 4
Switch for adjusting the input signal to High- or Lowlevel. If your
head-unit does not have RCA-outputs, change the position of the
switch from LOW to HIGH. Thus, you can connect the speaker
outputs of the head-unit to the
RCA-Inputs 14
.
14: Signal inputs CH 1-4
The amplifier has RCA connectors for RCA cables that can be
connected with the pre-amplifier output of the line-outputs of the
headunit or with a pre-amplifier. This connectors are goldplated
to ensure a better signal transmission.
15: Input Select CH 1 + CH 2
Switch for adjusting the input signal to High- or Lowlevel. If your
head-unit does not have RCA-outputs, change the position of the
switch from LOW to HIGH. Thus, you can connect the speaker
outputs of the head-unit to the
RCA-Inputs 14
.
english
Audiotec Fischer GmbH
Huenegraeben 26
D-57392 Schmallenberg
Tel.: +49 (0) 2972 97880
Fax: +49 (0) 2972 978888
www.audiotec-fischer.com
helix@audiotec-fischer.com