Do you have a question about the HELIX V TWELVE DSP MK2 and is the answer not in the manual?
Guidance on safely and correctly installing HELIX components in a vehicle.
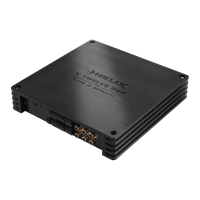
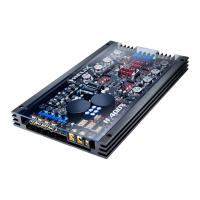
Key instructions for connecting the HELIX V TWELVE DSP MK2 amplifier to vehicle power and audio systems.
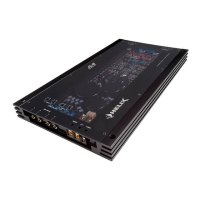
Interface for connecting the amplifier to a PC for configuration via USB cable.
Multifunction port for optional accessories like remote controls or other HELIX devices.
Button for switching setups or initiating a device reset.
Digital audio input for SPDIF signals.
Connects to factory or aftermarket radio speaker outputs.
RCA/Cinch inputs for pre-amplifier signals.
Indicates the operating mode of the amplifier and its DSP memory.
Output for turning on/off external amplifiers.
Speaker outputs for connecting sound systems.
Terminal for connecting the ground cable to the vehicle chassis.
Input for activating the amplifier via a remote signal from the head unit.
Terminal for connecting the +12V power cable to the battery.
Pre-amplifier outputs for connecting additional amplifiers.
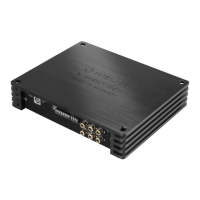
Connects to PC for amplifier configuration via USB.
Used for optional accessories like remote controls for signal adjustment.
Switches between setups or resets the device.
Accepts digital audio signals (SPDIF format).
Connects to factory radio speaker outputs without line outputs.
Accepts pre-amplifier signals via RCA/Cinch.
Visual feedback on amplifier operating mode and memory.
Activates connected external amplifiers.
Connects speaker systems to the amplifier outputs.
Ensures proper grounding for safe operation.
Turns the amplifier on/off when needed.
Connects the amplifier to the vehicle's +12V power source.
Provides pre-amplifier output signals to other amplifiers.
Connects RCA/Cinch outputs from head unit to amplifier inputs.
Connects factory radio speaker outputs directly to amplifier inputs.
Connects digital audio sources via optical SPDIF input.
Crucial step to match amplifier input to signal source voltage for optimal performance.
Fine-tuning input sensitivity using DSP PC-Tool software after jumper setup.
Details on connecting the main +12V power cable and fuse requirements.
Connects remote signal to turn amplifier on/off, especially when using line inputs.
Setting up automatic turn-on features for highlevel inputs.
Initial general DSP settings recommended before first use via PC-Tool.
Connects speakers to amplifier output terminals, ensuring correct polarity.
Provides signal to turn on external amplifiers, preventing noise.
Example of routing individual input channels to output channels.
Example of routing signals through virtual channels for advanced processing.
Explains the multi-stage signal processing concept for complex sound systems.
Applies equalizer settings to multiple output channels simultaneously.
Assigns DSP sound effects like RealCenter to specific virtual channels.
Highlights features like Rear Attenuation controllable via remote.
Routing input signals to virtual channels within the DSP PC-Tool.
Assigning virtual channels to physical output channels in the DSP PC-Tool.
Configuring virtual channels and activating DSP sound effects like RealCenter.
Adjusts the delay time for switching the integrated DSP on and off.
Determines memory locations for optional remote control setup switching.
Controls temporary deactivation of remote output during setup switches.
Adapts the ADEP.3 circuit for OEM radio diagnostic modes.
High-efficiency amplifier technology with reduced idle losses and improved sound quality.
Powerful co-processor for monitoring, communication, and software upgrades.
Circuit to prevent issues with factory radio diagnostic functions.
Reduces power consumption when no input signal is present.
Ensures stable operation during engine start-stop events.