Do you have a question about the HermanMiller X LOGITECH G EMBODY and is the answer not in the manual?
Remove front and back screws of arm pad using T-20 torx driver.
Remove arm pad for one side, then repeat for the opposite side.
Pull the back angle adjust handle to remove it.
Remove bolts with a power driver to detach the arm, then repeat for the other arm.
Pull the arms out from the bottom assembly.
Remove both lower spine bolts using a T-40 torx wrench.
Remove both lower back bolts using a T-40 torx wrench.
Use plier to twist and loosen fabric attachment pegs.
Remove the fabric component separately.
Use T-27 torx wrench to remove spine cap screws.
Pull the pivot pin out.
Use T-27 torx wrench to remove top antler attachment screws.
Lift the antler to detach it from the spine.
Pull one end of the antler away from the top frame to remove.
Remove the back component.
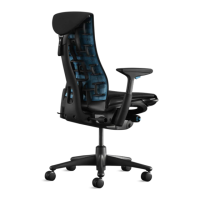
This document outlines the disassembly process for the Herman Miller Embody chair, designed to facilitate recycling. The chair is a sophisticated piece of office furniture, engineered for ergonomic support and comfort, and its design incorporates various materials that can be separated for environmental sustainability.
The Herman Miller Embody chair is an advanced ergonomic office chair designed to support the human body in a way that promotes health and comfort during prolonged sitting. Its primary function is to provide dynamic support, adapting to the user's movements and posture to reduce pressure and improve circulation. The chair features a unique "pixelated support" system, where a matrix of pixels conforms to the body's shape, distributing weight evenly. This system is integrated into both the seat and backrest, allowing for micro-adjustments that respond to the user's every shift. The backrest is designed to mimic the human spine, with a central spine element and flexible "ribs" that move independently to support the natural curve of the back. This dynamic back support helps to maintain a healthy posture, reduce spinal compression, and encourage movement, which is crucial for long-term well-being in a sedentary work environment. The seat is also designed to be flexible and adaptive, reducing pressure points and promoting blood flow to the legs and thighs. The chair's adjustability features allow users to customize the fit to their individual body type and preferences, ensuring optimal ergonomic alignment. This includes adjustments for seat depth, arm height and pivot, back angle, and tilt tension. The overall design aims to create a harmonious relationship between the user and the chair, fostering a sense of balance and fluidity throughout the workday.
The Embody chair is rich in usage features that contribute to its ergonomic performance and user comfort. The arm pads, for instance, are adjustable in height and pivot, allowing users to find the ideal position to support their arms and shoulders, reducing strain on the neck and upper back. The back angle adjust handle provides control over the recline of the backrest, enabling users to lean back and relax or sit upright for focused work. The tilt tension knob allows for fine-tuning the resistance of the chair's recline, ensuring that the chair moves with the user's body in a smooth and controlled manner. The seat depth adjustment feature is crucial for accommodating different leg lengths, ensuring that the user's thighs are properly supported without pressure on the back of the knees. The flexible "pixelated" design of the seat and backrest is a core usage feature, as it continuously adapts to the user's micro-movements, providing constant support and promoting dynamic sitting. This encourages subtle shifts in posture, which can help prevent stiffness and discomfort associated with static sitting. The chair's robust construction and intuitive controls make it easy for users to personalize their seating experience, enhancing productivity and overall well-being. The materials chosen for the chair, including various plastics and metals, are selected not only for their durability and performance but also with an eye towards their eventual end-of-life, as evidenced by the detailed disassembly instructions for recycling. The chair's design emphasizes a seamless interaction between the user and the furniture, making adjustments feel natural and effortless.
While the document primarily focuses on disassembly for recycling, it implicitly highlights certain aspects related to the chair's construction that inform its maintenance. The modular nature of many components, such as the arm pads, backrest, and seat assembly, suggests that individual parts could potentially be replaced if damaged, extending the chair's lifespan. The use of standard fasteners like Torx screws for various connections indicates that routine tightening or component replacement, if needed, can be performed with common tools. The instruction to remove fabric separately implies that the fabric components might be designed for cleaning or replacement, contributing to the chair's longevity and aesthetic appeal. The emphasis on identifying and segregating materials for recycling (plastics with ASTM codes, ferrous and non-ferrous metals) suggests a design philosophy that considers the entire lifecycle of the product. This forward-thinking approach to material selection and construction means that while the chair is in use, its components are likely durable and designed to withstand regular wear and tear. The detailed steps for disassembling various parts, such as the arm pads, back assembly, and tilt mechanism, provide insight into the chair's internal structure, which is typically robust and engineered for sustained performance. The fact that specific tools are required for disassembly (e.g., power driver, Torx wrenches, needlenose pliers) indicates a precise and secure assembly, which translates to a stable and reliable chair during its operational life. The absence of complex, proprietary tools for disassembly suggests a design that, while sophisticated, is also practical for servicing and end-of-life processing. The overall design, with its focus on separable components and identifiable materials, contributes to the chair's maintainability and its potential for a sustainable end-of-life.
| Type | Gaming Chair |
|---|---|
| Brand | HermanMiller X LOGITECH G |
| Model | Embody |
| Category | Indoor Furnishing |
| Adjustable Armrests | Yes |
| Lumbar Support | Yes |
| Tilt Mechanism | Yes |
| Weight Capacity | 300 lbs |
| Tilt Limiter | Yes |
| Tilt Tension Adjustment | Yes |
| Backfit Adjustment | Yes |
| Warranty | 12-year warranty |
| Weight | 51 lbs |
| Arm Style | Fully Adjustable |
| Adjustable Features | Seat Depth, Armrests, Backfit, Tilt |
| Color Options | Black |