Home
HIKVISION
Security Camera
DS-2XE6825G0-IZHS
Page 38
HIKVISION DS-2XE6825G0-IZHS - Page 38
48 pages
Manual
To Next Page
To Next Page
To Previous Page
To Previous Page
Loading...
Network Bullet Camera
·
Quick S
tart Guide
37
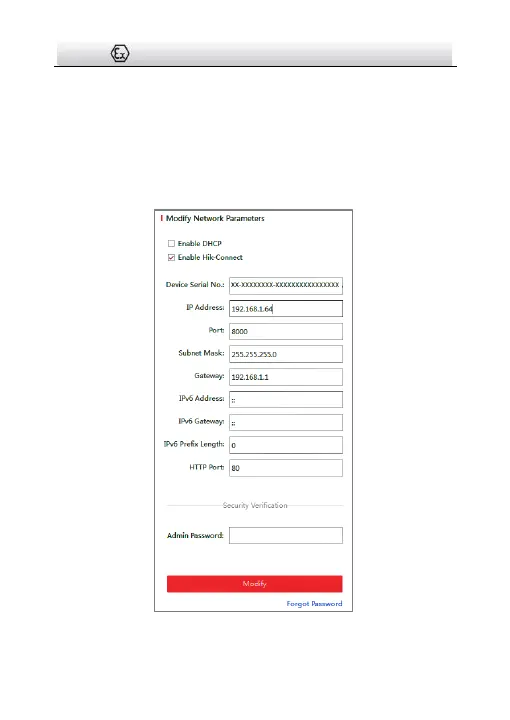
Steps:
1.
Run the SADP s
oftwar
e.
2.
Select an acti
ve device.
3.
Change the device IP a
ddress to the same subnet with
your
computer by either modifying the IP a
ddress manually or checking
the checkbox of
Enable DHCP
.
Figure 4-5
Modify the IP Address
37
39
Table of Contents
Main Page
Default Chapter
19
Table of Contents
19
1 Introduction
20
Overview
20
Model Description
20
2 Appearance
22
Overview
22
Cable Description
23
3 Installation
25
Wall Mounting
26
Cable Connection
29
4 Setting the Network Camera over the LAN
33
Wiring
33
Activating the Camera
34
Activation Via Web Browser
34
Activation Via SADP Software
35
Modifying the IP Address
37
5 Accessing Via Web Browser
40
6 Operating Via Hik-Connect App
42
Enable Hik-Connect Service on Camera
42
Enable Hik-Connect Service Via SADP Software
42
Enable Hik-Connect Service Via Web Browser
43
Hik-Connect Setup
45
Adding Camera to Hik-Connect
45
Initializing the Memory Card
47
Related product manuals
HIKVISION DS-2XE6222F-IS
36 pages
HIKVISION DS-2XE61 Series
24 pages
HIKVISION DS-2XE6145G0-HS
24 pages
HIKVISION DS-2XE6126FWD-HS
37 pages
HIKVISION DS-2XE62 2F-IS Series
24 pages
HIKVISION DS-2XC6245G0-L
21 pages
HIKVISION DS-2XM6122FWD-I
40 pages
HIKVISION DS-2XM6222FWD-I
31 pages
HIKVISION DS-2XC6745G0-IZHS
111 pages
HIKVISION DS-2XS6A87G1-LS/4G
116 pages
HIKVISION DS-2XS6A25G0-I/CH20S40
9 pages
HIKVISION DS-2XS6A87G1-LS/C36S80
59 pages
 Loading...