Verweise auf Schaubilder
DEUTSCH
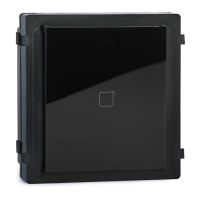
Auau
Montage
Bevor Sie beginnen:
1
3
Anschlussklemmen
2
• Achten Sie darauf, dass sich das Gerät in der Verpackung in gutem Zustand befindet und alle Montageteile enthalten sind.
• Achten Sie darauf, dass die Geräte während der Montage ausgeschaltet sind.
• Überprüfen Sie die Produktspezifikaon für die Installaonsumgebung.
Hinweis: Der Auau des Geräts variiert je nach Modell. Beziehen Sie sich auf das tatsächliche Gerät.
Hinweis: Beschreibungen der Anschlussklemmen und der Verdrahtung finden Sie in der Abbildung und im Benutzerhandbuch.
Gerät akvieren
Erste Schrie
4
Sie müssen das Gerät vor der Verwendung zuerst akvieren. Legen Sie dazu ein starkes
Passwort fest.
Akvieren Sie das Gerät lokal oder aus der Ferne über die iVMS-4200-Clientsoware.
1
Fernkonfiguraon
2
Hinweis: Weitere Informaonen zur Konfiguraon finden Sie im Benutzerhandbuch.
Hinweis: Einzelheiten zur Installaon finden Sie in der Abbildung und im Benutzerhandbuch.
Referencias del diagrama
ESPAÑOL
Apariencia
Instalación
Antes de empezar:
1
3
Terminal
2
• Asegúrese de que el disposivo del paquete esté en buenas condiciones y que todas las piezas de montaje estén incluidas.
• Asegúrese de que el equipo relacionado esté apagado durante la instalación.
• Compruebe las especificaciones de producto para el entorno de instalación.
Nota: el aspecto del disposivo varía en función del modelo. Remítase al disposivo en cuesón.
Nota: para las descripciones de los terminales y del cableado, consulte la figura y el manual de usuario.
Acvar disposivo
Primeros pasos
4
Debe acvar primero el disposivo estableciendo una contraseña segura antes de usarlo.
Acve el disposivo de forma local o a distancia mediante el soware de cliente iVMS-4200.
1
Configuración remota
2
Nota: consulte el manual de usuario para ver la configuración.
Nota: si durante la instalación necesita más información, consulte la figura y el manual de usuario.
Références du schéma
FRANÇAIS
Apparence
Installaon
Avant de commencer :
1
3
Borne
2
• Assurez-vous que l’appareil dans l’emballage est en bon état et que toutes les pièces d’assemblage sont incluses.
• Assurez-vous que l’équipement connexe est bien hors tension pendant l’installaon.
• Vérifiez les spécificaons relaves à l’environnement d’installaon du produit.
Remarque : l’apparence de l’appareil varie selon le modèle. Reportez-vous à l’appareil proprement dit.
Remarque : pour la descripon des bornes et du câblage, reportez-vous à la figure et au manuel de l’ulisateur.
Acver un appareil
Premiers pas
4
Vous devez acver l’appareil en programmant tout d’abord un mot de passe fort avant de
pouvoir l’uliser.
Acvez l’appareil localement ou à distance via le logiciel client iVMS-4200.
1
Configuraon à distance
2
Remarque : Pour plus de détails sur la configuraon, consultez le manuel d’ulisaon.
Remarque : pour l’installaon, reportez-vous à la figure et au manuel de l’ulisateur pour plus de détails.
Riferimento schemi
ITALIANO
Aspeo
Installazione
Prima di iniziare:
1
3
Morseera
2
• Assicurarsi che il disposivo e l’imballaggio siano in buone condizioni e che siano presen tue le par necessarie per
l'assemblaggio.
• Verificare che durante l'installazione tue le apparecchiature correlate siano spente.
• Controllare che le specifiche del prodoo siano compabili con l’ambiente di installazione.
Nota: l'aspeo del disposivo varia in base al modello. Fare riferimento al disposivo effevo.
Nota: per la descrizione del cablaggio e dei terminali, consultare la figura e il manuale d'uso.
Ava disposivo
Operazioni preliminari
4
Per potere ulizzare il disposivo, occorre per prima cosa avarlo impostando una password
sicura.
Avare il disposivo localmente o da remoto tramite il soware client iVMS-4200.
1
Configurazione remota
2
Nota: Per la configurazione, consultare il Manuale dell'utente.
Nota: per ulteriori informazioni sull'installazione, consultare la figura e il manuale d'uso.
Referências do diagrama
PORTUGUÊS
Aspeto
Instalação
Antes de começar:
1
3
Terminal
2
• Cerfique-se de que o disposivo na embalagem se encontra em boas condições e de que todas as peças de montagem
estão incluídas.
• Cerfique-se de que, durante a instalação, todo o equipamento relacionado se encontra desligado.
• Verifique a especificação do produto para o ambiente de instalação.
Nota: O aspeto do disposivo varia consoante o modelo. Consulte o próprio disposivo.
Nota: Para as descrições de cablagem e dos terminais, consulte a figura e o manual do ulizador.
Avar disposivo
Introdução
4
Em primeiro lugar, tem de avar o disposivo definindo uma palavra-passe segura para o mesmo antes
de ulizar o disposivo.
Ave localmente o disposivo ou remotamente através do soware de cliente iVMS-4200 iVMS-4200.
1
Configuração remota
2
Nota: Para obter informações sobre a configuração remota, consulte o Manual do Ulizador.
Nota: Para a instalação, consulte a figura e o manual do ulizador para ver detalhes.
Schemareferenties
NEDERLANDS
Uiterlijk
Installae
Voordat u begint:
1
3
Aansluitklem
2
• Zorg ervoor dat het apparaat in het pakket zich in goede toestand bevindt en alle montage-onderdelen zijn meegeleverd.
• Zorg ervoor dat alle gerelateerde apparatuur jdens de installae is uitgeschakeld.
• Controleer de productspecificae voor de installae-omgeving.
Opmerking: De verschijningsvorm van het apparaat kan variëren naar gelang de verschillende modellen. Verwijst naar het
daadwerkelijke apparaat.
Opmerking: Raadpleeg voor een beschrijving van de aansluing en bedrading de aeelding en de gebruikershandleiding.
Apparaat acveren
Aan de slag
4
U moet het apparaat eerst acveren door er een sterk wachtwoord voor in te stellen voordat u
het apparaat kunt gebruiken.
Schakel het apparaat ter plekke of op afstand in m.b.v. iVMS-4200-clientsoware.
1
Configurae op afstand
2
Opmerking: Raadpleeg de gebruikershandleiding voor de configurae.
Opmerking: Raadpleeg voor de installae de aeelding en de gebruikershandleiding voor meer informae.
Popis obrázků
ČEŠTINA
Vzhled
Montáž
Dříve než začnete:
1
3
Svorkovnice
2
• Ujistěte se, zda je zařízení v balení v dobrém stavu a zda jsou přítomny všechny dodávané součás.
• Během instalace se ujistěte, že všechna související zařízení jsou vypnutá.
• Zkontrolujte technické údaje výrobku podle instalačního prostředí.
Poznámka: Vzhled zařízení se u různých modelů liší. Viz konkrétní zařízení.
Poznámka: Popis svorky a zapojení naleznete na obrázku a v návodu k použi.
Akvace zařízení
Začínáme
4
Před použim zařízení je nejprve nutné provést jeho akvaci nastavením silného hesla.
Zařízení akvujte v místě nebo vzdáleně prostřednictvím klientského sowaru iVMS-4200.
1
Vzdálená konfigurace
2
Poznámka: Konfiguraci naleznete v uživatelské příručce.
Poznámka: Podrobnos týkající se postupu instalace naleznete na obrázku nebo v návodu k použi.
Diagramoversigt
DANSK
Beskrivelse
Installaon
Før du starter:
1
3
Terminal
2
• Kontrollér, at enheden i pakken er i god lstand, og at alle dele l samling medfølger.
• Kontrollér, at alt lknyet udstyr er slukket under installaonen.
• Kontrollér produktspecifikaonerne for installaonsmiljøet.
Bemærk: Enhedens udseende kan variere aængigt af model. Der henvises l den fakske enhed.
Bemærk: Find beskrivelse af terminaler og ledningsføring i figuren og brugervejledningen.
Akvér enhed
Kom godt i gang
4
Du skal først akvere enheden ved at indslle en stærk adgangskode, før du kan anvende
enheden.
Akvér enheden lokalt eller via ernadgang via iVMS-4200-klientsoware.
1
Fjernbetjent konfiguraon
2
Bemærk: Find oplysninger om installaon i figuren og brugervejledningen.
Bemærk: Find oplysninger om konfiguraon i brugervejledningen.
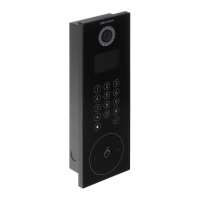
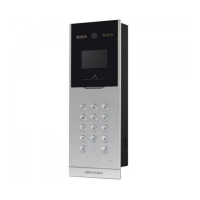
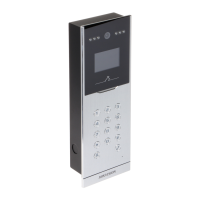
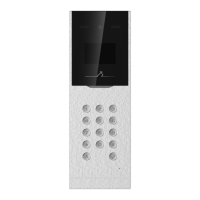
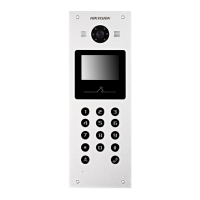
Lumière supplémentaire en cas de faible éclairage
Caméra
Écran LCD
1 2 3
5 6
Bouton d’appel
Bouton Centre d’appels
7
Microphone
8
Zone de lecture de carte
9
Haut-parleur
10
SABOTAGE
Zusatzlicht für schwache Beleuchtung
Kamera
LCD-Anzeigebildschirm
1 2 3 4
5 6
Bedienteil
Ruaste
Ruaste für Zentrale
7
Mikrofon
8
Kartenlesebereich
9
Lautsprecher
10
SABOTAGE
Luz complementaria de baja iluminación
Cámara
Pantalla de visualización LCD
1 2 3
4
5 6
Teclado Botón de llamada
Botón del centro de llamadas
7
Micrófono
8
Área de lectura de tarjetas
9
Altavoz
10
MANIPULACIÓN
Luce supplementare per ambien poco illumina
Telecamera
Schermo LCD
1 2 3 4
5 6
Taserino
Pulsante di chiamata
Pulsante di chiamata centrale
7
Microfono
8
Area di leura schede
9
Altoparlante
10
MANOMISSIONE
Luz suplementar para baixa iluminação
Câmara
Ecrã LCD
1 2 3 4 5
6
Teclado
Botão de chamada
Botão do centro de atendimento telefónico
7
Microfone
8
Área de leitura de cartões
9
Alfalante
10
ADULTERAÇÃO
Extra verlichng met lage verlichng
Camera
Lcd-display
1 2 3 4 5
6
Toetsenbord
Oproeptoets
Callcentertoets
7
Microfoon
8
Kaartleesgedeelte
9
Luidspreker
10
MANIPULATIE
Doplňkové osvětlení při slabém osvětlení
Kamera
LCD displej
1 2 3 4
5 6
Klávesnice
Tlačítko pro volání
Tlačítko pro volání centra
7
Mikrofon
8
Oblast čtení karty
9
Reproduktor
10
NEOPRÁVNĚNÉ MANIPULACE
Ekstra lys l lavt lysniveau
Kamera
LCD-skærm
1 2 3 4 5
6
Tastatur Opkaldsknap
Knappen Ring l alarmcentral
7
Mikrofon
8
Område l kortlæsning
9
Højaler
10
MANIPULATION
 Loading...