This document describes the Hilti AG 230-20D angle grinder, a hand-held electric power tool designed for professional use. It is intended for cutting and grinding metallic materials without the use of water, suitable only for dry grinding and cutting applications. The tool should only be operated by trained and authorized personnel who are informed of potential hazards.
Function Description
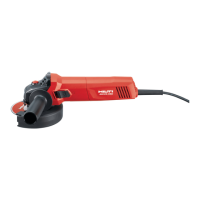
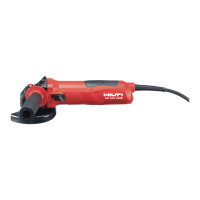
The AG 230-20D is equipped with an electronic starting current limiter, which reduces the initial current drawn by the power tool. This feature prevents the mains fuse from blowing and ensures a smooth, jolt-free start. The tool's motor is activated by an on/off switch, which is unlocked by a safety trigger.
The accessory tool, such as a grinding or cutting disc, is securely fastened to the arbor using a clamping flange and a clamping nut. The arbor lockbutton is used to hold the arbor stationary while tightening or loosening the clamping nut with a pin wrench. The guard, which is essential for safety, is keyed to ensure that only compatible guards can be fitted and to prevent it from coming into contact with the tool. The guard's clamping diameter can be adjusted using a screw to ensure proper tension.
Usage Features
Preparations: Before any operation, the supply cord must be unplugged to prevent inadvertent starting. The side handle can be screwed into one of the threaded bushings for improved grip and control. The guard is fitted onto the arbor collar, with its keyed locating lug engaging in the recess, and then turned to the desired position before being secured by closing the clamping lever. The guard's tension can be fine-tuned with an adjusting screw.
Accessory Tools: Only abrasive disc types approved for the power tool and specific guards should be used. The rated speed of the accessory must meet or exceed the maximum speed marked on the power tool. Discs with threaded inserts must match the drive spindle's thread, and flange-mounted tools require a hole diameter matching the flange's mandrel. Before each use, accessory tools should be checked for damage like chips, cracks, or excessive wear. If dropped, they should be inspected for damage or replaced. After installation, the tool should be run at maximum no-load speed for one minute to check for damage.
Fitting an Accessory Tool: After unplugging the tool and cleaning the clamping flange and nut, the clamping flange is fitted onto the arbor, followed by the accessory tool. The clamping nut is then screwed on, and the arbor lockbutton is pressed and held while the clamping nut is securely tightened with the pin wrench. The arbor lockbutton should only be pressed when the spindle has stopped rotating to prevent damage.
Removing an Accessory Tool: The supply cord must be unplugged. The arbor lockbutton is pressed and held while the clamping nut is loosened counterclockwise with the pin wrench. Once loose, the arbor lockbutton is released, and the accessory tool is removed.
Operation: To switch on, plug in the supply cord, press the safety trigger to unlock the on/off switch, and then press the on/off switch fully. The motor will start running. For cutting or slitting with abrasive cutting discs, a guard with a cover plate or a fully enclosing dust hood must always be used.
Grinding: When grinding, the power tool should be held securely with both hands, using the side handle (or optional hoop grip). Moderate feed pressure should be applied, and the tool should be moved to and fro while maintaining a 5° to 30° angle of attack. This technique helps prevent overheating and discoloration of the workpiece and ensures an even surface finish. Abrasive cutting discs should never be used for grinding.
Cutting: For cutting, apply moderate feed pressure and avoid tilting the power tool or cutting disc. The tool should be held at approximately 90° to the surface being cut. For optimal results when cutting profiles and square tubes, cutting should start at the smallest cross-section.
Switching Off: To switch off the tool, simply release the on/off switch.
Maintenance Features
Care: Regular care and maintenance are crucial for the tool's longevity and safe operation. Before performing any care or maintenance tasks, the supply cord must always be unplugged to prevent electric shock and injuries. Stubborn dirt should be carefully removed from the tool. The air vents should be cleaned carefully with a dry brush to prevent dust build-up, which can cause electrical hazards. The casing should be cleaned with a slightly damp cloth; silicone-containing cleaning agents should be avoided as they can damage plastic parts.
Maintenance: All visible parts and controls should be checked at regular intervals for signs of damage and proper function. If any damage or malfunction is found, the power tool should not be operated and must be repaired immediately by Hilti Service. Repairs to electrical components should only be carried out by trained electrical specialists. After cleaning and maintenance, all guards and protective devices must be refitted and checked for correct function.
Checks After Care and Maintenance: After completing care and maintenance, all protective and safety devices must be checked to ensure they are fitted and function faultlessly.
Storage and Transport: Electric tools should not be transported with accessory tools fitted. Before storing an electric tool or appliance, the supply cord must always be unplugged. Tools and appliances should be stored in a dry place, out of reach of children and unauthorized persons. After long periods of transport or storage, electric tools should be checked for damage before reuse.