EasyManua.ls Logo

Hisense 120L9H - User Manual

Hisense 120L9H
22 pages
Print Icon
To Next Page IconTo Next Page
Loading...
Read the guide carefully and ensure you have fully understood its contents before operating this device for the first time.
English
QUICK SETUP GUIDE
Question and Answer IconNeed help?

Do you have a question about the Hisense 120L9H and is the answer not in the manual?

Summary

Safety Instructions

Intended Use and Ambient Conditions

Power Supply

Connect to the correct voltage and ensure easy access to the power plug.

Operational and Safety Precautions

Power Plug and Cable Handling

Guidelines for safe use, routing, and maintenance of the power plug and cable.

Air Ventilation and High Temperatures

Ensure proper ventilation to prevent overheating and damage.

Volume and Thunderstorm Safety

Thunderstorm Precautions

Disconnect device during thunderstorms to prevent lightning damage.

Service, Packaging, and Modification

Service and Repair

Refer servicing to qualified personnel; no user-serviceable parts inside.

Product Modification Warning

Unauthorized modifications can void warranty, cause shock, or fire.

Laser Safety and General Precautions

Laser Safety Warning

Do not look directly at the lens; laser light can damage eyes.

General Precautions

Avoid hazardous radiation, liquids, fire sources, and sharp objects.

Network Setup and Audio Connection

Wireless Network Setup

Connecting the Laser TV to a wireless network using built-in adapter.

Powering On and Ventilation Requirements

Ventilation Space Requirements

Diagram showing minimum space required for proper ventilation.

Image Adjustment Procedures

Parallelizing Image Bottom with Screen

Adjusting the console or feet to make the image bottom parallel to the screen.

Advanced Image Alignment

Remote Control Functions

TV Remote Buttons Overview

Explanation of the functions of various buttons on the TV remote control.

Screen Setup Menu and Geometric Correction

Auto Geometric Correction

Steps for automatic image geometric correction using a mobile device.

Manual Geometric Correction and Eye Protection

Manual Geometric Correction

Procedure for manually adjusting image points using the remote control.

Eye Protection Feature

Explanation of how the eye protection feature works and its effect.

Maintenance and Troubleshooting

Quick Problem-Solving Tips

Basic troubleshooting steps for common issues.

Troubleshooting Common Issues

No Sound or Picture

Troubleshooting steps for no sound or picture output.

No Picture;Sound from External Source

Check connections and input mode for external sources.

Overview

This document provides a comprehensive guide for the Hisense Laser TV, covering its functions, usage, and maintenance.

Function Description

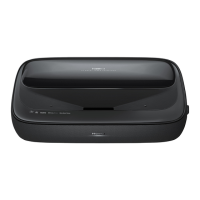
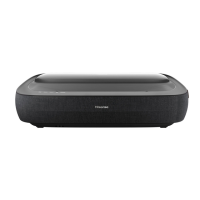
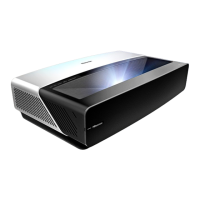
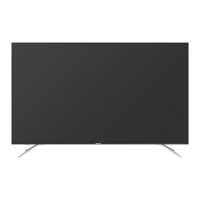
The Hisense Laser TV is designed to render video and audio signals in a home or office environment. It functions as a display device, projecting images onto a screen to provide a large-format viewing experience. The device incorporates a laser module for image projection, offering a high-quality visual output. It supports various input sources, including HDMI, and can be connected to external AV devices such as VCRs, DVD players, set-top boxes, and video cameras. For audio, it includes a headphone jack and can be connected to external audio amplifiers and speakers. The Laser TV also features network connectivity, supporting both wired (LAN) and wireless (Wi-Fi) setups to access internet content and services. It is equipped with an eye protection sensor that temporarily disables light output if a user gets too close to the lens, ensuring safety.

Usage Features

Setup and Installation: The initial setup involves mounting the screen, for which a specific screen installation guide is provided. The Laser TV itself should be handled by two people when moving it to protect the lens. It is recommended to connect all necessary cables (audio, video, Ethernet) to the ports on the back of the Laser TV before positioning it. Ensure all cables are securely connected to the correct ports to maintain optimal picture quality.

Power and Operation: To power on the Laser TV, plug the power cord into a wall outlet and press the POWER button. The device will undergo an initialization process, which may cause a slight delay before the picture appears. The remote control is used to switch the TV on/off, select input sources, access apps, and navigate menus. A physical switch on the remote activates a hands-free wake-up feature.

Image Adjustment: The Laser TV offers both automatic and manual geometric correction to fit the projected image onto the screen.

  • Automatic Geometric Correction: Requires the Laser TV and a mobile device to be connected to the same wireless network. Users adjust the TV's position using leveling feet, then scan a QR code with their mobile device. An alignment grid appears, and users take a photo of the full screen with their mobile device, then upload it to complete the correction. For best results, stand about 10 feet away in landscape mode, ensuring the entire screen and its frame are visible, and all 16 alignment grid points are in focus. The screen image should occupy at least 60% of the photo size.
  • Manual Geometric Correction: Allows users to select points on the projected image using the remote control's navigation buttons and adjust them to fit the screen. Long presses provide quick adjustments, while short presses offer precise adjustments. A save button is available to store changes, and a reset option returns the image to factory defaults.

Remote Control: The remote control includes buttons for power, input selection, app access, menu navigation, volume control, channel switching, and a microphone for voice commands. It operates via infrared in an unpaired state, with a range of up to 8 meters and specific horizontal and vertical angles. For Bluetooth remote controls, pairing with the Laser TV is required by pressing any button (except power and mic) within 3 meters of the TV after it's powered on. In special cases, a dedicated pairing button can be used.

Connectivity:

  • USB Ports: Support USB1.1, USB2.0 (max 500mA), and USB3.0 (max 1A) devices. When connecting hard disks or USB hubs, an external power supply for the connected device is recommended to avoid exceeding current consumption limits, which can cause damage or device rebooting. An included USB extension cable facilitates easier connection/disconnection.
  • Antenna: Supports both satellite (ANT1) and VHF/UHF (ANT2) antennas. ANT1 provides power for satellite antennas (13/18V, 0.5A max). If an outdoor antenna is used, ensure it's protected against voltage surges and static charges.
  • CI+ Module: For accessing encrypted channels, a CI+ module and card from a service provider are required. The module should be inserted into the COMMON INTERFACE slot when the Laser TV is switched off. Repeated insertion/removal should be avoided to prevent damage.

Safety Features:

  • Eye Protection: The device has an eye protection sensor that temporarily disables the laser light output if a user gets too close to the lens. Users are advised not to look directly into the lens when the device is on.
  • Ventilation: Proper ventilation is crucial to prevent overheating. Maintain at least 20 cm free space on the sides and 15 cm on the back of the unit. Do not block vents or place objects on the device, and avoid placing it in narrow, enclosed spaces.
  • Power Supply: Use only the supplied power cable and connect to an outlet with the correct voltage and frequency. The power plug should be easily accessible for disconnection.

Maintenance Features

Cleaning and Care:

  • General Cleaning: Unplug the power cord before cleaning. Use a soft, moist, clean, and color-natural cloth to clean the device, screen, and remote control. Avoid using chemicals, insect repellents, solvents, thinners, or other volatile substances, as these can degrade surface quality. Do not spray liquids directly onto the device.
  • Lens Cleaning: Do not touch the lens with bare hands or ordinary cleaning cloths. Use a dust blower to remove dust. For grease, dirt, or fingerprints, professional cleaning with optical cleaning cloth, lens wiping paper, or specialized solutions is recommended to avoid damaging the optical film and affecting image quality.
  • Power Plug: Wipe the power plug with a dry cloth periodically.

Storage and Handling:

  • Temperature and Humidity: Avoid using the device in rooms with high humidity or dust concentration. If moved from a cold to a hot environment, allow at least an hour for condensation to evaporate before switching it on.
  • Long Periods of Absence: Disconnect the power plug and all connected antenna cables during long periods of non-use, as the device consumes power even in standby mode.
  • Batteries: Discard batteries in a designated disposal area. Remove old batteries immediately to prevent leakage. If not using the remote for a long time, remove the batteries. If battery chemicals touch skin, wash immediately. Do not mix old and new batteries or different battery types (alkaline, carbon-zinc, rechargeable). Do not expose batteries to excessive heat.

Troubleshooting:

  • No Sound/Picture: Check if the power cord is plugged in, if the TV is out of standby mode, and if the LED light is on.
  • External Source Issues: Ensure correct output/input connections and input mode selection for external devices.
  • Picture Normal, No Sound: Check volume settings and if 'Mute' mode is active.
  • Sound, No Picture/Black & White Picture: Unplug and replug the TV after 60 seconds. Check color saturation (set to 50 or higher) and try different channels.
  • Distorted/Wavy Sound/Picture: Move nearby electric appliances away from the TV or plug the TV into a different power outlet.
  • Blurry/Cutting Out Sound/Picture: For external antennas, check direction, position, and connection, then adjust or fine-tune the channel.
  • Clicking Sound: A 'clicking' sound from the plastic cabinet is normal and occurs due to temperature changes causing expansion/contraction.
  • Remote Control Not Working: Confirm the TV has power, change batteries, and ensure they are correctly installed. If an unknown error occurs, remove batteries, press any key for 1-2 seconds, and reinsert them.

General Advice:

  • Do not attempt to modify the product, as unauthorized modifications can void the warranty and cause electric shock or fires.
  • Do not remove the cover/back of the device; refer all service to qualified personnel.
  • Keep anti-moisture materials and plastic bags out of reach of children.
  • If you notice anything unusual, immediately remove the power plug.
  • In case of fire, use a CO2 gas or powder extinguisher; if not available, isolate electrical supply before using a water extinguisher.

Hisense 120L9H Specifications

General IconGeneral
Display TypeLaser TV
Screen Size120 inches
Resolution4K UHD (3840 x 2160)
Smart TVYes
ProcessorQuad-Core
RAM3 GB
Speaker Output30 W
HDMI Ports3
USB Ports2
ConnectivityWi-Fi, Ethernet
Brightness3000 Lumens
Color Gamut107% BT.2020
AudioDolby Atmos
Wireless ConnectivityWi-Fi 802.11ac, Bluetooth
HDR SupportHDR10, HLG

Related product manuals