Do you have a question about the Hitachi TM4000 and is the answer not in the manual?
Turn on the earth leakage breaker and the power switch on the main unit.
Center the specimen stage using X, Y knobs and press EVAC/AIR to evacuate.
Select accelerating voltage, vacuum level, and detector.
Click the 'Start' button to turn on the high voltage.
Use X, Y knobs for field of view, Auto B/C for brightness/contrast, and Auto Focus.
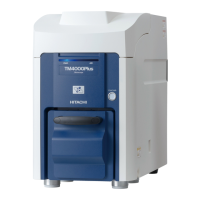
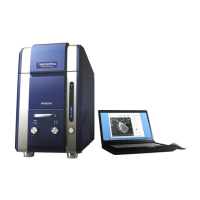
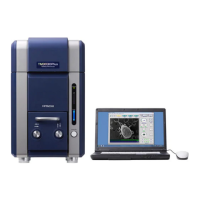
The TM4000/TM4000Plus is a tabletop scanning electron microscope designed for ease of use and efficient observation of various specimen types. Its intuitive interface and streamlined operation make it suitable for a range of applications, from routine inspections to more detailed analyses.
The primary function of the TM4000/TM4000Plus is to provide high-magnification images of specimen surfaces. It operates by evacuating a specimen chamber, introducing a sample, and then using an electron beam to scan the specimen. Detectors capture secondary electrons or backscattered electrons emitted from the specimen, which are then used to form an image on a connected computer display. This allows for detailed visualization of surface topography and material composition.
The device supports various observation conditions, including different accelerating voltages (e.g., 5kV, 15kV) and vacuum levels (Conductor, Standard, Chg-up Red), which can be selected based on the specimen type and desired image quality. Multiple detectors, such as Backscattered Electron (BSE), Secondary Electron (SE), and a mix of both, are available to provide different types of image contrast and information.
The system includes an integrated software application that provides a Graphical User Interface (GUI) for controlling the microscope, capturing images, and performing basic image processing. Users can adjust magnification, brightness, contrast, and focus directly through the software or using physical knobs on the device. The software also features auto-functions for brightness, contrast, and focus, simplifying the image acquisition process.
The TM4000/TM4000Plus is designed for straightforward operation, starting with a simple power-on sequence. The system guides the user through the evacuation process, indicated by blinking LED lights (BLUE for evacuation, WHITE for air introduction).
Specimen loading is a key feature, designed for both bulk and water/oil-containing samples. For bulk specimens, conductive tape is used to attach the sample to a specimen stub. For water/oil-containing specimens (e.g., biological, botanical, food items), a paste or toothpick can be used to secure the sample to the stub. A height gauge assists in adjusting the specimen's height on the stub to ensure optimal imaging conditions, typically aiming for a 1 mm gap width.
Once prepared, the specimen stub assembly is inserted into the specimen stage. The stage can be precisely positioned using X and Y adjustment knobs on the front of the device, aligning the specimen with a center position mark and guides. An optional hex screw can be used to secure the stub assembly.
Observation begins by selecting the appropriate accelerating voltage and vacuum level. The system allows for real-time adjustment of magnification, brightness, and contrast. Auto-functions for brightness/contrast and focus simplify the initial setup, while manual adjustments provide fine-tuning capabilities. The X and Y knobs on the front of the TM4000 allow users to set the desired field of view.
Image capture is facilitated by "Quick save" and "Save" options. "Quick save" captures the image displayed on the screen at a lower resolution, while the "Save" function allows for higher resolution capture and includes options for image improvement functions like contrast enhancement. Captured images can be saved in various file formats (e.g., BMP) and to specified folders.
Stopping observation involves a reverse process: introducing air into the chamber, removing the specimen, and then re-evacuating the chamber if no further observations are planned. The system provides clear LED indicators throughout these steps.
The manual emphasizes a crucial maintenance feature: always leaving the chamber under vacuum when the system is not in use. This practice is highlighted as essential for keeping dust and moisture out of the chamber, thereby ensuring the microscope remains in good condition and prolonging its operational life. This proactive measure helps prevent contamination and maintains the integrity of the vacuum system, which is critical for optimal imaging performance.
The design of the specimen stage and chamber allows for relatively easy access for cleaning or minor maintenance if required, although specific cleaning procedures are not detailed in this simple manual. The robust construction and clear operational guidelines contribute to the overall maintainability of the device, ensuring reliable performance over time.
| Type | Scanning Electron Microscope (SEM) |
|---|---|
| Resolution | 30 nm |
| Filament Type | Tungsten |
| Stage | Motorized X, Y, Z, Rotation, Tilt |
| Image Capture | Digital image capture |
| Operating System | Windows |