EasyManua.ls Logo

Hitachi TM3030Plus - User Manual

Hitachi TM3030Plus
2 pages
Print Icon
To Next Page IconTo Next Page
Loading...
Simple Manual for TM3030Plus Tabletop Microscope
Before observation, thoroughly read the safety precautions provided in the TM3030Plus instruction manual for proper use.
(1) Turn on the earth leakage breaker on the back of the main unit.
(2) Turn on the power switch on the right side of the main unit to start the device.
(3) Evacuation will start automatically when EVAC LED blinks blue.
When AIR LED lights yellow, press the EVAC/AIR switch to start evacuation.
EVAC LED lights blue when the evacuation ends.
(4) Turn on the PC. Start the TM3030Plus application.
Bulk specimen (Conductive/Non-conductive) Water / Oil containing specimen
(5) Put the conductive tape on the specimen stub and attach a (5) When observing water containing specimens such as biological
specimen on it. and botanical specimens, food items and so on, use a paste to
stick a specimen on the stub.
(6) Attach the specimen stub to the specimen holder, and adjust its height using a height gauge
so that the gap width becomes about 1 mm.
(7) Press the EVAC/AIR switch to introduce air into the specimen chamber.
AIR LED blinks yellow.
After the air introduction is completed, the lighting pattern of AIR LED (yellow) changes from
blinking to lighting. (About 1 minute)
(8) Draw out the specimen stage slowly, and set the specimen holder.
(9) When performing high-magnification observation or observing a heavy specimen, use
the provided ball wrench to secure the specimen holder.
(10) Turn the X,Y knobs to center the specimen stage. (In the case of the motor drive stage,
the stage is centered automatically after air introduction is completed.)
Make sure that the specimen does not contact the upper surface of the specimen chamber,
and insert the specimen stage.
(11) Push the EVAC/AIR switch to evacuate the specimen chamber while holding the specimen
stage lightly. EVAC LED blinks blue. When the evacuation is completed, the lighting pattern of
the EVAC LED (blue) changes from blinking to lighting. (About 3 minutes)
(12) Set the Observation condition. (Refer to the reverse side.)
(13) Click the [Start] button in the upper left part of the operation window.
The auto start function operates and an image is displayed.
At this time, the magnification is set at 100x.
(14) Turn the X, Y knobs to move the stage, and set the observation field of view.
In the case of the motor drive stage, click the buttons or press them
continuously in the image observation area to move the stage.
When double-clicking any arbitrary point in the area, it will be centered.
The field of view settings will become easier in the [Fast] mode at a lower
magnification.
(15) Observation procedure by auto functions
1. Set the observation field of view and magnification.
2. Adjust Brightness and Contrast . (Click the [Auto B/C] button.)
3. Perform focusing. (Click the [Auto Focus] button.)
4. Confirm the image. (Click the [Slow] button.)
* When the Auto focus function doesn't work well, adjust the focus by
manual operation. There are three ways as below.
Focus adjustment operation will become easier in the [Reduce] mode.
(a) Focus adjustment by mouse dragging (i)
Move the mouse cursor into the image observation area, where hold
down the left mouse button and move it from side to side.
(b) Focus adjustment by mouse dragging (ii)
Move the mouse cursor on the [Focus] button, where hold down the left
mouse button and move it from side to side.
(c) Focus adjustment by clicking the [Focus] button.
Adjust the focus by clicking + or - side of the [Focus] button. Focus
changes continuously while holding down the button.
(16) Click the [Save] button to capture the image.
(Image saving size: 1280×960 pixels)
(17) After the image capturing process is completed, the Save Image dialog will be
displayed. Input a file name and save the image.
(18) Click the [Stop] button in the upper left part of the operation window, and the
button indicates [Start]. The observation is finished.
(19) Press the EVAC/AIR switch to introduce air into the specimen chamber. Wait
until the lighting pattern of AIR LED (yellow) changes from blinking to lighting.
(About 1 minute)
(20) Draw out the specimen stage slowly, and remove the specimen holder.
(21) Close the specimen stage.
(22) Press the EVAC/AIR switch while holding the specimen stage lightly, and the
specimen chamber is evacuated. Wait until the lighting pattern of EVAC LED
(blue) changes from blinking to lighting. (About 3 minutes)
(23) Click the [Close] button in the upper right part of the operation window to close
the TM3030Plus application, and shut down the PC.
(24) Turn off the power switch on the right side of the main unit, and shut down the
device. (After the device is left for a long time with the inside of the specimen
chamber exposed to air, the observation image might be badly influenced
because of a decrease of the vacuum degree and so on.
Be sure to execute the procedure 6. (22) before shutting down the device.)
Copyright © Hitachi High-Technologies Corporation 2014. November/2014 1st Edition
All rights reserved. Printed in Japan. Part No. 55E-8889 HS-TH (HMS)
Operation Procedure
1. Starting Instrument
2. Preparing Specimen
3. Mounting Specimen
4. Starting Observation
5. Saving Captured Image
6. Stopping Observation
7. Shutting Down Instrument
Items to be Prepared
Specimen
Conductive double-sided tape
(for solid specimens)
Paste and Toothpick
(for water containing specimens)
Tweezers
Specimen stub
Specimen holder
Height gauge
Tighten the hexagon socket head screw with the ball wrench to secure the specimen holder.
Be careful not to let the ball wrench contact the stage feeding screw.
Stage feeding screw
<Note>
When clicking the [Quick Save] button, the image currently being observed will be saved.
(The image size is 640×480 pixels.)
View mode settings area
Specimen Stub
Conductive
Double-sided Ta
p
e
S
p
ecimen
Set the gap width to about 1mm.
1. Starting Instrument
2. Preparing Specimen
3. Mounting Specimen
Align the cross mark with the positioning guide.
4. Starting Observation
5. Saving Captured Image
6. Stopping Observation
7. Shutting Down Instrument
Clic
k
Clic
k
Manual focusing operation (a)
Manual focusing operation (b) (c)
[Reduce] button
[Reduce] button
Clic
k
4.
[
Slow
]
button
buttons
[
Fast
]
button
Low magnification
1. [Magnification] button
2. [Auto B/C] button
3. [Auto Focus] button
Paste
Toothpick
Specimen Stub
Specimen
All manuals and user guides at all-guides.com
all-guides.com
Question and Answer IconNeed help?

Do you have a question about the Hitachi TM3030Plus and is the answer not in the manual?

Summary

Starting the Instrument

Power On and Initialization

Steps to turn on the earth leakage breaker, power switch, and PC, initiating device startup and evacuation.

Preparing the Specimen

Specimen Preparation Methods

Guidance on preparing conductive and water/oil containing specimens for observation.

Mounting the Specimen

Attaching and Securing Specimen Holder

Procedure for attaching the specimen stub to the holder and adjusting its height.

Loading Specimen into Chamber

Steps for introducing air, drawing out the stage, securing the holder, centering, and evacuating the specimen chamber.

Starting Observation

Observation Setup and Initial Viewing

Setting observation conditions, starting the auto-start function, and moving the stage for initial viewing.

Saving Captured Image

Capturing and Saving Images

Instructions on how to capture an image and save it with a file name.

Stopping Observation

Halting Observation and Purging Chamber

Procedure to stop observation, introduce air, remove the specimen holder, and re-evacuate the chamber.

Shutting Down the Instrument

Closing Application and Powering Down

Steps to close the application, shut down the PC, and turn off the instrument.

Recommended Observation Conditions

Observation Condition Tables

Guidance on setting observation conditions based on purpose and specimen type (conductive/non-conductive).

Overview

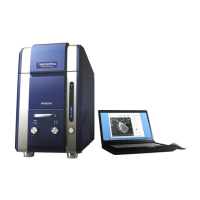
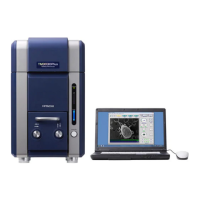
The TM3030Plus Tabletop Microscope is a sophisticated imaging device designed for detailed observation of various specimens, offering both ease of use and high-quality results. It supports a range of observation conditions and specimen types, making it suitable for diverse applications from material science to biological studies.

Function Description

The TM3030Plus operates by evacuating a specimen chamber to create a vacuum environment, allowing for electron microscopy. The device is equipped with an intuitive interface that guides users through the entire observation process, from initial setup to image capture and saving.

Observation Modes: The microscope offers several observation modes tailored to different analytical needs:

  • Compositional Distribution (BSE): This mode utilizes Backscattered Electron (BSE) signals to reveal differences in material composition. It's particularly useful for distinguishing between areas of varying atomic numbers within a specimen.
  • Topographical Information (SE): Using Secondary Electron (SE) signals, this mode provides detailed information about the surface topography and morphology of the specimen. It's ideal for visualizing surface features, textures, and structures.
  • Mixed Image (Mix): This mode combines both BSE and SE signals to offer a comprehensive view, simultaneously showing both compositional and topographical information in a single image.
  • EDX Analysis: For advanced elemental analysis, the device supports Energy Dispersive X-ray (EDX) analysis, allowing users to identify the elemental composition of specific areas on the specimen.

Magnification Control: The TM3030Plus provides flexible magnification control, with distinct settings for different observation scales:

  • Low Mag: Suitable for observations at magnifications of 2,000x or less, offering a broad overview of the specimen.
  • Middle Mag: Designed for magnifications between 2,000x and 6,000x, providing a balance between overview and detail.
  • High Mag: Optimized for magnifications of 6,000x or more, enabling highly detailed examination of fine structures.

Auto Functions: To simplify the observation process, the microscope incorporates several auto functions:

  • Auto B/C (Brightness/Contrast): Automatically adjusts image brightness and contrast for optimal viewing.
  • Auto Focus: Automatically focuses the image, reducing the need for manual adjustments.

Image Capture and Saving: The device allows users to capture high-resolution images of their observations. Images can be saved with customizable file names and are stored with relevant metadata such as date, time, distance, magnification, and scale. A "Quick Save" option is also available for rapid image capture.

Usage Features

The TM3030Plus is designed for user-friendliness, with a clear operational workflow and helpful indicators.

Starting the Instrument:

  1. Power On: The process begins by turning on the earth leakage breaker and then the main power switch.
  2. Evacuation: The device automatically initiates evacuation of the specimen chamber, indicated by a blinking blue EVAC LED. Manual evacuation can also be triggered if needed.
  3. Software Launch: Once evacuation is complete, the PC is turned on, and the TM3030Plus application is launched.

Preparing Specimens:

  • Bulk Specimens (Conductive/Non-conductive): For solid specimens, conductive double-sided tape is used to attach the specimen to a stub.
  • Water/Oil Containing Specimens: For liquid or semi-liquid specimens, such as biological samples or food items, a paste and toothpick are used to secure the specimen to the stub.
  • Height Adjustment: The specimen stub is then attached to the specimen holder, and its height is adjusted using a height gauge to ensure an optimal gap width of approximately 1 mm.

Mounting Specimens:

  1. Air Introduction: Air is introduced into the specimen chamber by pressing the EVAC/AIR switch, indicated by a blinking yellow AIR LED.
  2. Stage Access: The specimen stage is slowly drawn out, and the specimen holder is set. For heavy or high-magnification specimens, a ball wrench is used to secure the holder.
  3. Stage Centering: The X,Y knobs are used to center the specimen stage. For motor-driven stages, centering is automatic after air introduction.
  4. Chamber Evacuation: The specimen chamber is re-evacuated by pushing the EVAC/AIR switch while holding the specimen stage lightly, indicated by a blinking blue EVAC LED.

Starting Observation:

  1. Condition Setting: Users set the observation conditions based on the specimen type (conductive/non-conductive) and observation purpose (compositional, topographical, mixed, or EDX).
  2. Auto Start: Clicking the "Start" button initiates the auto start function, displaying an image at 100x magnification.
  3. Field of View Adjustment: The X, Y knobs or on-screen buttons are used to move the stage and set the desired observation field of view. Double-clicking any point in the image area centers that point.
  4. Observation Procedure: The observation typically involves setting the field of view and magnification, adjusting brightness and contrast using "Auto B/C," and performing focusing with "Auto Focus." Manual focusing options are also available via mouse dragging or clicking the focus buttons.

Stopping Observation:

  1. Observation End: Clicking the "Stop" button concludes the observation.
  2. Air Introduction: Air is introduced into the specimen chamber.
  3. Specimen Removal: The specimen stage is slowly drawn out, and the specimen holder is removed.
  4. Chamber Evacuation: The specimen chamber is re-evacuated to maintain vacuum integrity.

Shutting Down Instrument:

  1. Software Close: The TM3030Plus application is closed, followed by shutting down the PC.
  2. Power Off: The main power switch on the device is turned off. It is crucial to ensure the specimen chamber is evacuated before shutting down to prevent adverse effects on observation image quality due to vacuum degradation.

Maintenance Features

While the manual primarily focuses on operational procedures, certain aspects imply maintenance considerations:

  • Vacuum Integrity: The repeated evacuation and air introduction cycles are central to the device's operation. Maintaining the vacuum system is critical for consistent image quality. The instruction to re-evacuate the chamber after removing a specimen and before shutting down highlights the importance of preserving the vacuum environment.
  • Cleanliness: Although not explicitly detailed as a maintenance task, the careful handling of specimens and the chamber implies the need to keep the system clean to prevent contamination that could affect image quality or device performance.
  • Software Updates: As with any sophisticated digital instrument, periodic software updates may be necessary to ensure optimal performance, compatibility, and access to new features.
  • Component Handling: Instructions like "holding the specimen stage lightly" during evacuation and "tighten the hexagon socket head screw with the ball wrench" suggest that proper handling of mechanical components is essential to prevent damage and ensure longevity.

The TM3030Plus is designed to be a reliable and efficient tool for electron microscopy, with a focus on user-friendly operation and consistent, high-quality imaging.

Hitachi TM3030Plus Specifications

General IconGeneral
Accelerating Voltage15 kV
Sample SizeDiameter up to 70 mm
WeightApproximately 50 kg
Filament TypeTungsten
Vacuum SystemTurbo molecular pump
Image CaptureDigital imaging
DisplayLCD Monitor
Operating ConditionsTemperature: 15 - 30°C, Humidity: 80% or less, no condensation
Power Requirements100-240 V, 50/60 Hz
TypeTabletop Scanning Electron Microscope (SEM)
DetectorSE and BSE detectors

Related product manuals